If you love multi-chromes, bold shifts, and anything sparkly, the new Danessa Myricks Lightwork VII Palette is probably already on your radar. It’s been going viral all over social media — and today, I’m sharing my full review, real swatches, and whether it’s worth adding to your makeup collection.
And with Sephora’s 20% off sale ending on 12/14, this is the perfect time to grab it if you’ve been eyeing it!
First Impressions
Right out of the box, Lightwork VII feels luxurious. The palette includes a mix of:
Multichromes
Duo-chromes
High-shift metallics
Soft shimmer toppers
It’s everything Danessa Myricks is known for — rich, smooth, and bold formulas that work beautifully on deeper, tan, and medium skin tones (including mine!).
Swatches on Real Skin
This palette SHINES in real lighting. Every shade shifts differently depending on angle, sunlight, and undertone.
If you want to see the exact swatches on my medium/tan skin, I shared the full breakdown in my YouTube video. You can watch it here:
Expect:
Ultra-pigmented shimmer
smooth metallic payoff
bold and buttery mattes
a little goes a long way
My Eye Look Using Lightwork VII
For the tutorial, I created a dramatic but wearable multichrome look — perfect for holiday events, glam moments, or just when you want your eyes to be the main character.
The shades layered beautifully and blended easily. No patchiness, no weird fallout.
If you like glam that feels effortless, you’ll enjoy this palette.
Should You Buy It During the Sephora Sale?
The short answer: YES – if you love shimmer-heavy, multi-chrome goodness in your looks.
This palette performs like luxury, and the multi-chromes alone justify the price. And with 20% off at Sephora until 12/14/2025, it’s honestly the best time to pick it up.
If you don’t typically reach for bold shades, the palette might be more of a special-occasion product, but it’s still a stunning collector’s piece.
Shop the Palette
Final Thoughts
Danessa Myricks never disappoints when it comes to color, texture, and innovation. Lightwork VII is a gorgeous addition to the Lightwork series and performs beautifully on medium-to-deep skin tones.
If you love dimension and sparkle… this palette is a must-buy.
Disclaimer: This video is NOT sponsored. The product(s) mentioned in this video were sent for review consideration in a PR Gift. All opinions are my own, 100% honest & unbiased. Affiliate links are posted throughout this description box. If you click on the affiliate links, I can and may receive commission off of the product purchases. This is at no additional cost to you if you use my link, but you can decide to use my link or opt out and go directly to the website mentioned.
Welcome to a new year and a fresh start! Today, I’m sharing a Get Ready With Me (GRWM) experience featuring the gorgeous Alter Ego Mishaven Palette. This palette…
I’m so excited to share with you the Emily Edit Palettes, a collaboration between Makeup Revolution and EmilyNoel83, one of my favorite Beauty YouTubers.
Who is EmilyNoel83?
When I started doing YouTube videos 10+ years ago, I remember being one of the first 200 subscribers to EmilyNoel83. She was a news reporter named Emily Noel who had a bubbly personality. Emily filmed her videos in a small apartment with that “newscaster” flair and “girl next door” attitude, which I love. She offers honest and truthful reviews that are not sponsored. Her easy to follow makeup tutorials are for all levels of skill. Cupcake (that’s her cat) would steal the show and make appearances. Now, several years later, I’ve watched Emily have two beautiful little girls and build a channel that I value and respect.
Emily’s love for life, positivity and informative style is endearing and keeps her audience coming back for more.
Revolution Makeup, USA
Now, 10 years later, she’s collaborating with Makeup Revolution. I’m so excited to share this collab with all of you.
The Emily Edit – The Needs Palette
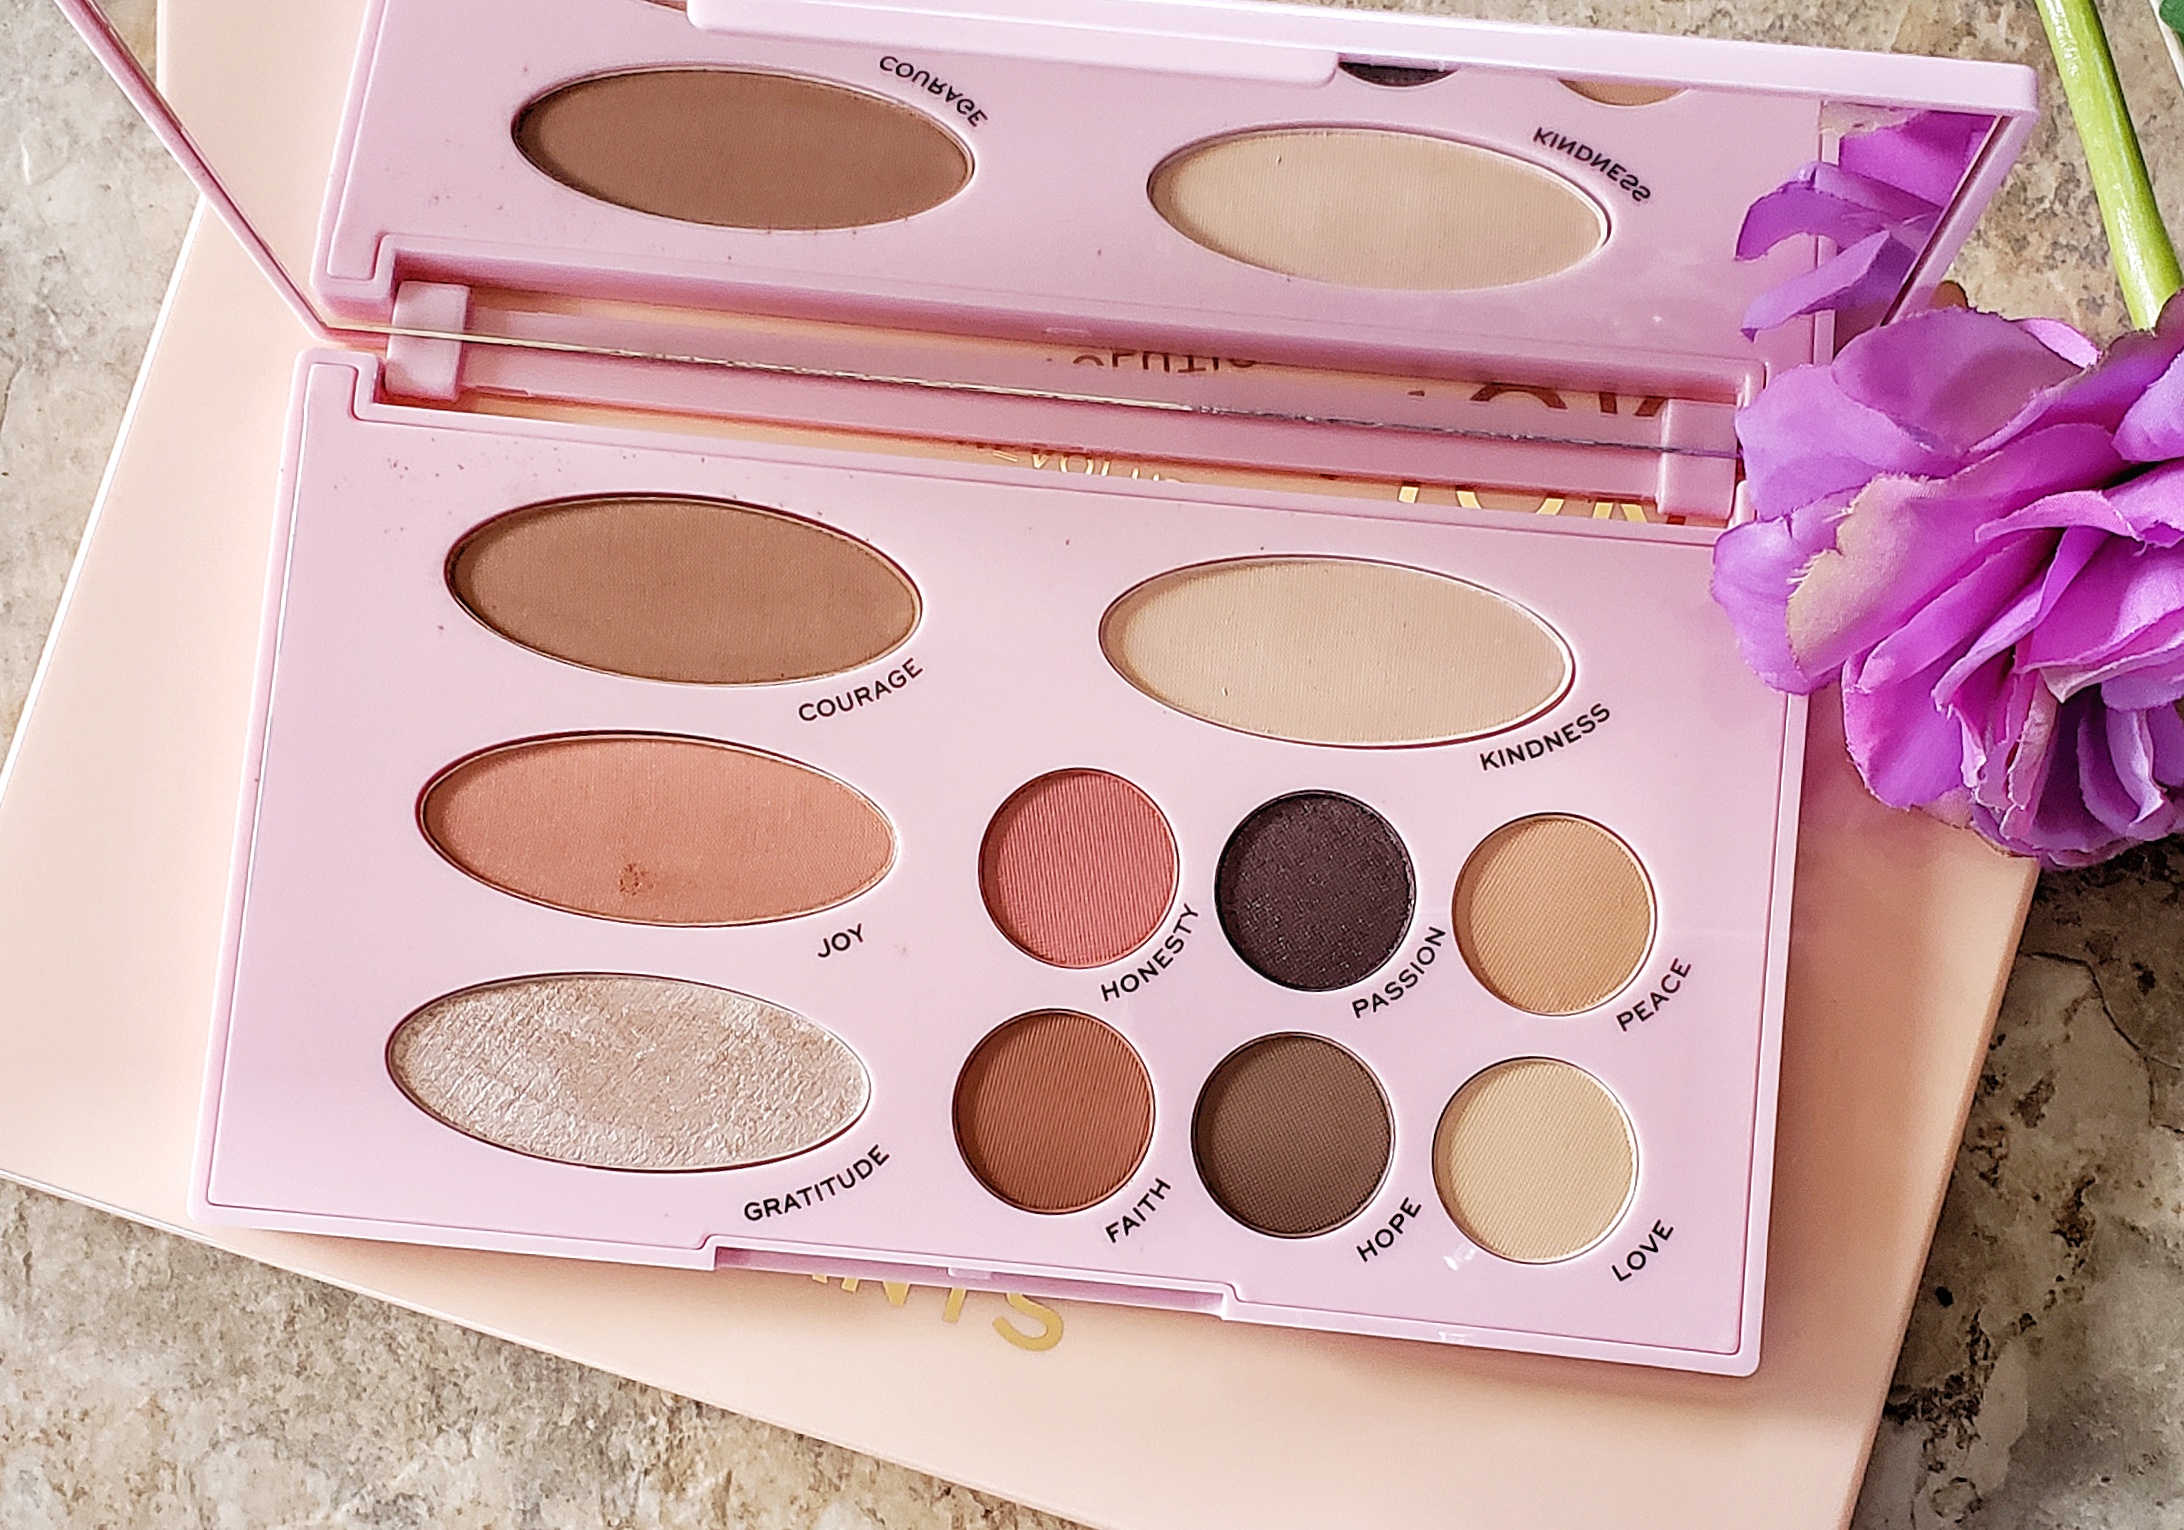
The Needs Emily Edit was designed to be a “greatest hits” of the brand. A full-face style palette that really offers a “multi-tasking” use for each shade. This beautiful palette is full of positivity, featuring Emily’s personal shade names that have a special color identity. Gorgeously cased in pale pink packaging with Emily’s signature in rose gold.
Shades included in The Needs:
Courage – a medium brown, bronzer and contour shade with a matte finish
Joy – peachy pink blush with a matte finish
Gratitude – a creamy highlight with a satin finish
Kindness – cream translucent powder with a matte finish (Emily likes to use it as an under-eye powder)
Honesty – blush peach, satin finish
Passion – dark brown, with a red shimmer
Peace – peachy nude, matte finish
Faith – warm brown, matte finish
Hope – fudge brown, matte finish
Love – cream shade with a matte finish
I’m over the moon in love with these shades and the palette in a whole. The Needs offers you the perfect travel palette because it has everything you need to create a look. Every powder in this palette is silky and creamy. Whether creating a smokey or neutral eye look, this palette has you covered. The perfect “everyday” palette.
Left to Right Swatches: Courage, Joy, Gratitude, Kindness, Honesty, Passion, Peace, Faith, Hope and Love.
Did I mention how large the mirror is? A large mirror (the size of the palette) makes this ideal for any makeup lover. The palette casing is sturdy and beautiful, offering it a lux look with great names. Also, I love opening this palette and looking at the shade names, it’s so inspiring.
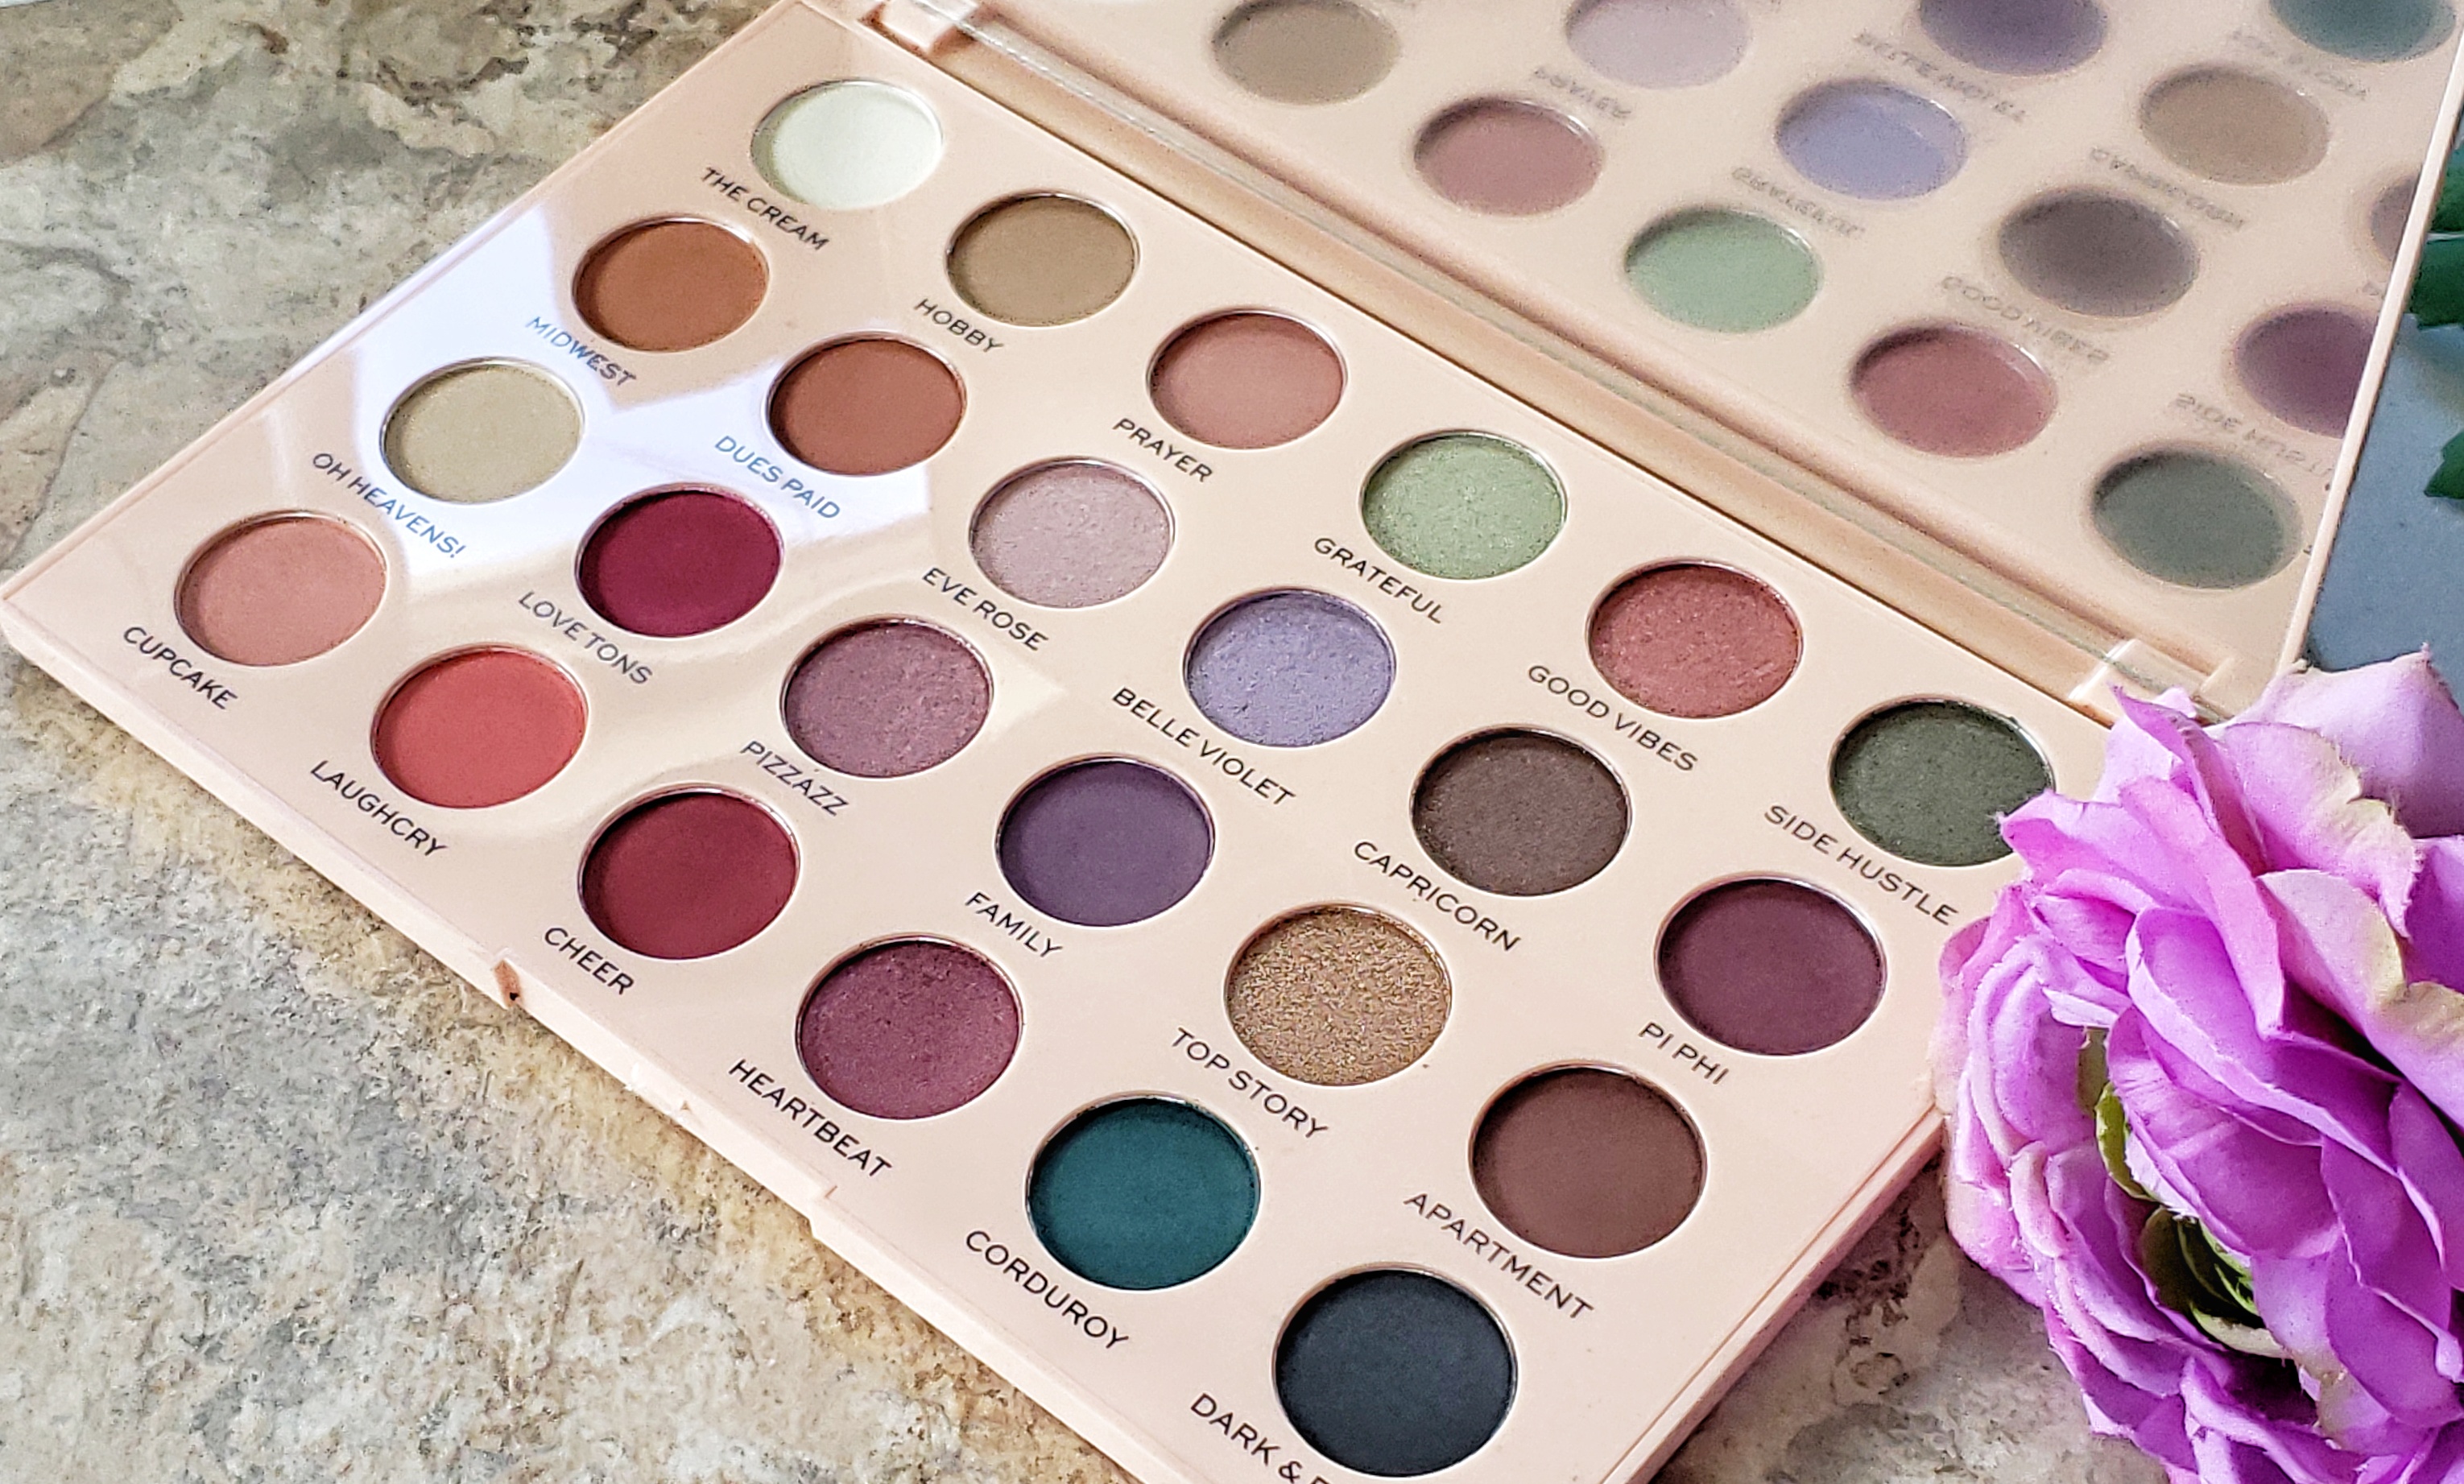
The Emily Edit – The Wants Palette
Emily Edit The Wants palette has easily become one of my favorites in my eyeshadow collection. This gorgeous piece features 24 colors in a combination of matte, satin and shimmer shades. What I love the most about this palette is the universal color range and how it works well with all skin tones. But, I am absolutely crushing on the color selection as well.
The Wants palette is encased in a pale peach packaging with Emily’s signature in rose gold.
When you buy this palette, you may notice that each color is laid out in little quads that you can use together to create a cohesive look. However, the colors all work well together so there are a plethora of combinations you can use to create a gorgeous look.
My Favorites?
While I’ve been enjoying all of the shades, (I’m trying not to discriminate) some of my favorites include: Oh Heavens!, Love Tons, Side Hustle, Grateful, Dues Paid, Family, Corduroy, Heartbeat, Top Story and Capricorn. Let’s be honest here, I should have just listed all the shades… haha, I struggled to choose.
Shades included in The Wants:
The Cream – white cream, matte finish
Midwest – light tan, matte finish
Oh Heavens! – beige cream, satin finish
Cupcake – peach, satin finish
Hobby – light brown, matte finish
Dues Paid – red brick, matte finish
LoveTons – plum, matte finish
Laughcry – blood orange, matte finish
Prayer – sepia brown, matte finish
Eve Rose – light lilac with a gold shift, satin finish
Pizzazz – maroon, matte finish
Grateful – lime green, shimmer finish
Belle Violet – lavender, shimmer finish
Family – deep purple, matte finish
Heartbeat – chestnut, shimmer finish
Good Vibes – Rich copper, shimmer finish
Capricorn – mocha brown, satin finish
Top Story – gold, shimmer finish
Corduroy – emerald green, matte finish
Side Hustle – khaki green with a gold shift, shimmer finish
Pi Phi – plum purple, matte finish
Apartment – wood brown, matte finish
Dark & Early – black, matte finish
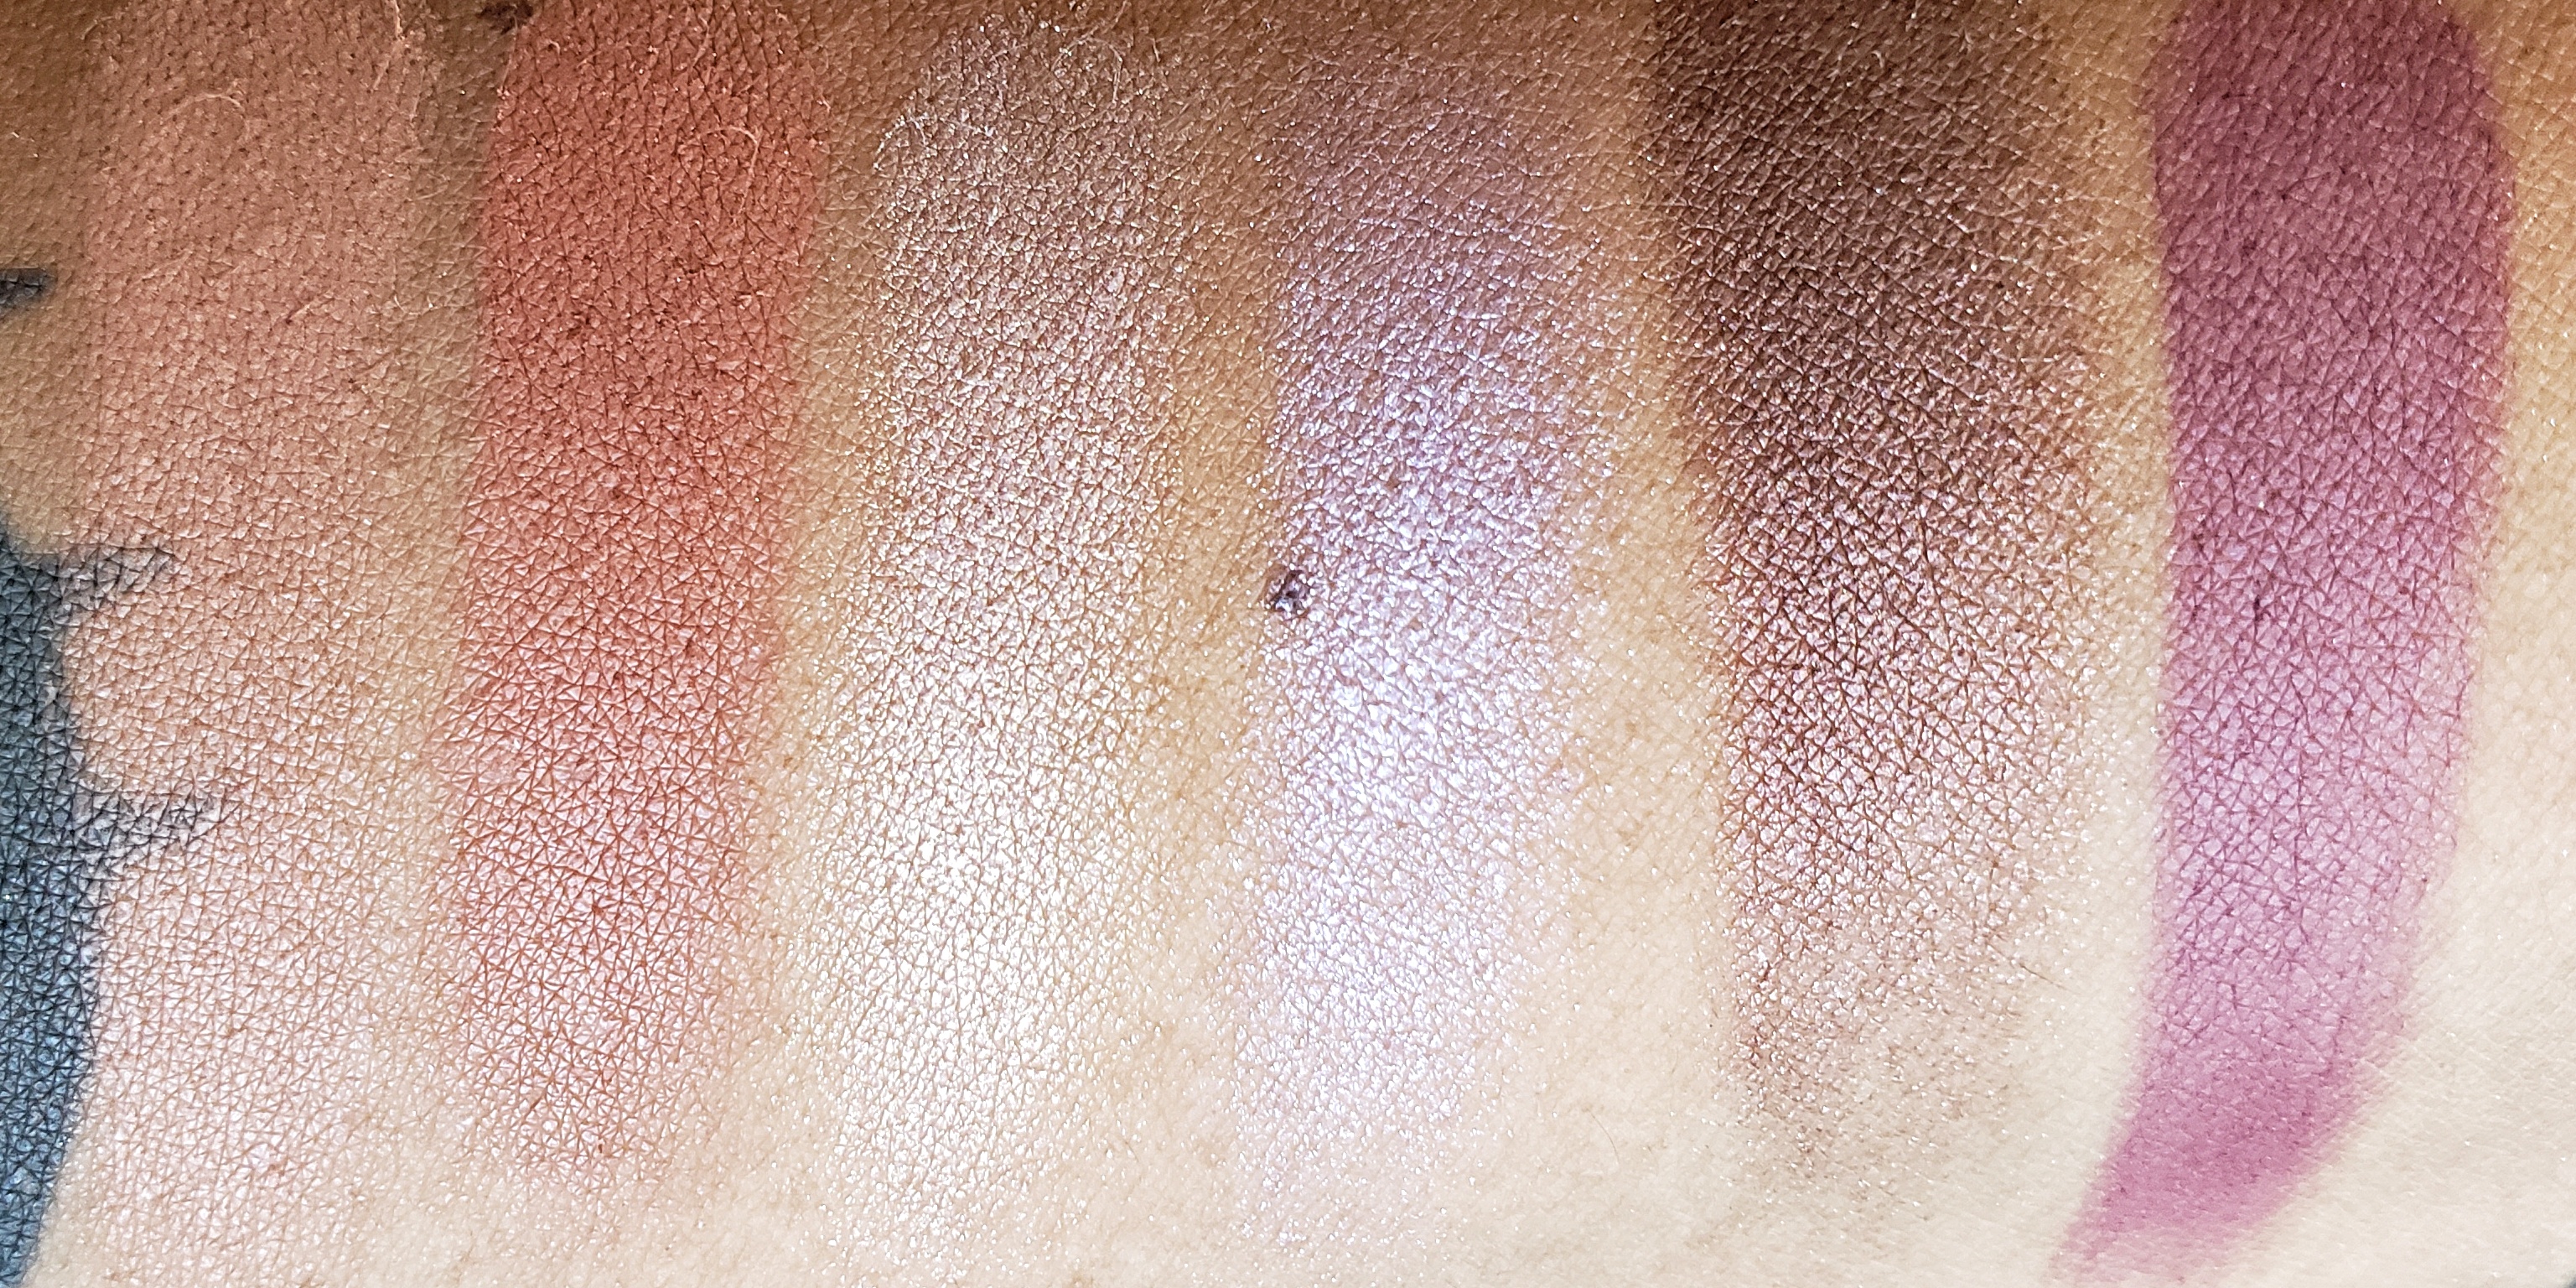
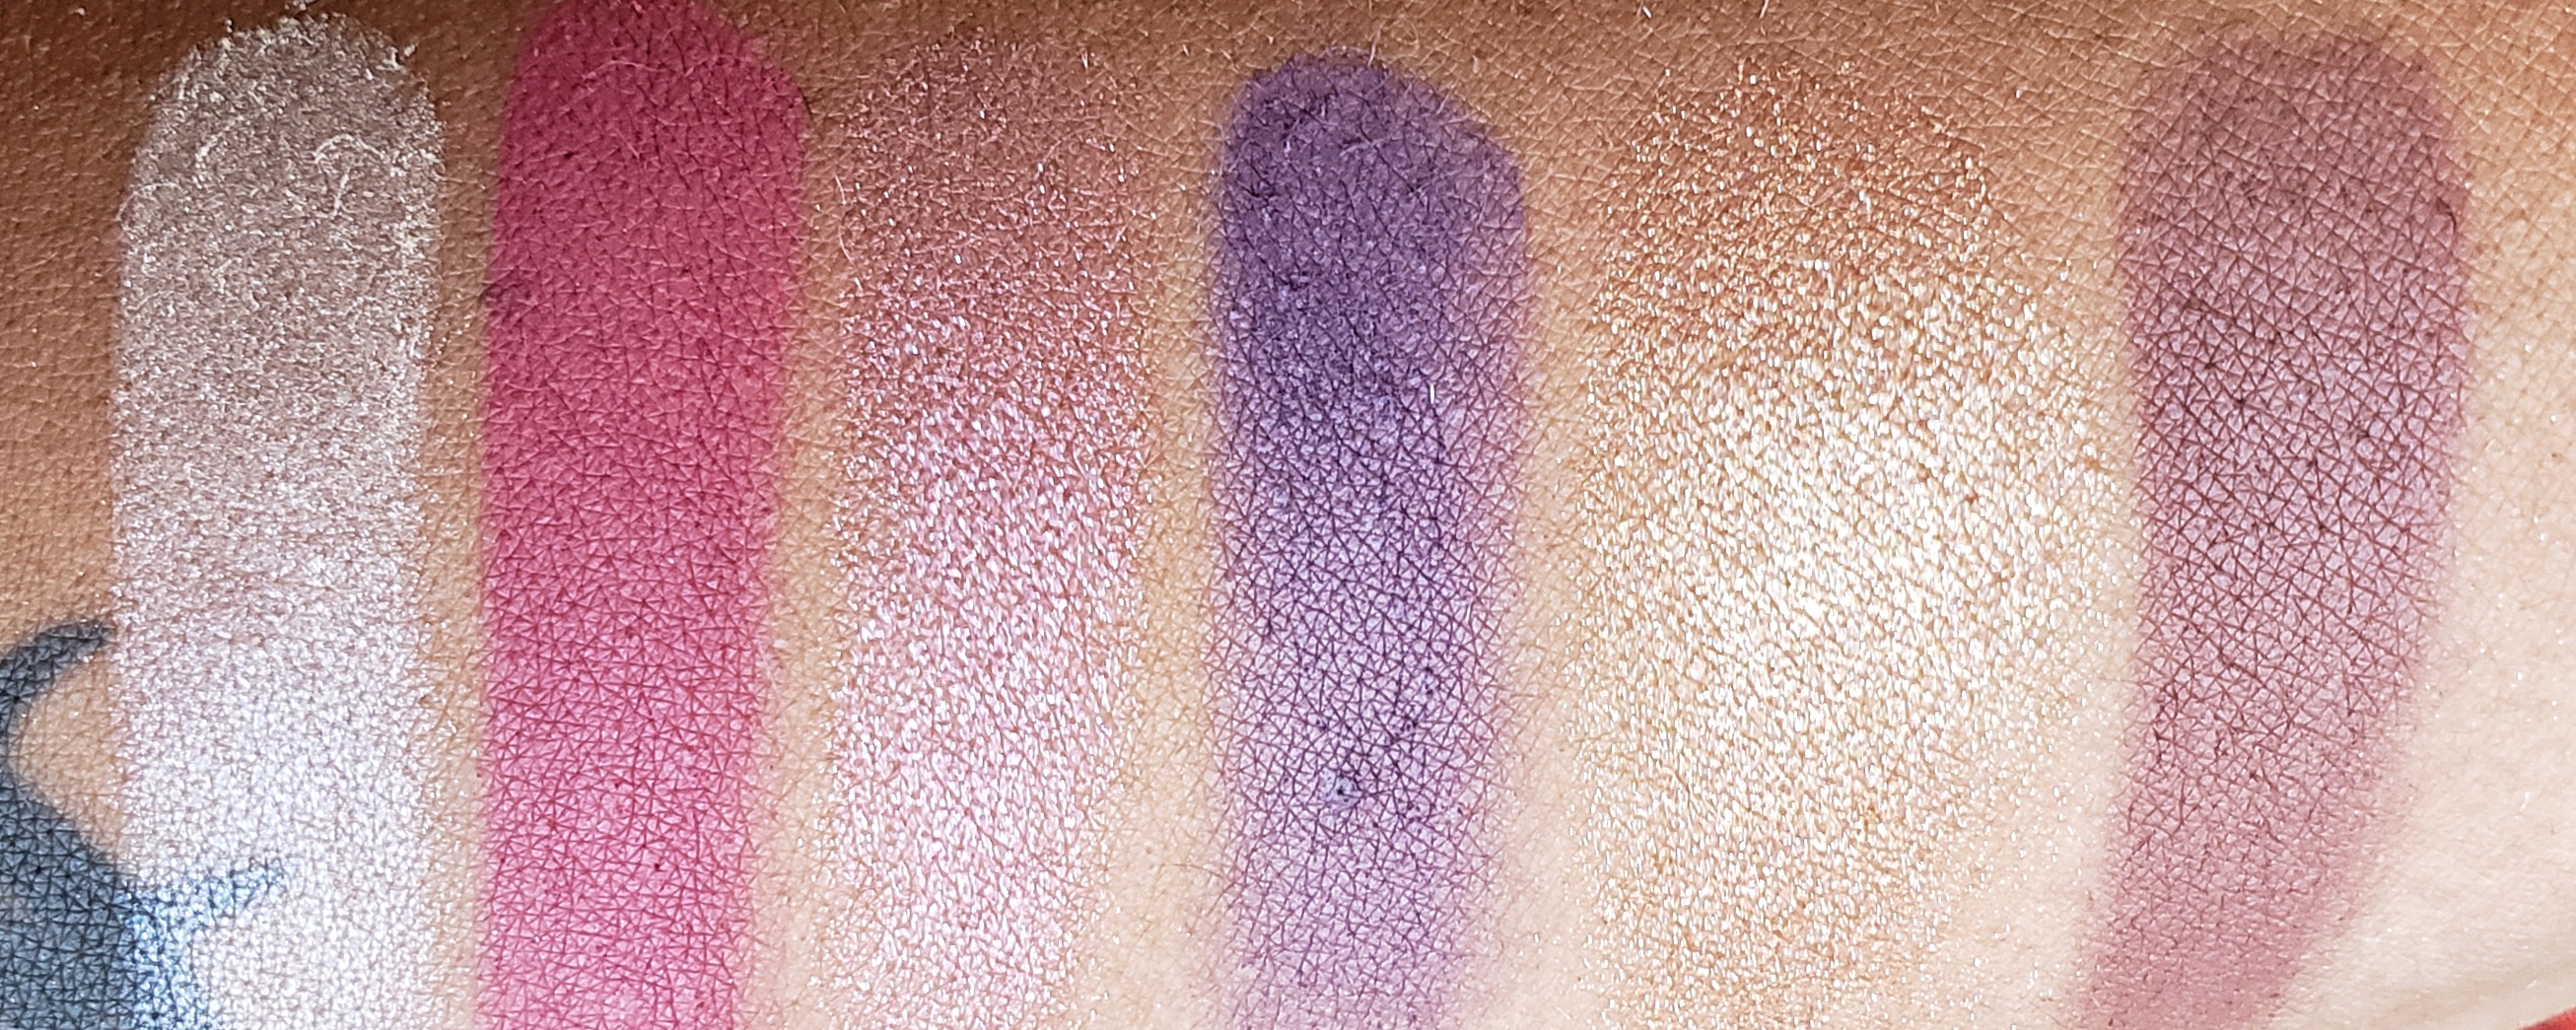
Swatches Left to Right – The Cream, Hobby, Prayer, Grateful, Good Vibes, Side Hustle
Swatches Left to Right – Midwest, Dues Paid, Eve Rose, Belle Violet, Capricorn, Pi Phi
Swatches Left to Right – Oh Heavens!, Love Tons, Pizzazz, Family, Top Story, Apartment
Swatches Left to Right – Cupcake, Laughcry, Cheer, Heartbeat, Corduroy, Dark & Early
** Note that these swatches are done directly on my hand without any primer or base. Many of these colors are applied to my skin in one swipe, so bare in mind that they can be built up to obtain a darker and richer shade. I am a medium skin tone.
To create this look, I followed Emily’s Tutorial here, Rich Fall Glam. I’m using all the shades she mentioned in this look. Shades used: Heartbeat, Oh Heavens!, Top Story, Dark & Early, Cheer, Corduroy, Side Hustle and Grateful.
To create this look, I followed Emily’s Tutorial here, Rich Fall Glam. I’m using all the shades she mentioned in this look. Shades used: Heartbeat, Oh Heavens!, Top Story, Dark & Early, Cheer, Corduroy, Side Hustle and Grateful.
“I wanted this palette to inspire but could also allow you to stay in your comfort zone. I wanted the perfect balance of light, medium and really rich dark shades. I want the colors to be buildable, so you can reach that level of intensity that you want. You can create countless looks and endless creativity.”
-Emily Noel
For this look I’m using a combination of The Needs Palette and The Wants Palette. Shades used include: Honesty, Passion, Gratitude & Peace (The Needs) and Good Vibes and Dark & Early (The Wants)
My Final Thoughts
It is not often that I run out and buy a makeup palette that is a collaboration with any particular YouTuber. But, as soon as I found out about this one, I knew I had to have it. RevolutionxEmily The Needs and The Wants Palettes are beautiful and created so well. I’ve mentioned the packaging previously, but I must reiterate that I really love how sturdy these palettes are. Let’s talk about the price point too. The Needs palette is just $15 and The Wants Palette is $20. It’s not only affordable for anyone to purchase, but it is also great quality for the price point.
For this look I’m using a combination of The Needs Palette and The Wants Palette. Shades used include: Honesty, Passion, Gratitude & Peace (The Needs) and Good Vibes and Dark & Early (The Wants)
Way to Go Emily!
Though haven’t been wearing much makeup lately, the moment that I picked these up, I’ve been using them daily. Both palettes have become favorites and I know I’ll be getting a ton of use out of them. Mirrored hardshell case and beautiful shades in creamy shadows, yes… this is a must-have for anyone of any age.
EmilyNoel83 is one of my favorite YouTubers (she’s even listed on my YouTube Favorites List), so I am so excited and proud of her and her accomplishments. These palettes are definitely Homeruns in my book and I’m loving them!
You can purchase these palettes where available at: https://www.revolutionbeautyusa.com/, http://ultabeauty.com or in person at your local Ulta Store.
Disclaimer: The products featured in this post were purchased with my own money. All opinions are 100% honest & unbiased. Affiliate links may be posted throughout. Visit my Disclosures Page for more information.
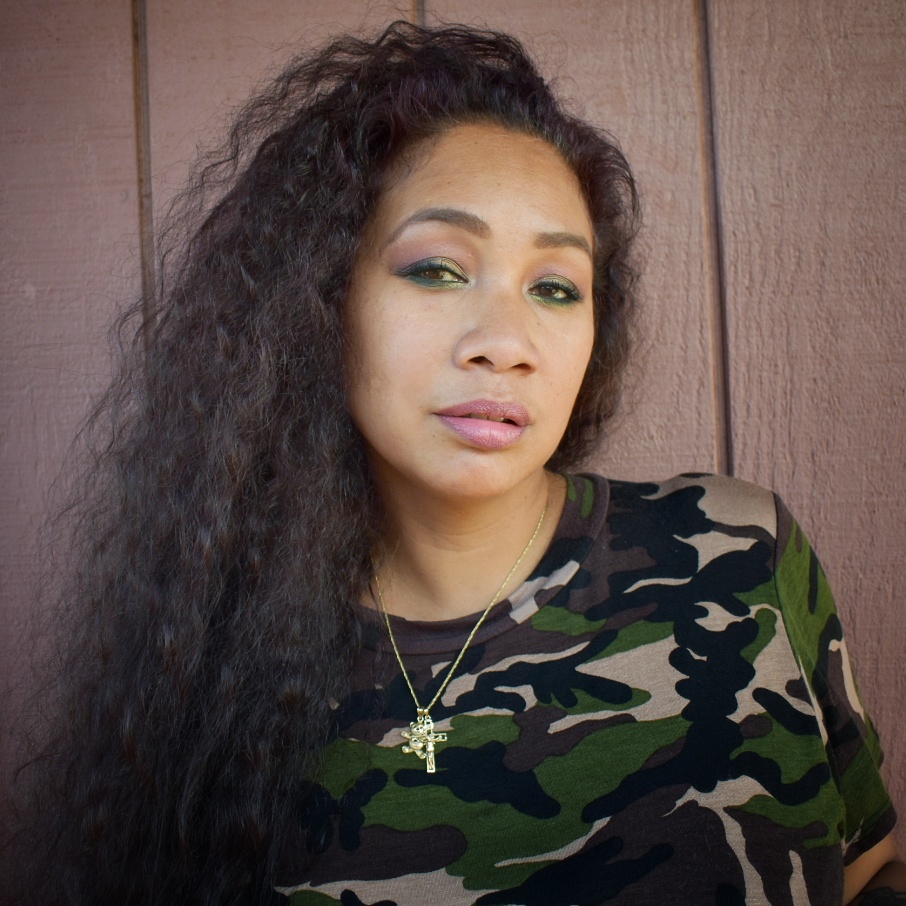
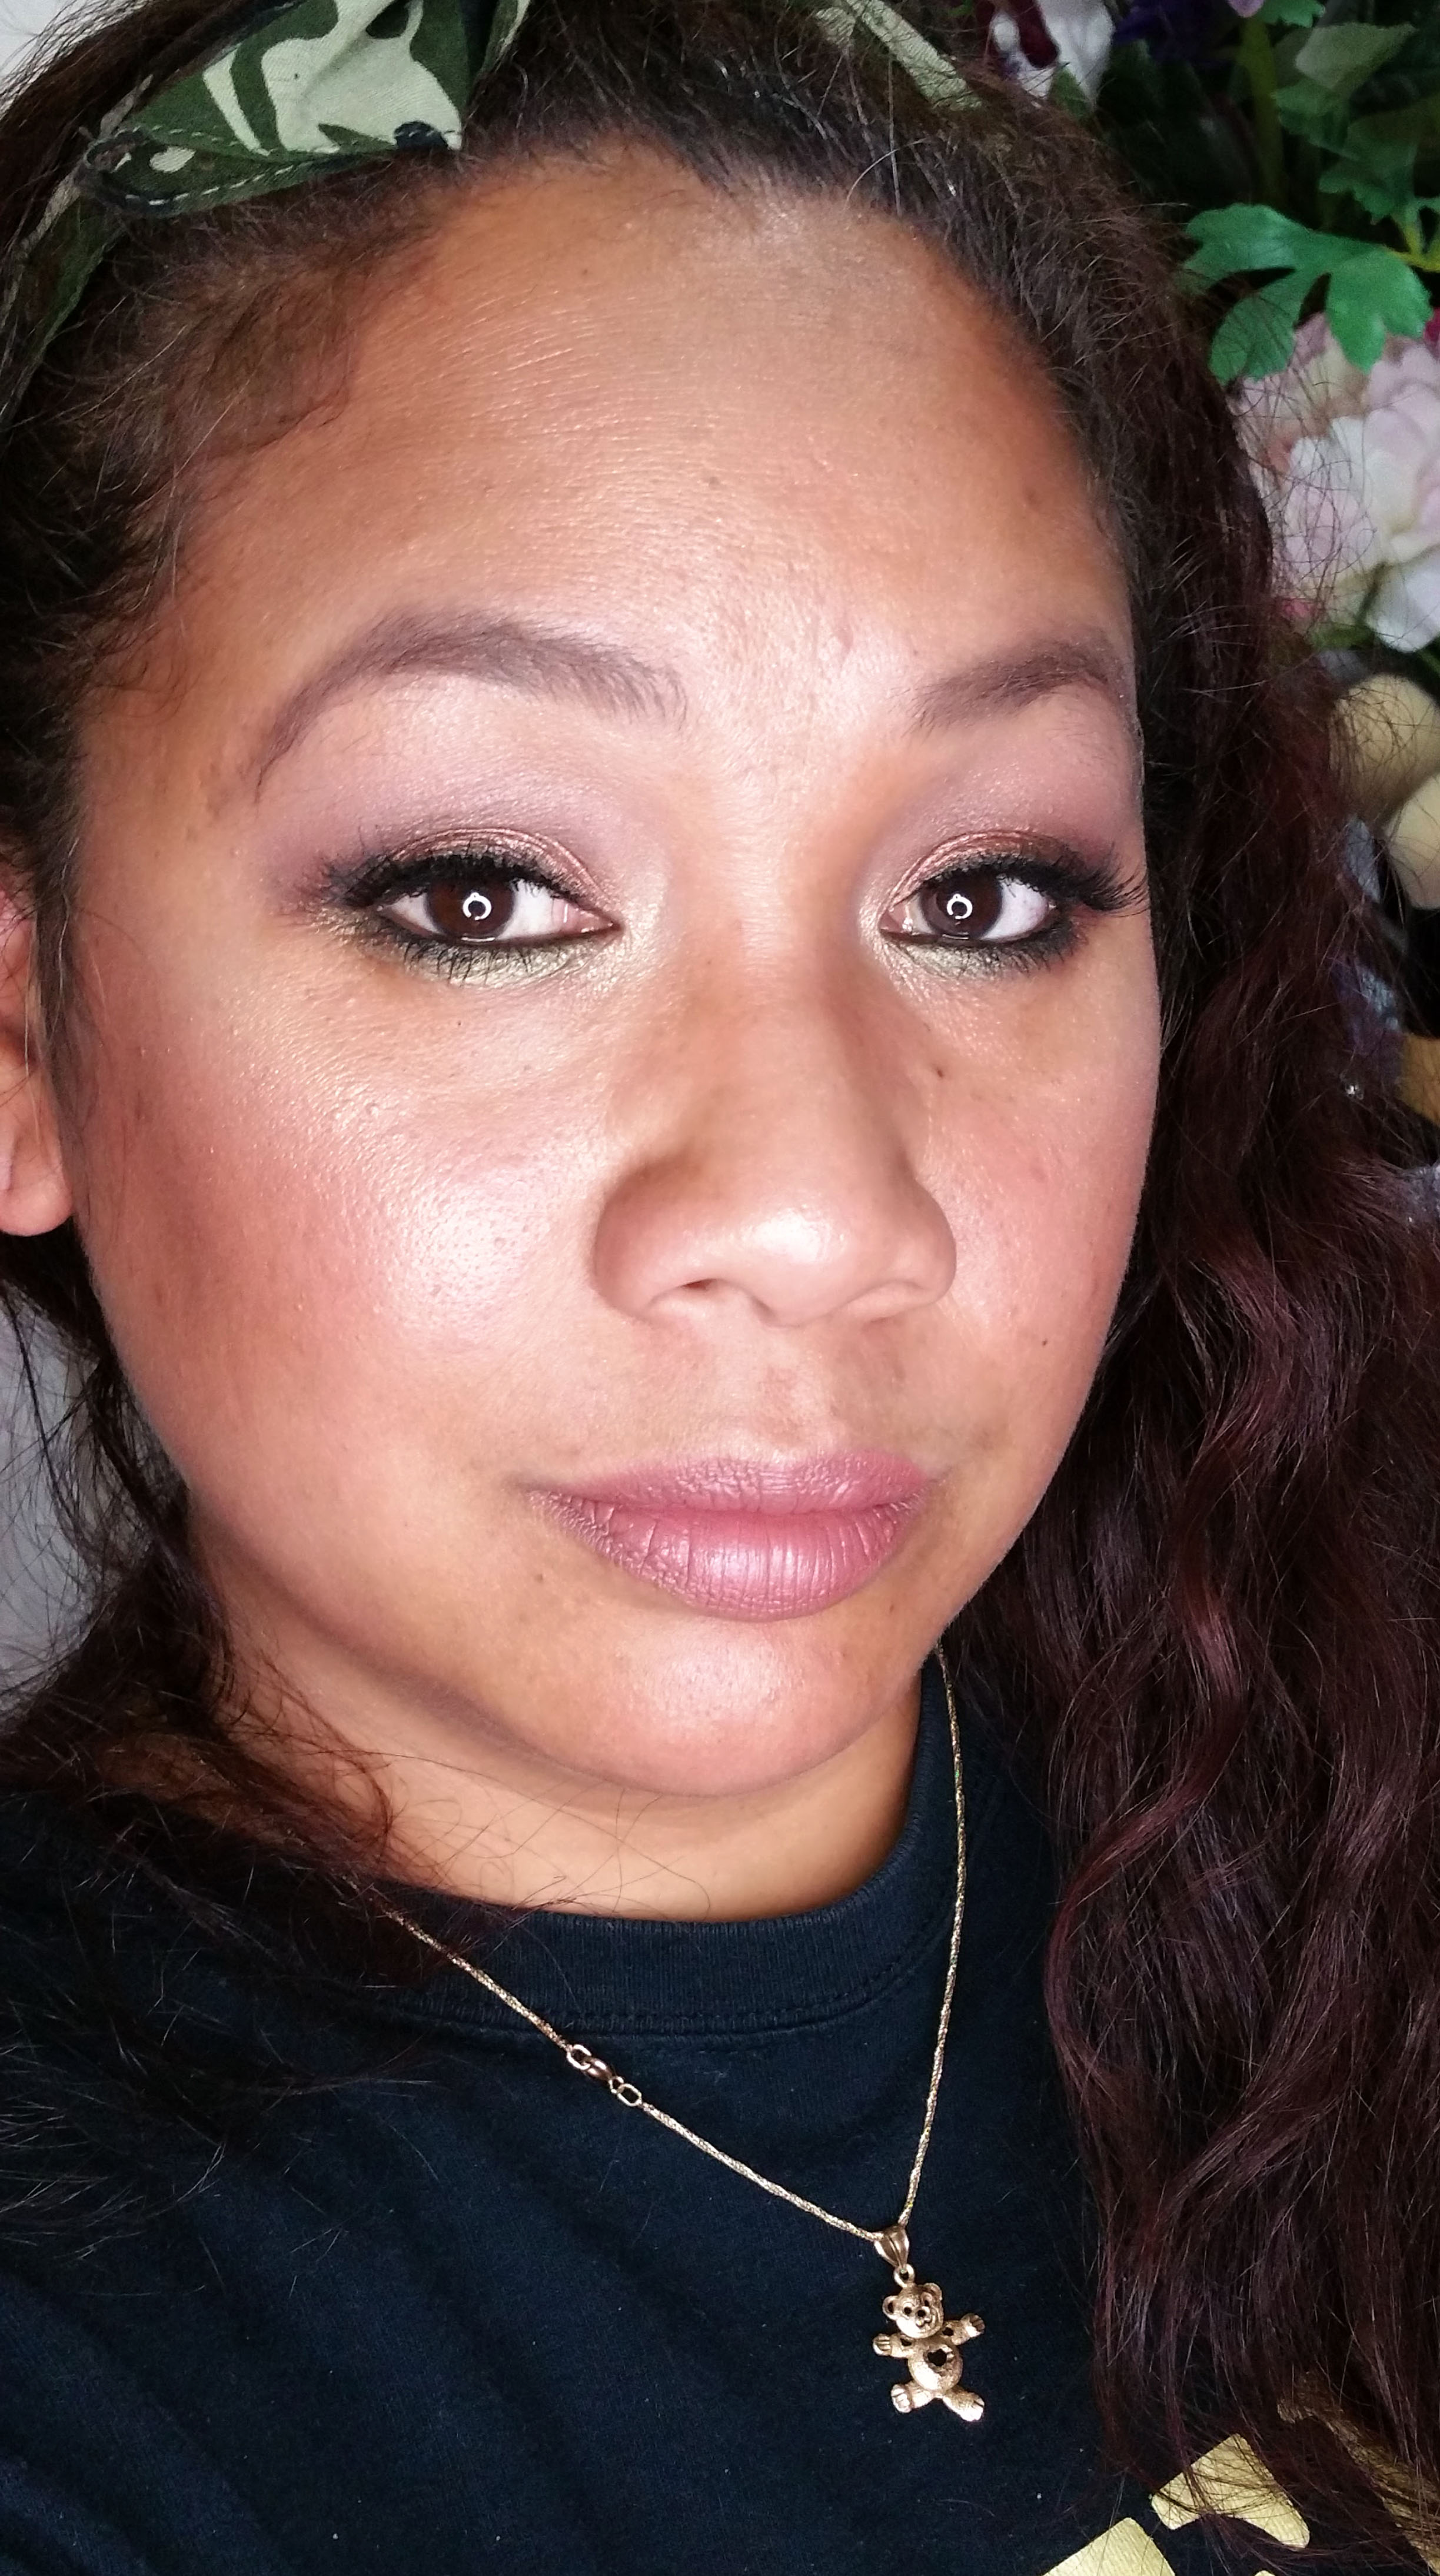
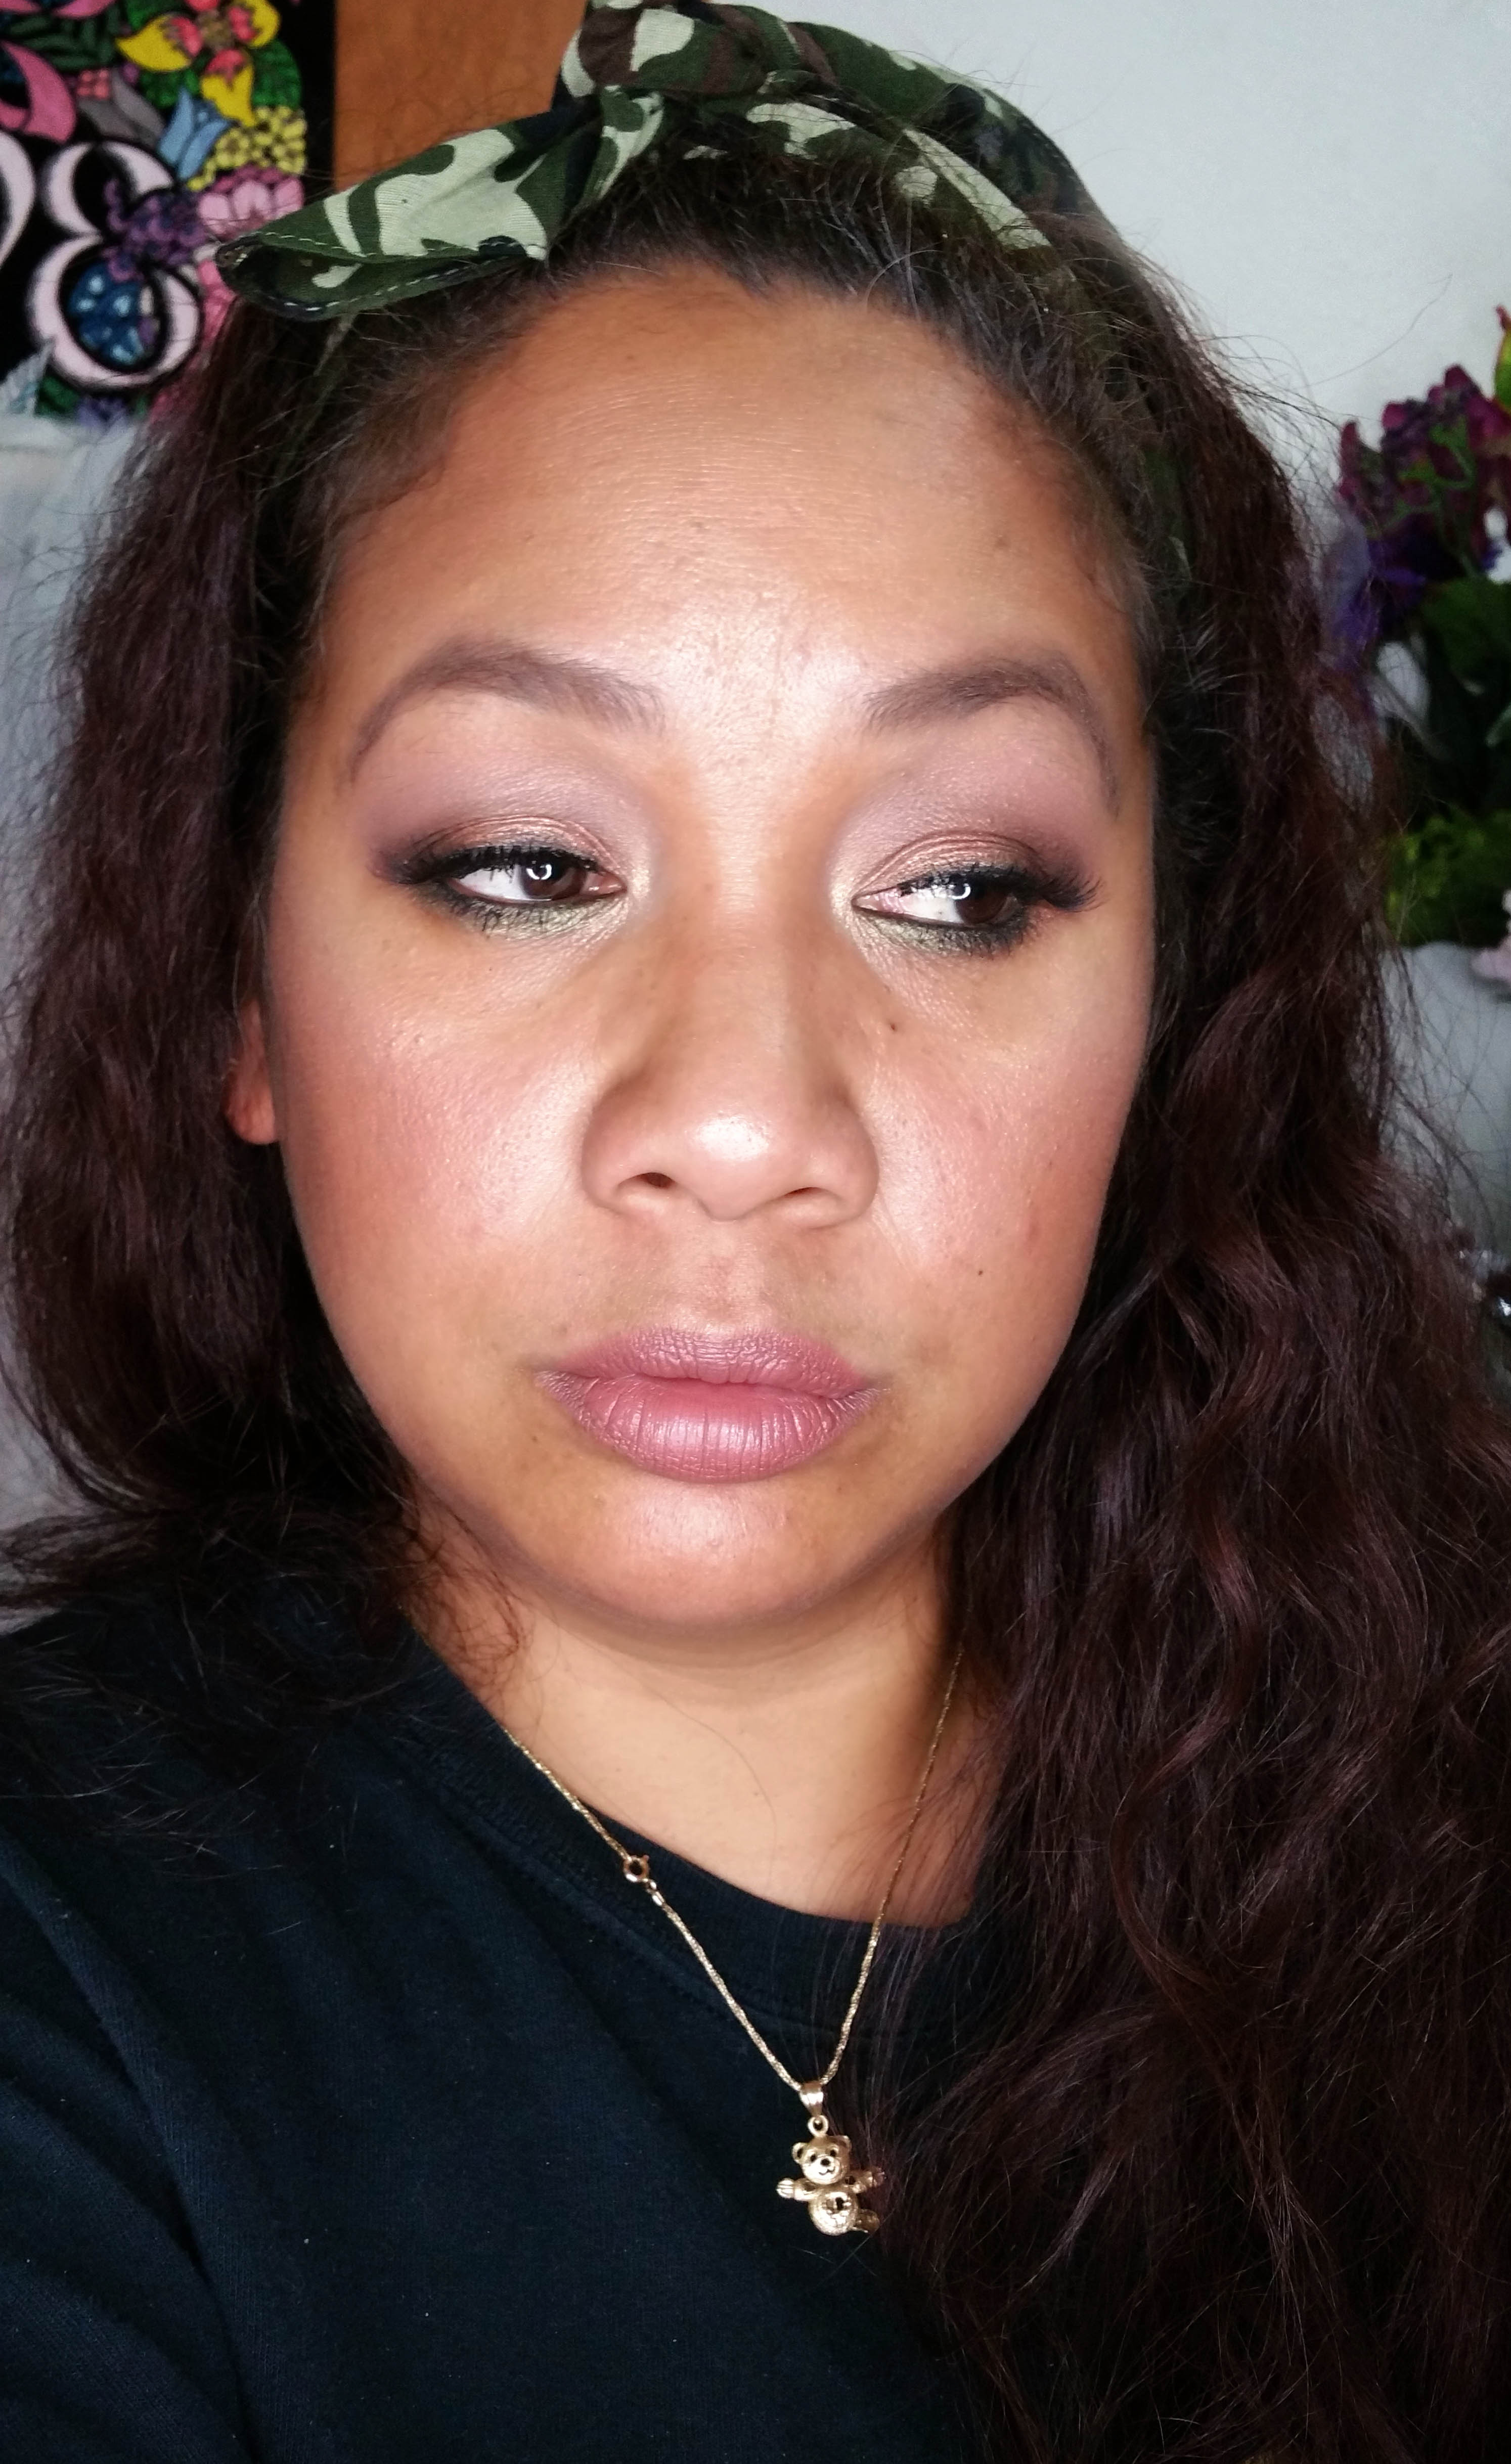
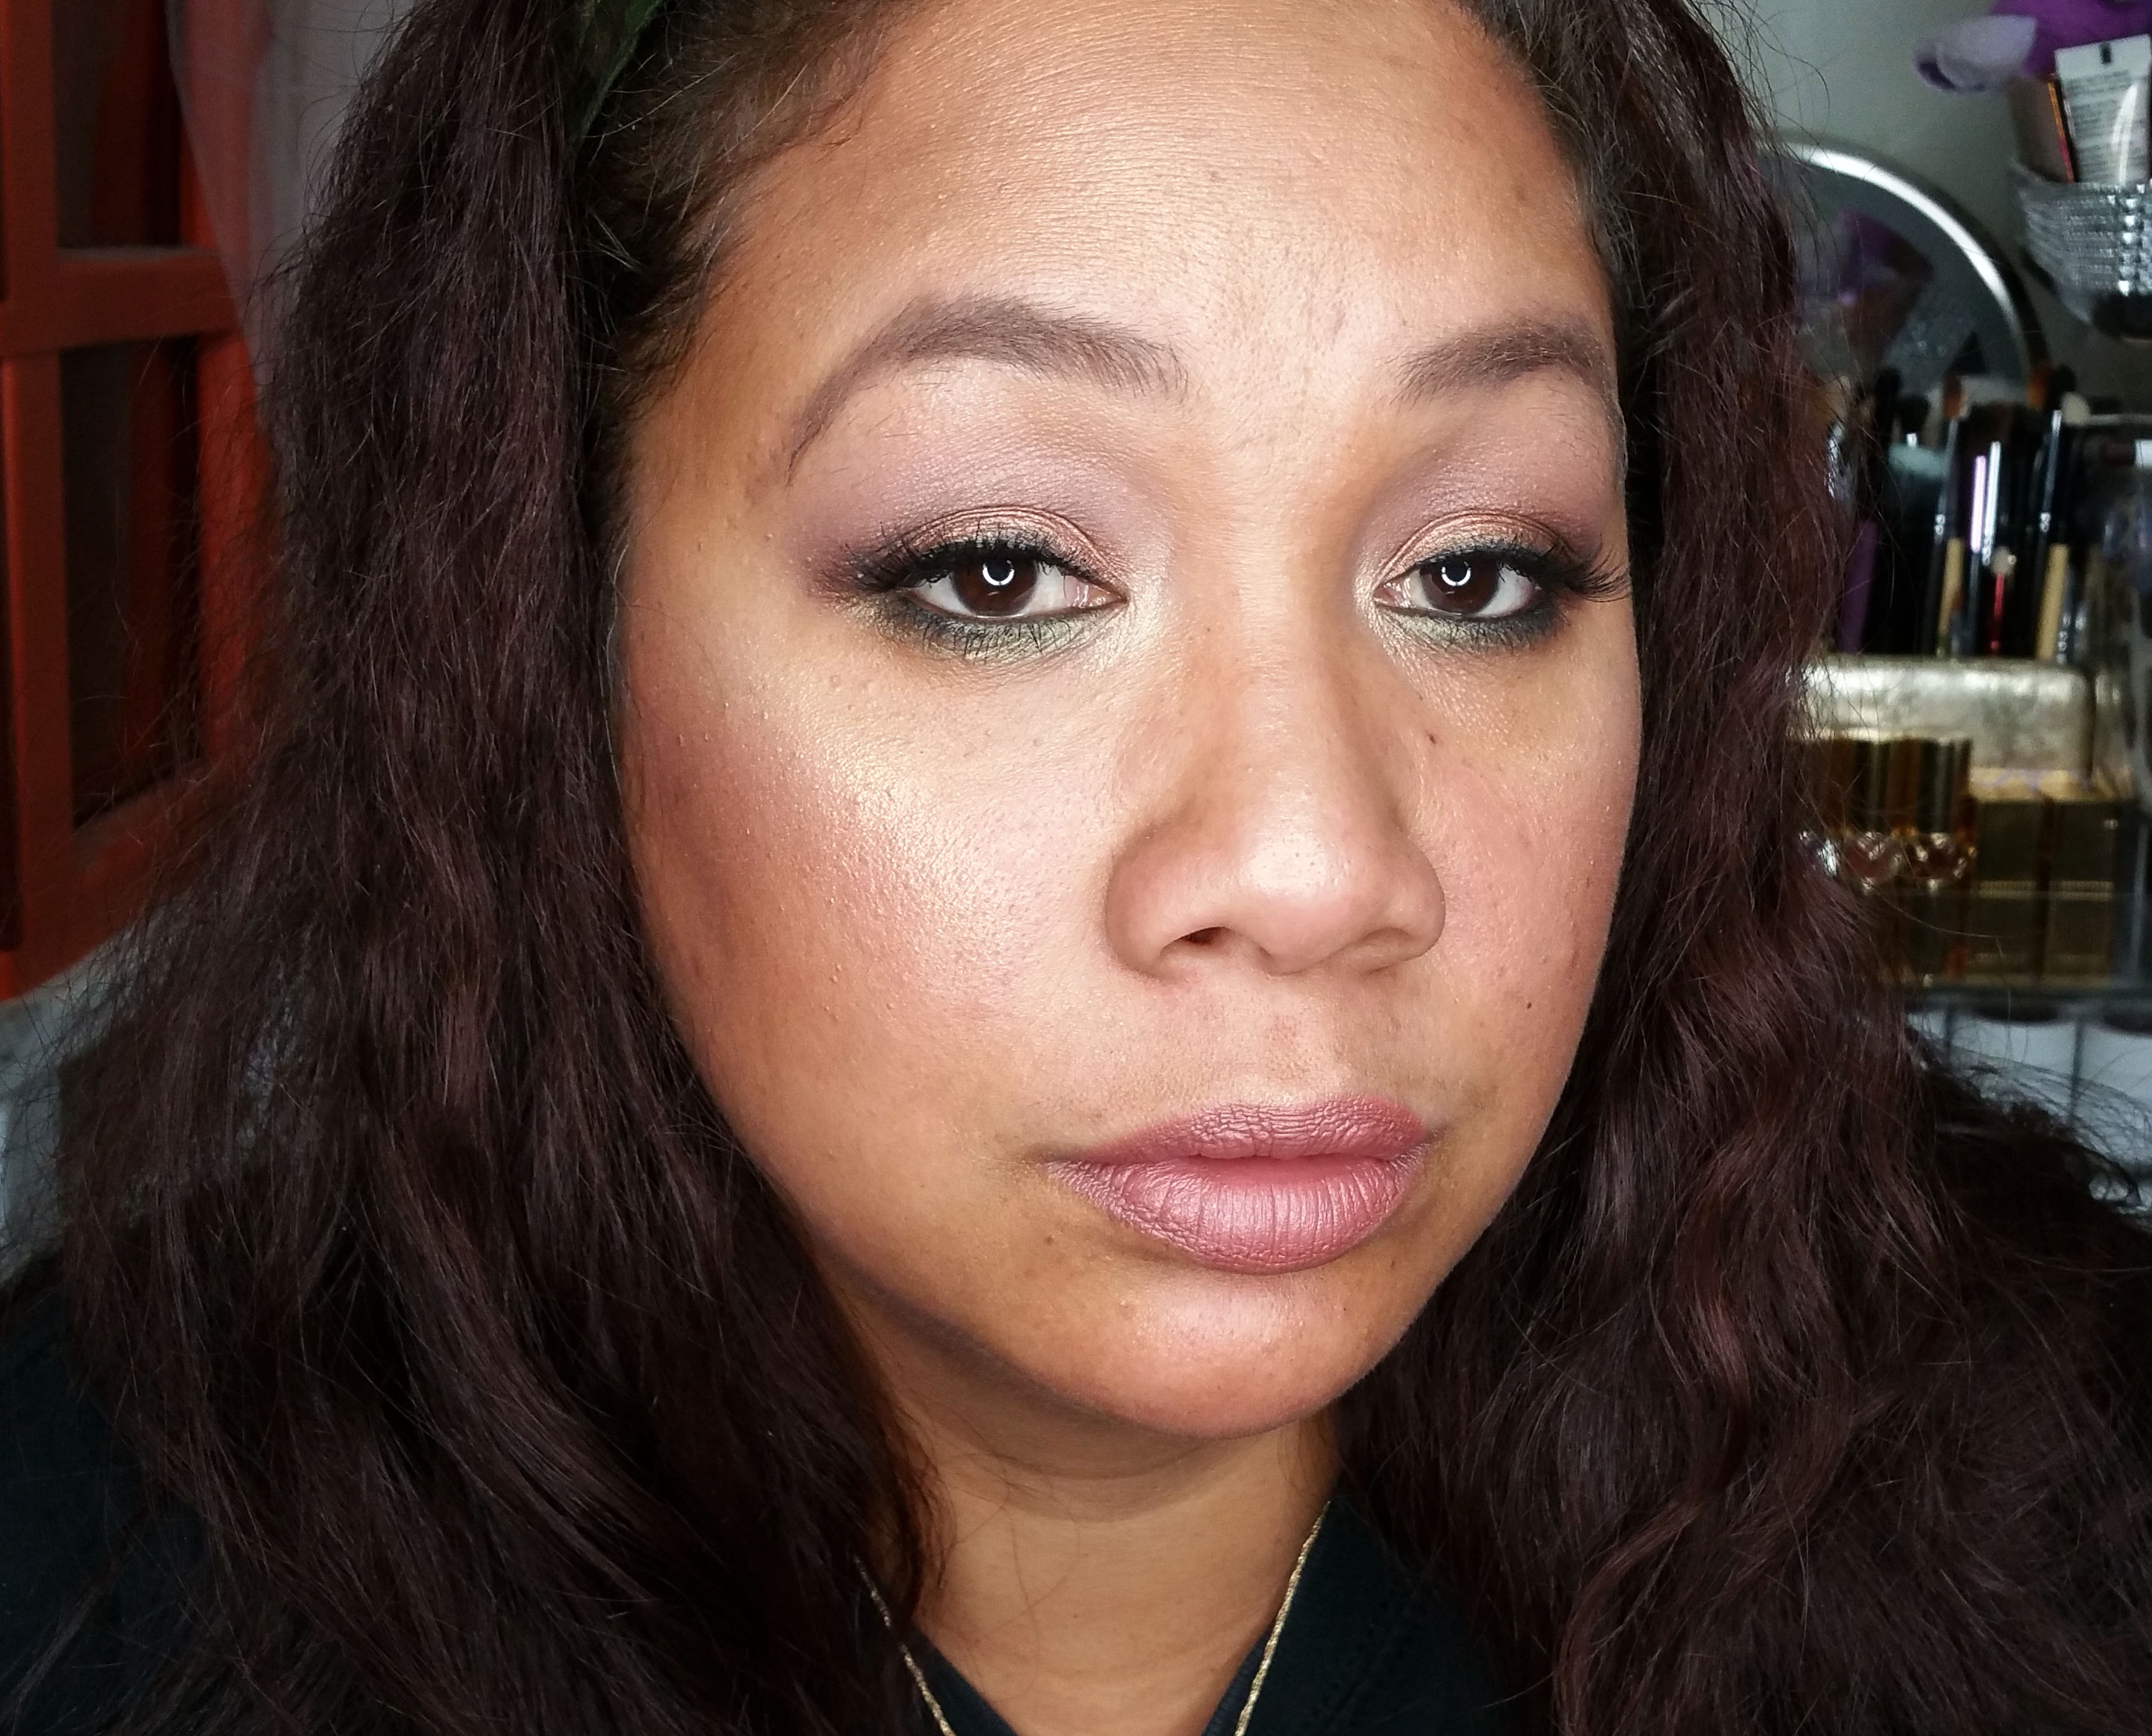
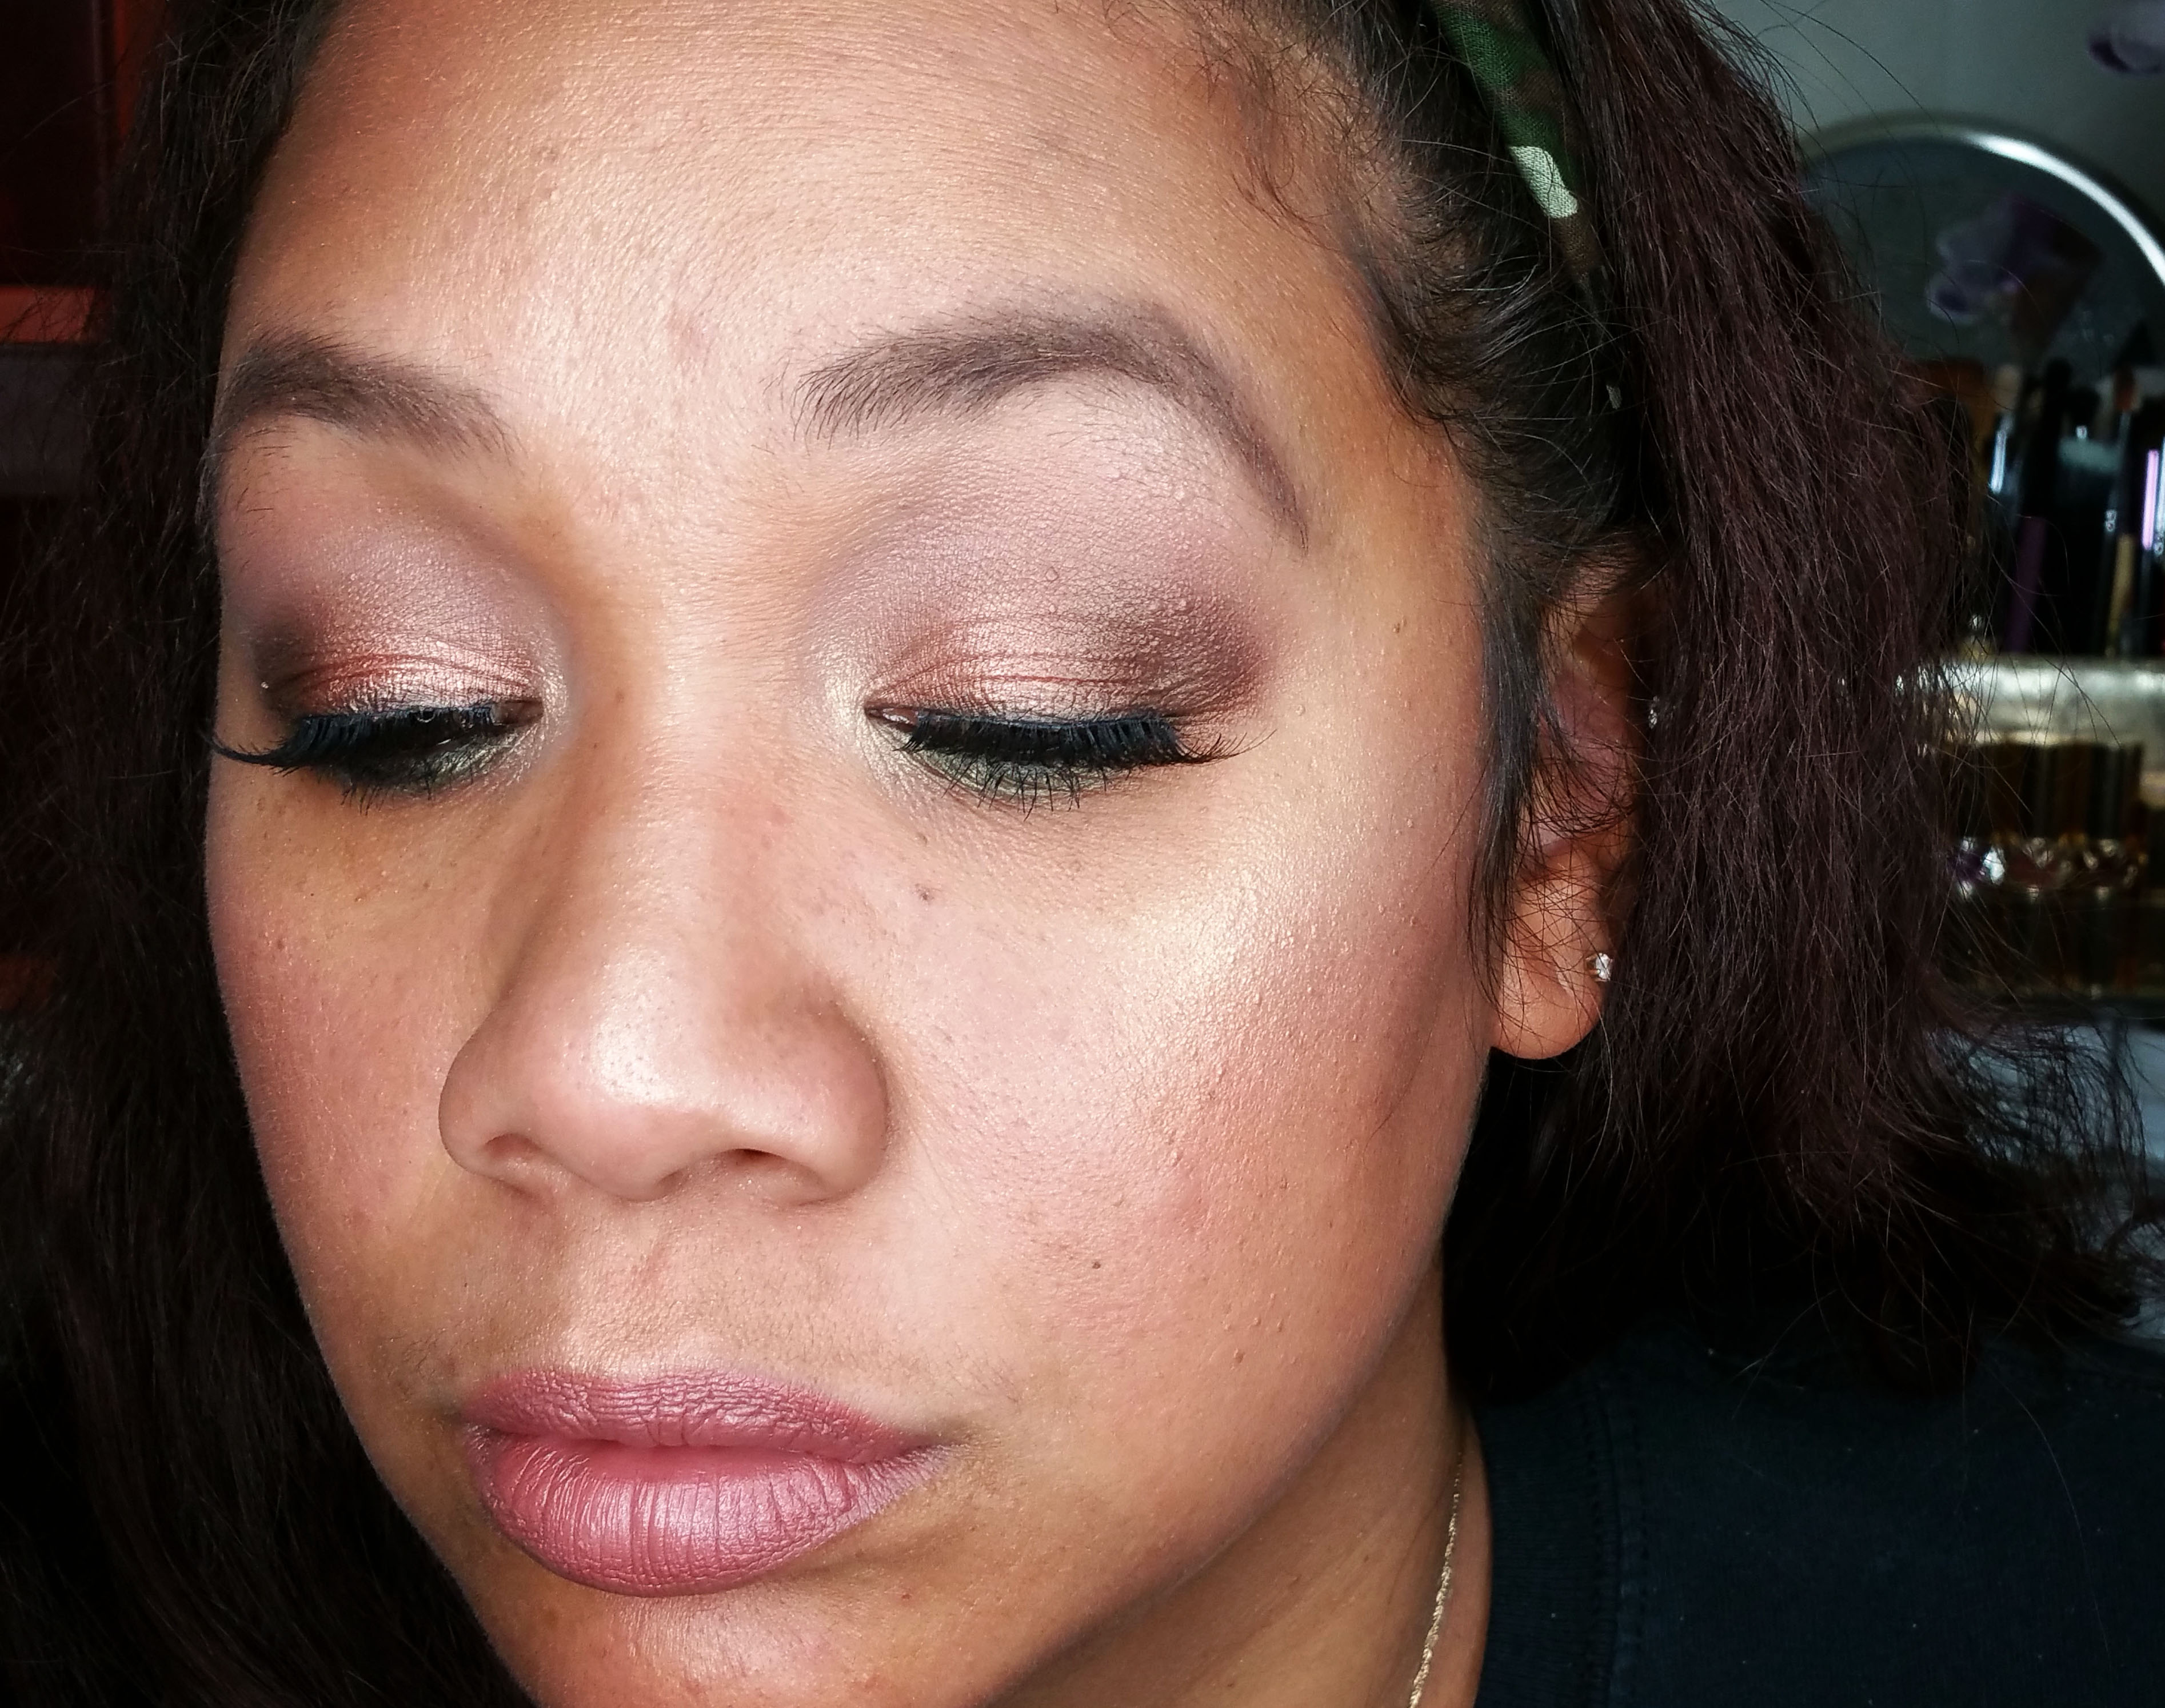
It seems like it’s been quite a while since I’ve shown my face in a makeup look or tutorial or anything along those lines. As much as I love makeup, I love a bare face so much more and besides a little tinted lip color or lip balm and some mascara, I haven’t been really using much makeup lately. With the boys out on Summer break and I feeling like a needed a little refresh, I figured I would pull out some makeup products I haven’t touched in a while and a few that I have been loving and bronze the heck out of my face while adding some glow and a little pop of color. My GRWM video which you can click and watch here (also embedded below) is quite long since I’m chatting and talking it up like girlfriends do, so if you want the shorter version, just keep reading. If you want to come hang out with me and talk story for 30 minutes or so, hey, grab something to drink – cup of joe or a glass of somethin’ and click play.
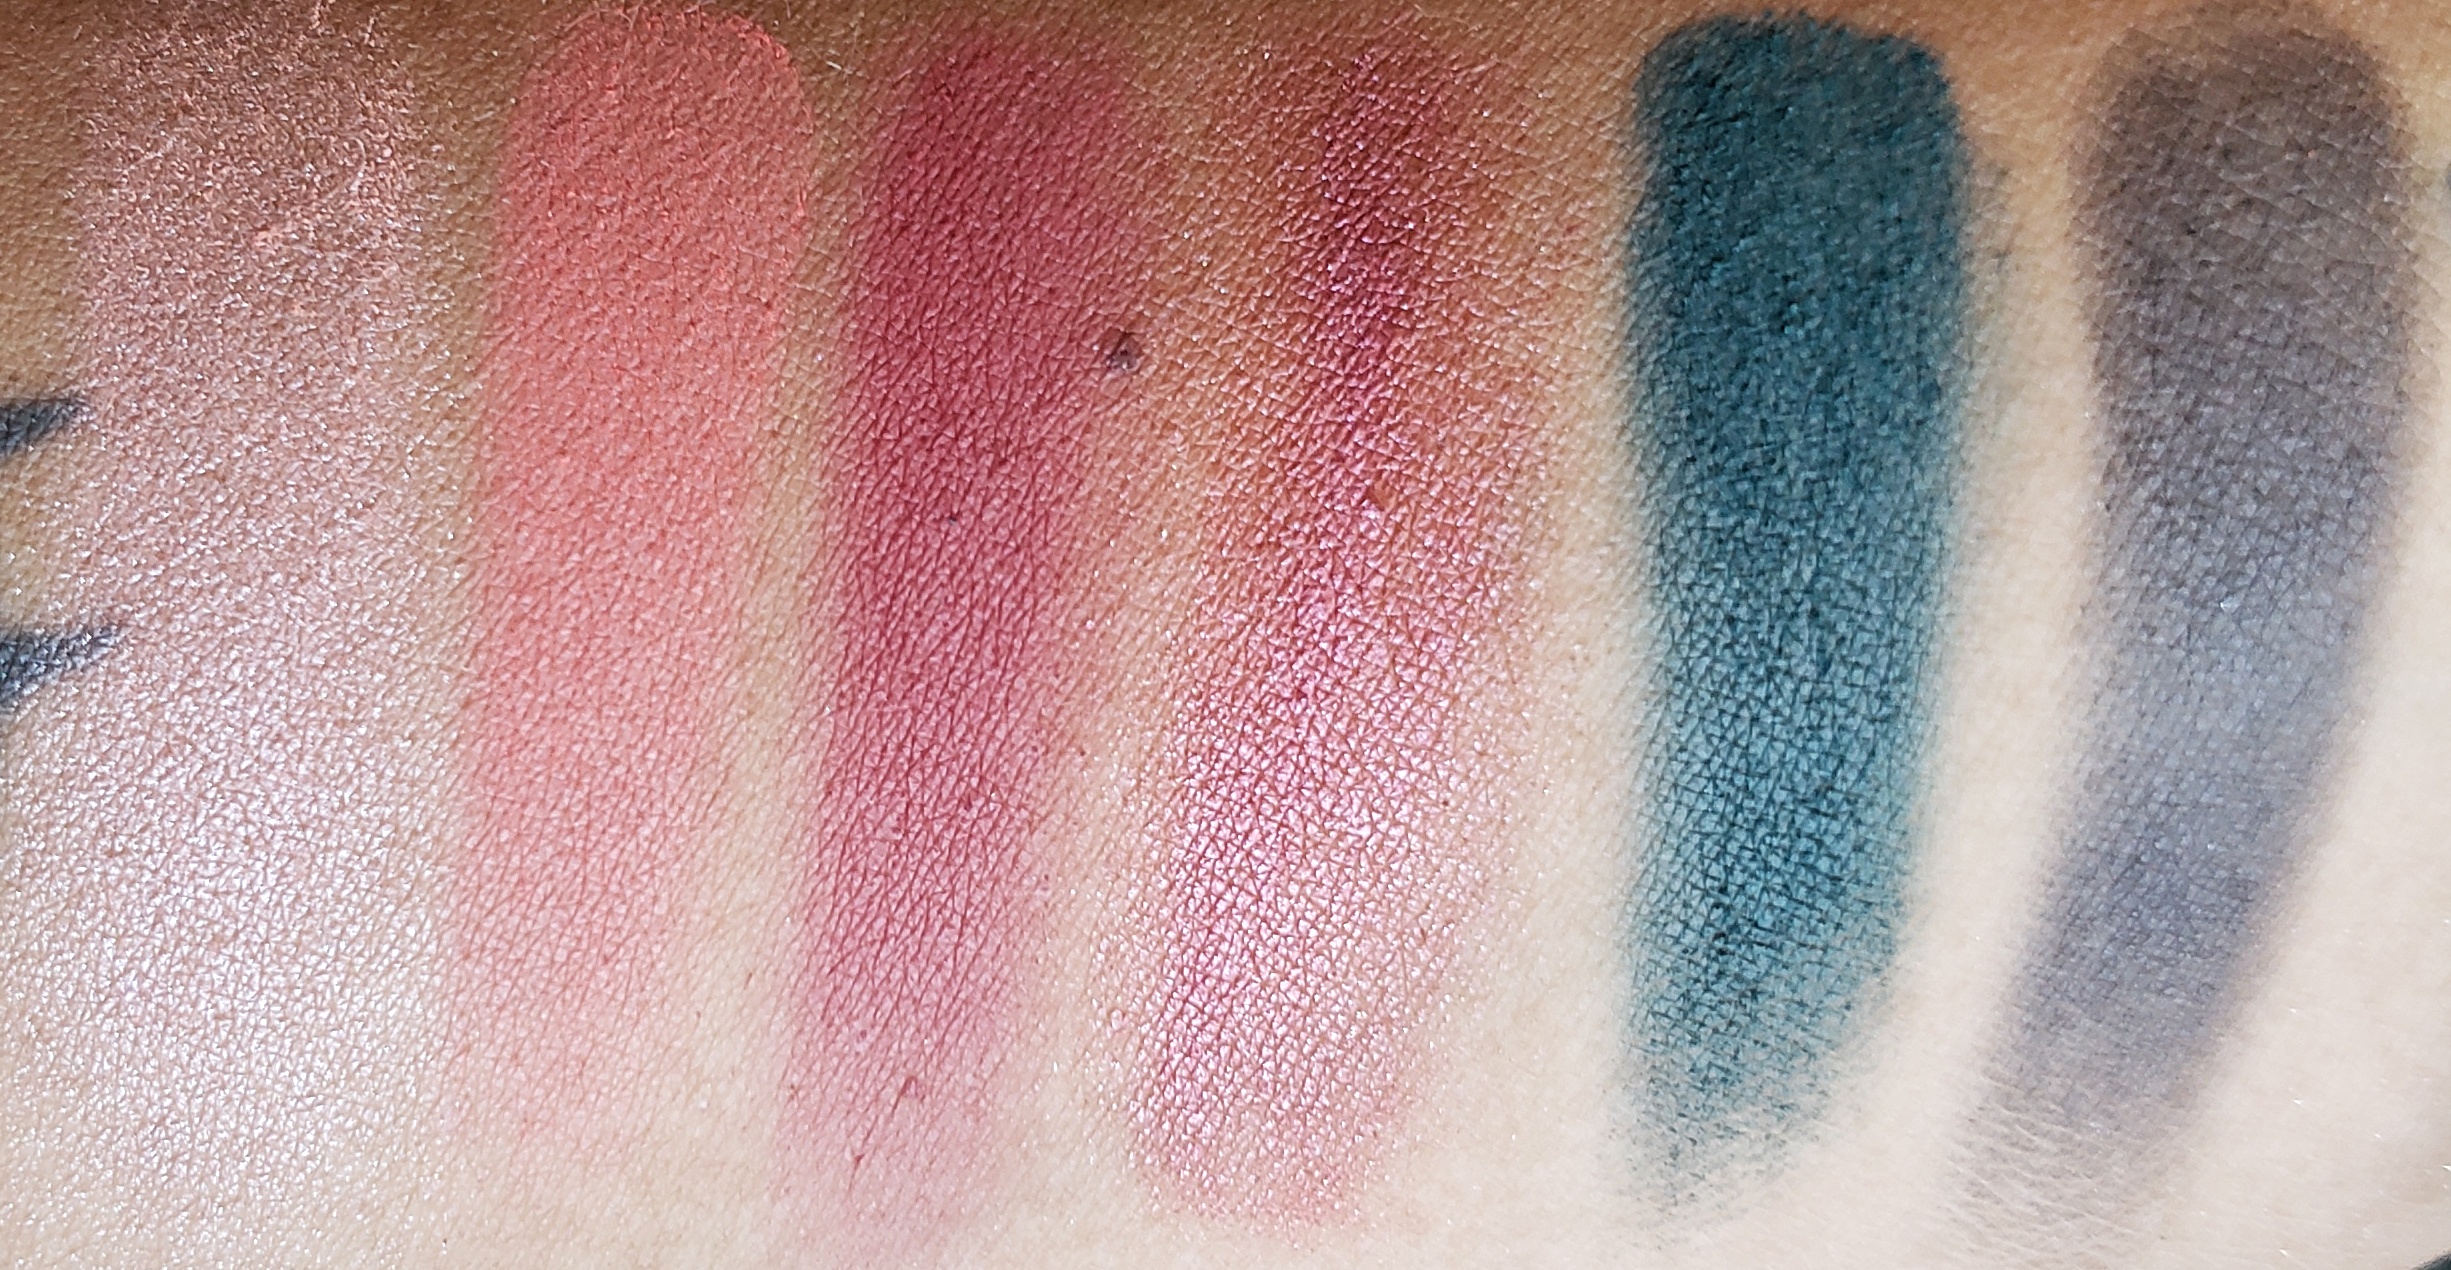
Like most of my makeup looks, I didn’t really give it any thought and just pulled at different cosmetics to create something I knew was functional and that I could use during the day. It seems like a really long time since I utilized my Milani Bella Eyes Gel Shadows, so I figured I would grab those and make use of them. Frankly, I just really wanted to use Bella Khaki – it’s such a gorgeous color and I just don’t use it as much as I should. If you are looking for a soft pop of color, a shade like Bella Khaki is gorgeous for that kind of look – it’s a gorgeous green with a light gold shift so it works really well with a bronze or neutral eye look.
Here are the products I used:
BROWS
Milani Stay Put Brow Color in Medium Brown – brow gel
EYES
Milani Eye Shadow Primer
Milani Bella Eyes Gel Eye Shadow in Bella Mandarin (transition shade)
Milani Bella Eyes Gel Eye Shadow in Bella Taupe (crease and outer v shade)
Milani Bella Eyes Gel Eye Shadow in Bella Bronze (Outer V and outer 3rd of eye lid)
Milani Bella Eyes Gel Eye Shadow in Bella Khaki (lower lash line – pop of color)
Milani Bella Eyes Gel Eye Shadow in Bella Cafe (lower lash line below Bella Khaki to blend and soften lower lash line color)
ColourPop Super Shock Shadow in Lala (applied and blended onto the eye lid)
Milani Bella Eyes Gel Eye Shadow in Bella Chiffon (inner corner of the eyes – highlight)
Milani Bella Eyes Gel Eye Shadow in Bella Ivory (brow bone highlight)
Milani Kohl Kajal liner (waterline/tightline and a thin line on the upper lash line)
Ardell Demi Wispies False Lashes
FACE
Physicians Formula Butter Bronzer in Light (to bronze up the face all over)
Milani Baked Matte Bronzer in Sienna (to lightly contour)
Makeup Revolution Shimmer Brick Radiant
Milani Baked Blush in Rose D’Oro
Milani Illuminated Face Powder in Amber Nectar (blended all over the face to give a soft glow and soften my makeup)
LIPS
Jordana Easyliner Lip Liner in Rock’n Rose
Jordana Modern Matte Lipstick in Matte Whisper
Jordana Modern Matte Lipstick in Matte Innocent
This eye look may require some additional layering, but it’s very easy to create and I love that you really can’t screw it up – it’s all about layering and blending. You can certainly use this look without lashes and it would still be very wearable for every day – but since my lashes are pretty much non-existent, well – it was a given that I pop some wispies on and call it a day.
** The photos were taken with my phone, so I hope they offer a good visual for anyone reading. Video also filmed with my phone.
That’s pretty much it. The look is simple and easy to create and like I mentioned earlier, I do have a video that walks you through the steps if you’re interested in learning how I did it. It’s a long one as I chat about my life at the moment and explain each step – so if you’re interested in hanging out with me, grab your favorite drink and watch the video embedded above or click here to watch directly on YouTube.
What about you… do you rock out a bronze look as summer season hits? Comment below and let me know.
xo
Disclaimer: Some of the products mentioned in this post were sent to me for review consideration over the years and some were purchased by me with my own money. All opinions are my own, 100% honest and unbiased as with anything on my site. Affiliate links are posted through out.
Valentine’s Day is a holiday filled with soft pinks and sweet kisses and as a tradition, each year I have created a Valentine’s Day look using the Too…
This is a Collaborative Post with Ulta Beauty, Style Hunters and Amazing Cosmetics After being in the Beauty Industry for quite a bit of years, I have…
I can’t believe Halloween is just a few short weeks away and I’m a bit stressed that I haven’t started on any makeup looks yet. I figured I would share some of my past Halloween Makeup Creations with all of you since many of them were posted on old blogs and hopefully spark a little inspiration and creativity for my looks this year.
Hawaiian Mermaid. This look took a little while to create, but it was fun and I enjoyed it. I am using pigments/mineral eye shadows to create this look, which I’m proud of since the shadows and lipstick were created by me when I owned my own Indie Cosmetic Company.
When creating a mermaid look – you can decide how much or how little you want to go and I opted for a dramatic look. I really think that the contacts I used made such a big difference in how it all came out for me.
Masquerade Mask – I really enjoyed created this look a few years ago. The object of this look was to use makeup to create a mask on my face instead of using a real one. I loved how it turned out and how simple it was to create. If you’re looking for a last minute costume, this can work in a pinch.
The Crazy Creepy Doll – This Halloween Makeup look will remind you of your childhood play things. So cute and sweet with a little twist. This doll has come back to play and haunt you. I had so much fun creating this look and doing the intro for the video which you can find here. As sweet and cute as she looks, she’s here to make your life miserable. Creating this look is simple – just do up your makeup with soft shades and then add some accessories that will make it scary. If you are planning to use a knife or similar, makeup sure that you have a fake or plastic toy one for going out in public.
Sexy Glamour Kitty is one of my favorite looks created over the years. It’s simple and with a little cat ears or leopard ears and some creative thinking, you can easily have a look for Halloween that is fun and fast to do. A gold smoky eye, bold vampy like lips and leopard spots – the look came together quickly and easily. This look was so popular it was featured on many sites, including Ipsy and you can find the tutorial for this look here on my old YouTube Channel.
What makes this Leopard Kitty looks so easy is that you can pull accessories like your favorite jewelry or wear that little black dress you love and a pair of sexy heels and the look will come together easily. Leopard ears are so easy to find and cost just a few dollars, so you have a quick costume that’s affordable to create.
Poison Ivy – This look was never fully completed for a tutorial, but something I threw together to utilize the red wig I had. I simply just drew vines with makeup and eye liners on my face, added green around the eyes and put in a pair of green contacts. The look came together quickly and easily. If you wanted to really make this look more realistic, adding ivy leaves as a crown or similar would make this look complete. When and if I should complete this look to where I wanted it to go, I will be sure to post an update.
This look is simple and you can use what you already have on hand. A red wig can also be purchased reasonably priced and you can add a long skinny black dress or tights with this look to finish it off and make it show stopping.
Sugar Skull – Dia de los Muertos Day of the Dead is one of my favorite looks that I have created over the years. I created this look using different cosmetic products – even the white face was created using the lightest color foundation I had in my kit. This look is one of my favorites because it allows you to be creative in your own and the designs never are set in stone – you can do whatever you choose. The tutorial for this look can be found here. I hope to create another version of this look this year utilizing different colors I’ve been wanting to try out.
Bonnie Parker – Bonnie & Clyde: This look was not done necessarily for Halloween. I created it as a part of the Bonnie & Clyde Movie Release and thought this was such a great one to share. It’s simple, easy to create and one of my favorites. With a soft smoky eye and a deep red lip – you are good to go.
Of course, props work when creating a look – so I opted for what we already had on hand… and make sure that you are not using a real gun while out in public. This look is still one of my favorites and the eye and lip look is something I’ve developed into my own and use often.
Sophia Burset – Laverne Cox, Orange is the New Black – the complete look and tutorial can be found here. This look was inspired by Orange is the New Black – which has become one of my favorite shows. Simple to create and easy to rock out. Creating a nice eye look, berry lips and putting on some scrubs will make this look complete. Don’t forget your plastic fork to comb your hair with.
Celebrity looks are easy to create and Halloween is all about a little fun and creativity anyway. The options are endless and there is so much you can do with makeup alone – even if it means a simple smoky eye.
Queen of the Forest Nymph – If you shop through my Halloween Stash, you’ll see I have my fair share of fairy wings and this is why. One of my favorite things are fairies and when I created this look, I wanted to really have something that I loved represented. Tutorial can be found here. This look is easy to create and really just takes a little imagination.
What makes whimsical creatures so fun to create for Halloween is that they are all about your imagination and what you can come up with. I wanted this Forest Nymph look to really stand out as someone in nature and by adding greens and gold I was able to really create that look that I was shooting for.
Dark Alice – Alice in Wonderland: This look was fun to create. I went for a gothic / dark vibe to create this look and all I did for the eyes was create a deep vampy makeup look and added black lips. If you are really stumped for a costume, something like this is really simple and easy to do. A full list of products used and tutorial can be found here.
Twilight the Autumn Woodland Fairy – a full list of products and tutorial on this look can be found here.
Regina The Evil Queen – Once Upon a Time: Quite possibly one of the favorites I have done over the years. This look is simple and I pulled out some of the clothes I already had as well as a crown and cape and then created the makeup to look that the character’s. This look was so fun and I enjoyed filming the intro for the makeup tutorial as well which I think really made it one of the most favorite videos I have created.
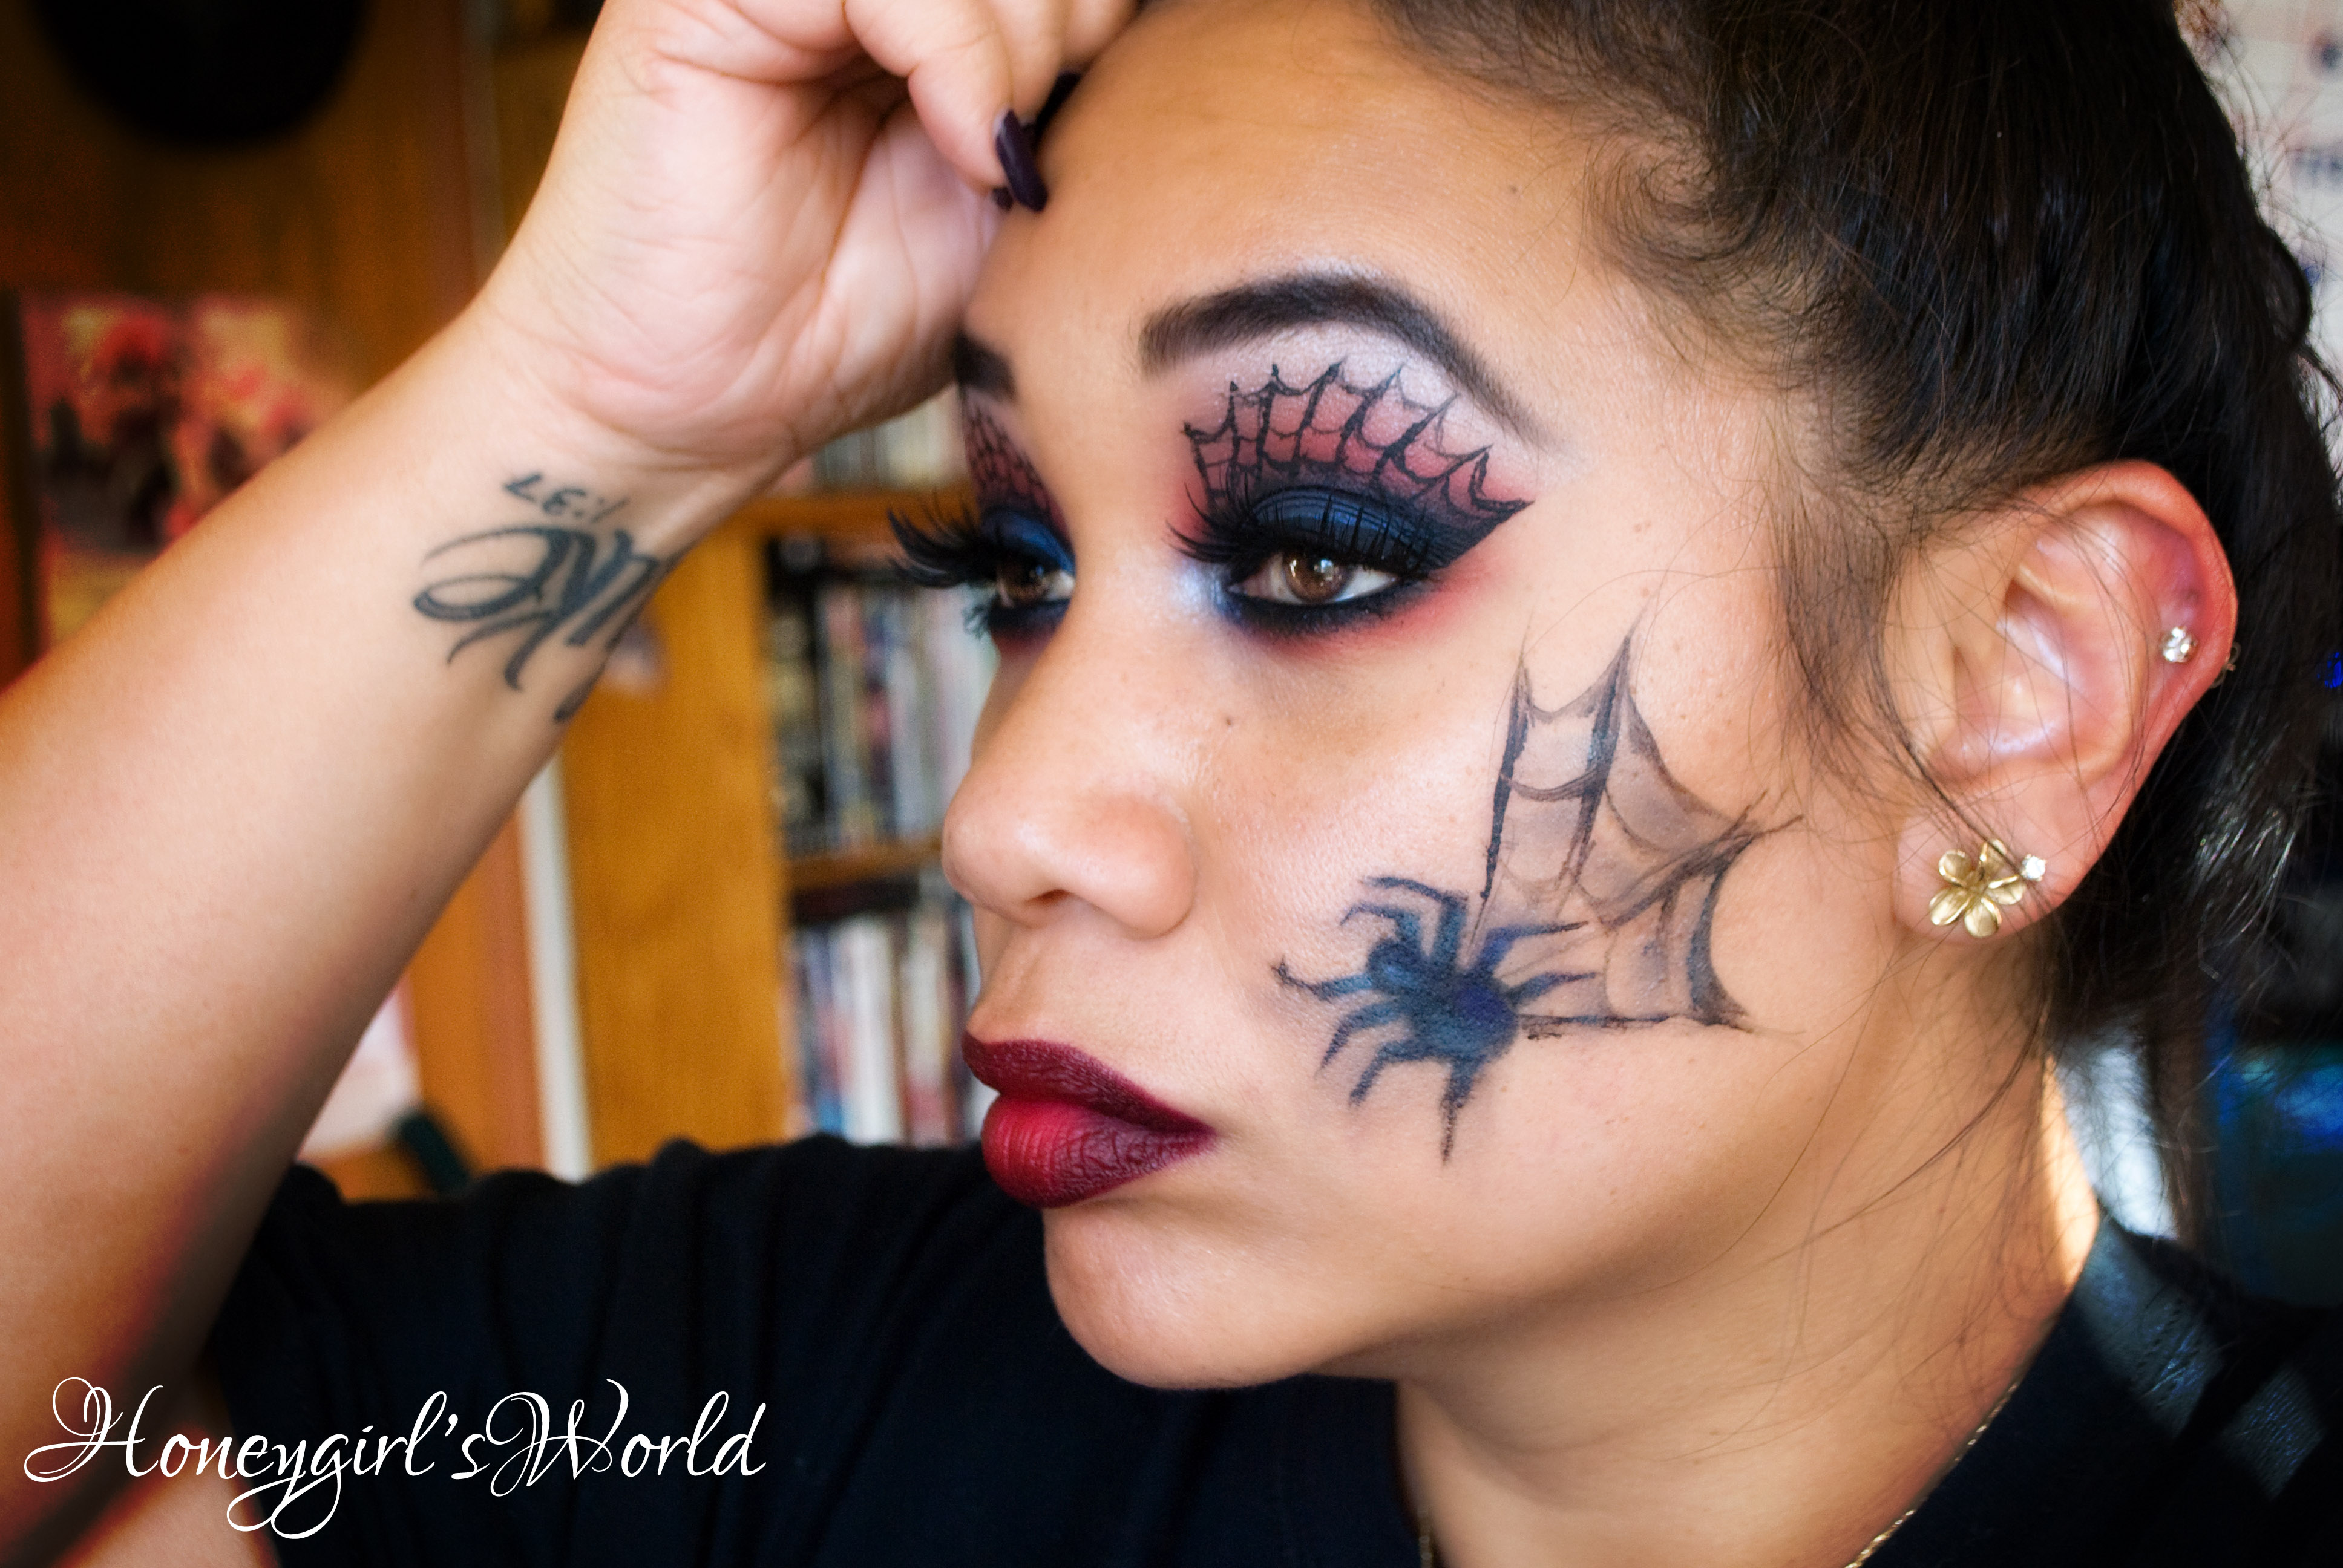
Amazing Spiderman inspired – This look was all about the colors and using them as inspiration for the eye look. The creepy spider on the cheek, well – that’s just the webbing on the cake… lol
Skull Mask – This look was my last minute creation for last year’s Halloween Day look. I’m not gonna lie… I did my eye makeup and realized I didn’t want to take it off or ruin it so I decided to plan my costume around it. Hey, it worked… it had the scare factor, but was a show stopper.
Halloween is about having fun and being creative and of course, all the candy you collect (thankfully I can still take part in that with my sons). Each year I enjoy creating looks that are either simple or unique and I wanted to share them with all of you. As a child my family didn’t have much money and I learned that by taking the tools we already had and a little creativity and we could have fun and awesome costumes. I’m very thankful that my parents instilled this into me, because I teach my children that same concept.
I hope to have some Halloween looks posted for all of you soon – I’m working on some ideas. In the meantime, I thought I would share some of my past ones and all the fun I had over the years. Have fun and enjoy yourselves, no matter the age and you will have a grand time. What are you doing this Halloween? Do you have a costume in mind? Which of my past Halloween looks are your favorites?
Thank you to Mary Kay® and SheKnows/BlogHer for sponsoring this post. I have been a long time Project Runway and Mary Kay® addict, so I was beyond ecstatic to have the…
Let me be real with you all for a second… when asked, “What is your no makeup makeup look?” I’ll straight up answer you with… “Um, no makeup – at all!”
But, It’s absolutely no secret that my every day makeup look (if I am using any makeup that is) is mascara and a lippy and on most days. Since I really do not use makeup, but I want to add a little sexy to the mix, I’ll pull out my big guns, my heavy hitters… my HG products. So today, in collaboration with a few gals from the Beauty Blogger Collab, I’m bringing to you my “no makeup” makeup look. This is what I put on when I need a little swag in my look, but still want minimal makeup. Of course, like I mentioned earlier – if you are looking for a look with literally no makeup, well – that works too 🙂
So let’s chit chat a little about what my no-makeup makeup look is. I definitely want to look polished and put together and it all starts with great skin and my skin care regime. To give me that fresh dewy look that I love, I make sure to cleanse, add my favorite serums like Hyaluronic Acid and Anti-Wrinkle serum and then finish with a great moisturizer. These products alone give me a natural glow and really freshen up my face and my look. It’s essential that I do this each day to keep a youthful appearance.
My basic and daily makeup products for me are mascara and lip balm so mascara and a lippy of choice is a definite must have. My lashes are really short, so if I have clear eye lash glue on hand, I’ll slap on a pair of flirty false lashes, but today I opted for a few coats of mascara to help open up my eyes. Since I have my eyeliner tattooed, adding mascara to my lashes not only opens my eyes more but also enhances my tattooed liner and makes my lash line look fuller. My lips are another thing… if I am not pulling for a colored lip balm, I’m reaching for my favorite nude lippies to help enhance my pout. Usually my no-makeup look would stop there, but if I want to add a little something extra, I’ll add a blush, highlight and a light contour. Applying these with a light hand are key to get that sunkissed and radiant look that adds a little to your makeup but keeps them guessing if you have anything on.
Here are the products I used on my look today:
Brows – For my brows, since they are shaped fairly well and are full, I used my NYX Control Freak Eye Brow Gel. (Review here) I swept this product over my brows to set them in place for the day.
Lashes – Since I have short lashes, I like to layer certain mascaras to make my lashes stand out without false eyelashes. Today I used my Covergirl Super Sizer mascara layered with Benefit’s Roller Lash. These two lashes paired together help to give me some length and volume without looking spidery or clumpy.
Lips – One of my absolute go-to lippies for an “every day” or no-makeup look is MAC’s High Tea. This lipstick is the perfect nude with a gloss texture and offers the perfect color to compliment my pout.
Bronzer – To add a little warmth, a light bronze and some subtle contouring I used Laura Geller’s Bronze-n-Brighten Baked Color Correcting Bronzer in medium. Using a domed bronzing brush I light dust this all over the areas I want to give a subtle bronze look. It’s not about contouring but more about a light definition.
Blush & Highlight – For a little color to my cheeks and a soft highlight I used my Laura Geller Blush-N-Brighten in Como. This combination has a blend of pink and gold to offer the perfect amount of color to your cheeks and a gorgeous peach gold highlight so the sun looks like it is perfectly kisses your cheeks. With a fluffy brush I lightly dust this on the applies of my cheeks and blend onto my cheek bone.
Set your makeup – To set and put that nice dewy look back into my face, I spritz on one of my favorite facial sprays. Today I used my Evian Mineral Water Spray. Since it is warm, this is perfect to cool me down but also give my makeup that effortless, no-makeup look.
My normal “no-makeup” makeup look is pretty easy and simple to create but it puts a little pep in my step and still gives me that “put together” look without using too much. If I go with a basic look (mascara and lippy) or add a little blush, bronze & highlight – it’s something you can definitely see me rocking out most of the time. If I were asked what my go-to look for Summer is, this is it.
So what are your favorite go-to’s to create that “no-makeup”? When I say “no makeup” I mean it, but sometimes we could use a little style and flair to our look, don’t you think? Be sure to stop by and check out the links below for the no-makeup makeup looks of the lovely ladies from the Beauty Blogger Collab.
Smooches! xo
Disclaimer: There are affiliate links through out this post. Some of the products mentioned or discussed may have been sent to me as Press Samples over the years but nonetheless, all thoughts and opinions are my own and 100% honest & unbiased.

")