From four leaf clovers to large pots of gold… Saint Patrick’s Day has been filled with fun for all – not just the Irish. While I believe that a persons’ luck comes from hard work, I also believe in good luck as well… and you can still find me searching for a four leaf clover or wondering if there really is a pot of gold at the end of that rainbow. In years past I have celebrated with fun makeup looks and bold bright greens but this year, I wanted it to be something anyone could wear… a look that was simple to recreate but still offers a statement. Today I bring to you my St. Patrick’s Day makeup and nails, in collaboration with the beauties from The Beauty Blogger Collab. Be sure to stop by and check out all the pretty looks these ladies have created and show them some love too.
I filmed a tutorial for my eye look which you can find here, or check out the video embedded below. The steps are easy and I’m using a mixture of drugstore and high end product to create it.
A full list of products is posted below! Remember to use the products you have on hand that are similar in shade or adapt the look and taper it for you specifically.
Brows – Jordana FabuBrow Eye Brow Pencil in 05 Soft Brown and set with NYX Control Freak Eye Brow Gel
Face – Pacifica Alight Multi-Mineral BB Cream
Eye Shadow Primer – Milani Eye Shadow Primer
Eye Shadows – Milani Bella Eyes Bella Caffe (transition), Milani Bella Eyes Bella Taupe (crease shade), L’Oreal Infalliable Shadow Amber Rush (lid shade), Colour Pop Shameless (lower lash line and outer v / outer crease), Milani Bella Eyes Bella Emerald (outer v / outer crease)
Eye liner – Milani Supreme Kohl Kajal (waterline/tightline), Kat Von D Tattoo Eye liner in Trooper (winged liner), Smashbox 3D Always Sharp liner in Billionaire (upper lash line used above the black winged liner for a pop of color)
Lashes – Cover Girl Clump Crusher Mascara (upper and lower lashes), Ardell Demi Whispies 120, KISS Aloe Black Glue
Now, wasn’t about to leave out my nail loving friends. We all know I’m a bit nail art challenged, so I went with what I know. To create this simple nail look, I used China Glaze Rare & Radiant which is a Color Shift / duo chrome type of polish that goes between green and gold with a slight blue hue. I topped that polish off with ILNP’s Supernova flakies polish to add to the crazy green and gold effect. If you are a bit nail art challenged as I am, I think something simple like that will work. It kind of reminds me of Mardi Gras. lol
I hope you guys enjoyed my inspired makeup and nail look for St. Patty’s Day. I wanted both to be easy to create for anyone and you can’t go wrong with something that takes a few minutes to complete. Don’t forget to stop by my video and check out the tutorial for the makeup look if you haven’t already – you can find that here. Stop by my Instagram and keep up with me there for new photos, posted daily and be sure to say hi on Twitter and Facebook too.
For more inspired makeup and nails – be sure to check out the links to the lovely ladies below and see what kind of awesome they have waiting for you too.
It’s no secret that I’m a romantic at heart and I’m pretty lucky to have found a fairy tale love “Happily Ever After”, which is something people search…
Roses, candy, kisses and love… sweet nothings and candle light are all things that remind me of Valentine’s day. Each year I look forward to creating a…
Seriously, where did the year go? I can’t believe I’m sitting here at my desk typing a post about New Year’s Eve Makeup and I could have swore I just did this a year ago. lol All kidding aside, it has been quite a year of reflection, positive and negative changes in my life and everything in between, but I eagerly welcome a new year filled with its many blessings I call life. Today I bring to you a New Year’s Eve Makeup Tutorial in collaboration with some of my gorgeous friends from The Beauty Council. Many of us are including some gorgeous products from Mirabella Cosmetics, so I’m so eager to see all the different creations that the ladies put together. Without further adieu, let’s get with it!
For New Year’s Eve looks, I usually will add in something blue or silver, but this year I decided I would use blue and gold as accents in my look – more so for my outfit. My little sister Harmony found me the perfect scarf that is not only fashionable but cozy and warm. Since I figured out the accessory for my look, I opted to go for a romantic look featuring warm bronze and brown shades and created a smoky, sexy, sultry eye look with nude lips to compliment my scarf.
For those of you that are looking for an eye look that will have a bold statement without having a bold color like blue or silver shadow, I think this would be a great look. Check out my video tutorial embedded below or click here to watch directly on YouTube. All products used as well as photos are posted below.
Don’t forget to Subscribe and Comment if you liked this video! 🙂
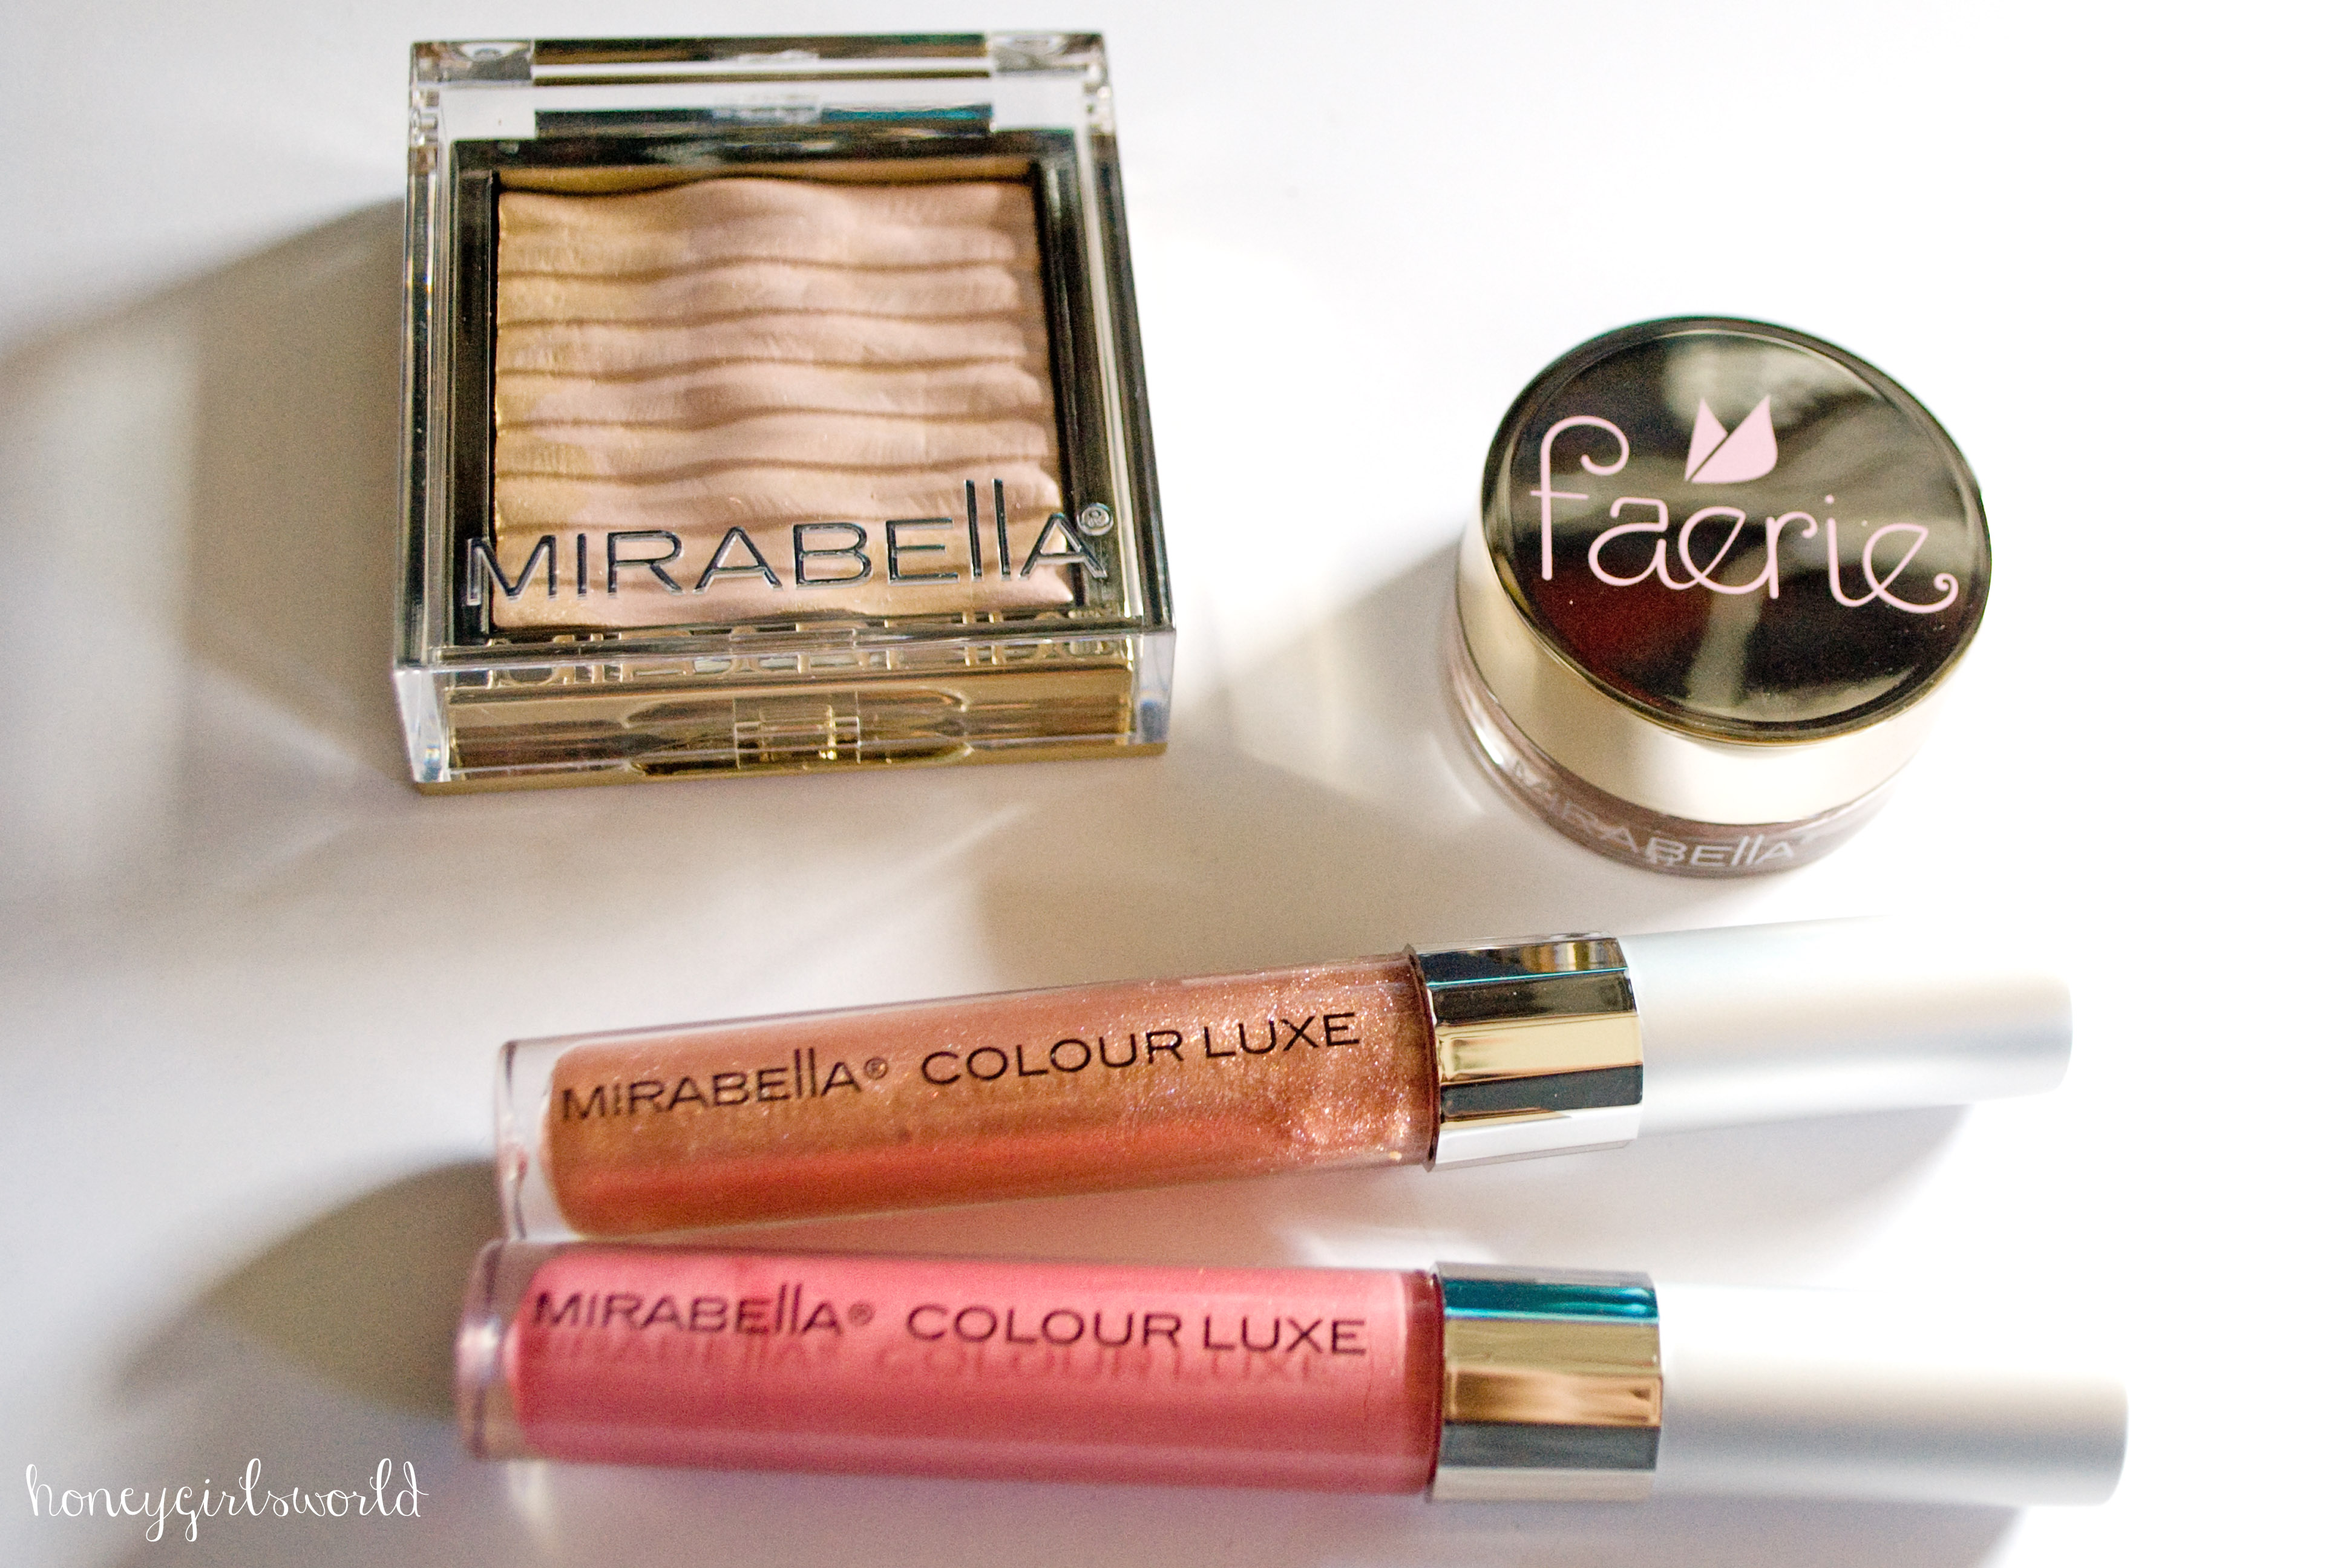
Lips: Jordana Easy Liner lip liner in Rock n Rose, Maybelline Creamy Matte lipstick in Daringly Nude and topped with Mirabella’s Lip Gloss in Luminosity.
With a soft sultry look like this one, I wanted to make sure that I had products that would add a little sexy and these products from Mirabella Cosmetics are perfect to complete the look.
Luminosity Colour Luxe Lip Gloss- retails for $26 USD
Myth Visionary Long Wear Eyeshadow- retails for $29 USD
Swirling Pearl Brilliant Highlighting Powder- retails for $40 USD
My goal for this look was to ensure it would be easy to create, but that it would last through the Holiday festivities. Eating, drinking and talking… sipping on some Crystal… spending time and popping fireworks with our children. I paired this look with a soft nude lip because I knew it would be low maintenance and easy to reapply if needed. I also wanted to add warmth and drama to the eyes. This sexy smoky eye is easy to achieve but definitely something that will work with all eye colors and add some sexy to your New Year’s Eve look.
Happy Holidays and Happy New Year to all of you from my house to yours! 2014 has been a fabulous year and I’m so thankful for new blogger friends, YouTube friends and everyone for their support on my blogging and vlogging journey. Thank you from the bottom of my heart <3 Best Wishes to all of you for a fabulous 2015 with many blessings and lots of love!
xo
Don’t forget to stop on by the other links posted below… check out what some of my girls from The Beauty Council put together for New Years Eve Looks too!
DISCLAIMER: Some of the items discussed in this post were provided to me for review/consideration/use and are Press Samples (Mirabella Beauty Cosmetics). Any opinions or thoughts on the items are my own and unbiased. My thoughts have not been swayed in order to receive free product. The rest of the products were purchased by me.
On Halloween I did a makeup look that really sparked a lot of interest… woohoo – it’s nice to do something right for once. lol I was actually rushing through the eye look so I could do the skull makeup look but the eye makeup look is what caught the attention of everyone and I was asked to do a tutorial. Now mind you, I’ve been sick pretty much since Halloween, so I haven’t had the chance to really get the tutorial up and when I finally decided to get it going… it turned out much longer than I would have liked. But, oh well – I digress and move forward. So since I was feeling like I needed to put some makeup on, I decided to “dress my face” – see what I did there? And, now… onto the tutorial. It’s a long one because I am chit chatting and talking through all the steps. Click here to watch directly on YouTube. All details on the products used as well as photos are posted below. I hope you all enjoy this Fall Berry Smoky Eye.
Hope you liked my talk through – now onto the photos and all the details.
Products used:
Coastal Scents Step One Eye Primer
Anastasia Beverly Hills Tamanna Dress Your Face Palette – Sangria (used in the brows and on the lid), Bengal (used as transition shade), Chocolate (used in the crease), China Rose (used on the inner third of the eye lid), Noir (used to deepen the outer V), Fresh (used to highlight the browbone) and Venezia (the pop of color used on the inner corner of the eyes).
Anastasia Beverly Hills Amrezy Palette – Iridescent Purple (used on the brows as well as the lower lash line), Legend (used to highlight my cheekbones).
In the original eye look for Halloween, I used a blend of Sangria (Tamanna) and Iridescent Purple (Amrezy) but for this specific tutorial I only used Iridescent Purple. So sorry about that, I just wasn’t feeling well and forgot to add Sangria.
Tarte Smolder-eyes Pencil in Fig (used as a base for Sangria and applied on the lower lash line)
Jordana 12 Hour Made To Last Liquid Pencil Liner in Black Point (applied to waterline/tightline)
New York Color (NYC) Liquid Eye liner in Black (used to create the winged liner)
Jordana Best Lash Volumizing Mascara (upper and lower lashes)
Kiss EZ Lashes in 11 – false lashes
NYX Matte Lip Cream in Istanbul (applied to my lips)
Paula Dorf 2+1 For Brows (used to create the shape and define the tail and arch of my brows)
I know I said this earlier but this look is very easy to create. It’s just about layering colors, color placement and of course the colors you choose. While I didn’t get a chance to do so – you can certainly pair this look with a darker lip shade like a berry or wine or even a nice berry pink. Nude was the choice I went with because it was right within my reach and I wasn’t feeling very well, otherwise I may have chosen to go for a berry shade myself.
Now for the fashion sense, I wasn’t feeling quite well but I do what I always love to do during the Fall and Winter months and that’s throw on a beanie or scarf and rock it out. On this day I decided a beanie and a pair of gold hoop earrings would suffice. I also have on a t-shirt… adorned with big bold letters that describe me to a “t”. lol
My shirt was custom made by me at HICustom.com in their design lab. I’ll be sure to have more information on the brand and about the company in a later post. I’m using a pair of jeans – which is my go to during the colder months.
I hope you guys enjoyed this super easy look. I will have a review on the Tamanna Palette coming soon so stay tuned for that. Wishing you all the best of these chilly months to come. xo
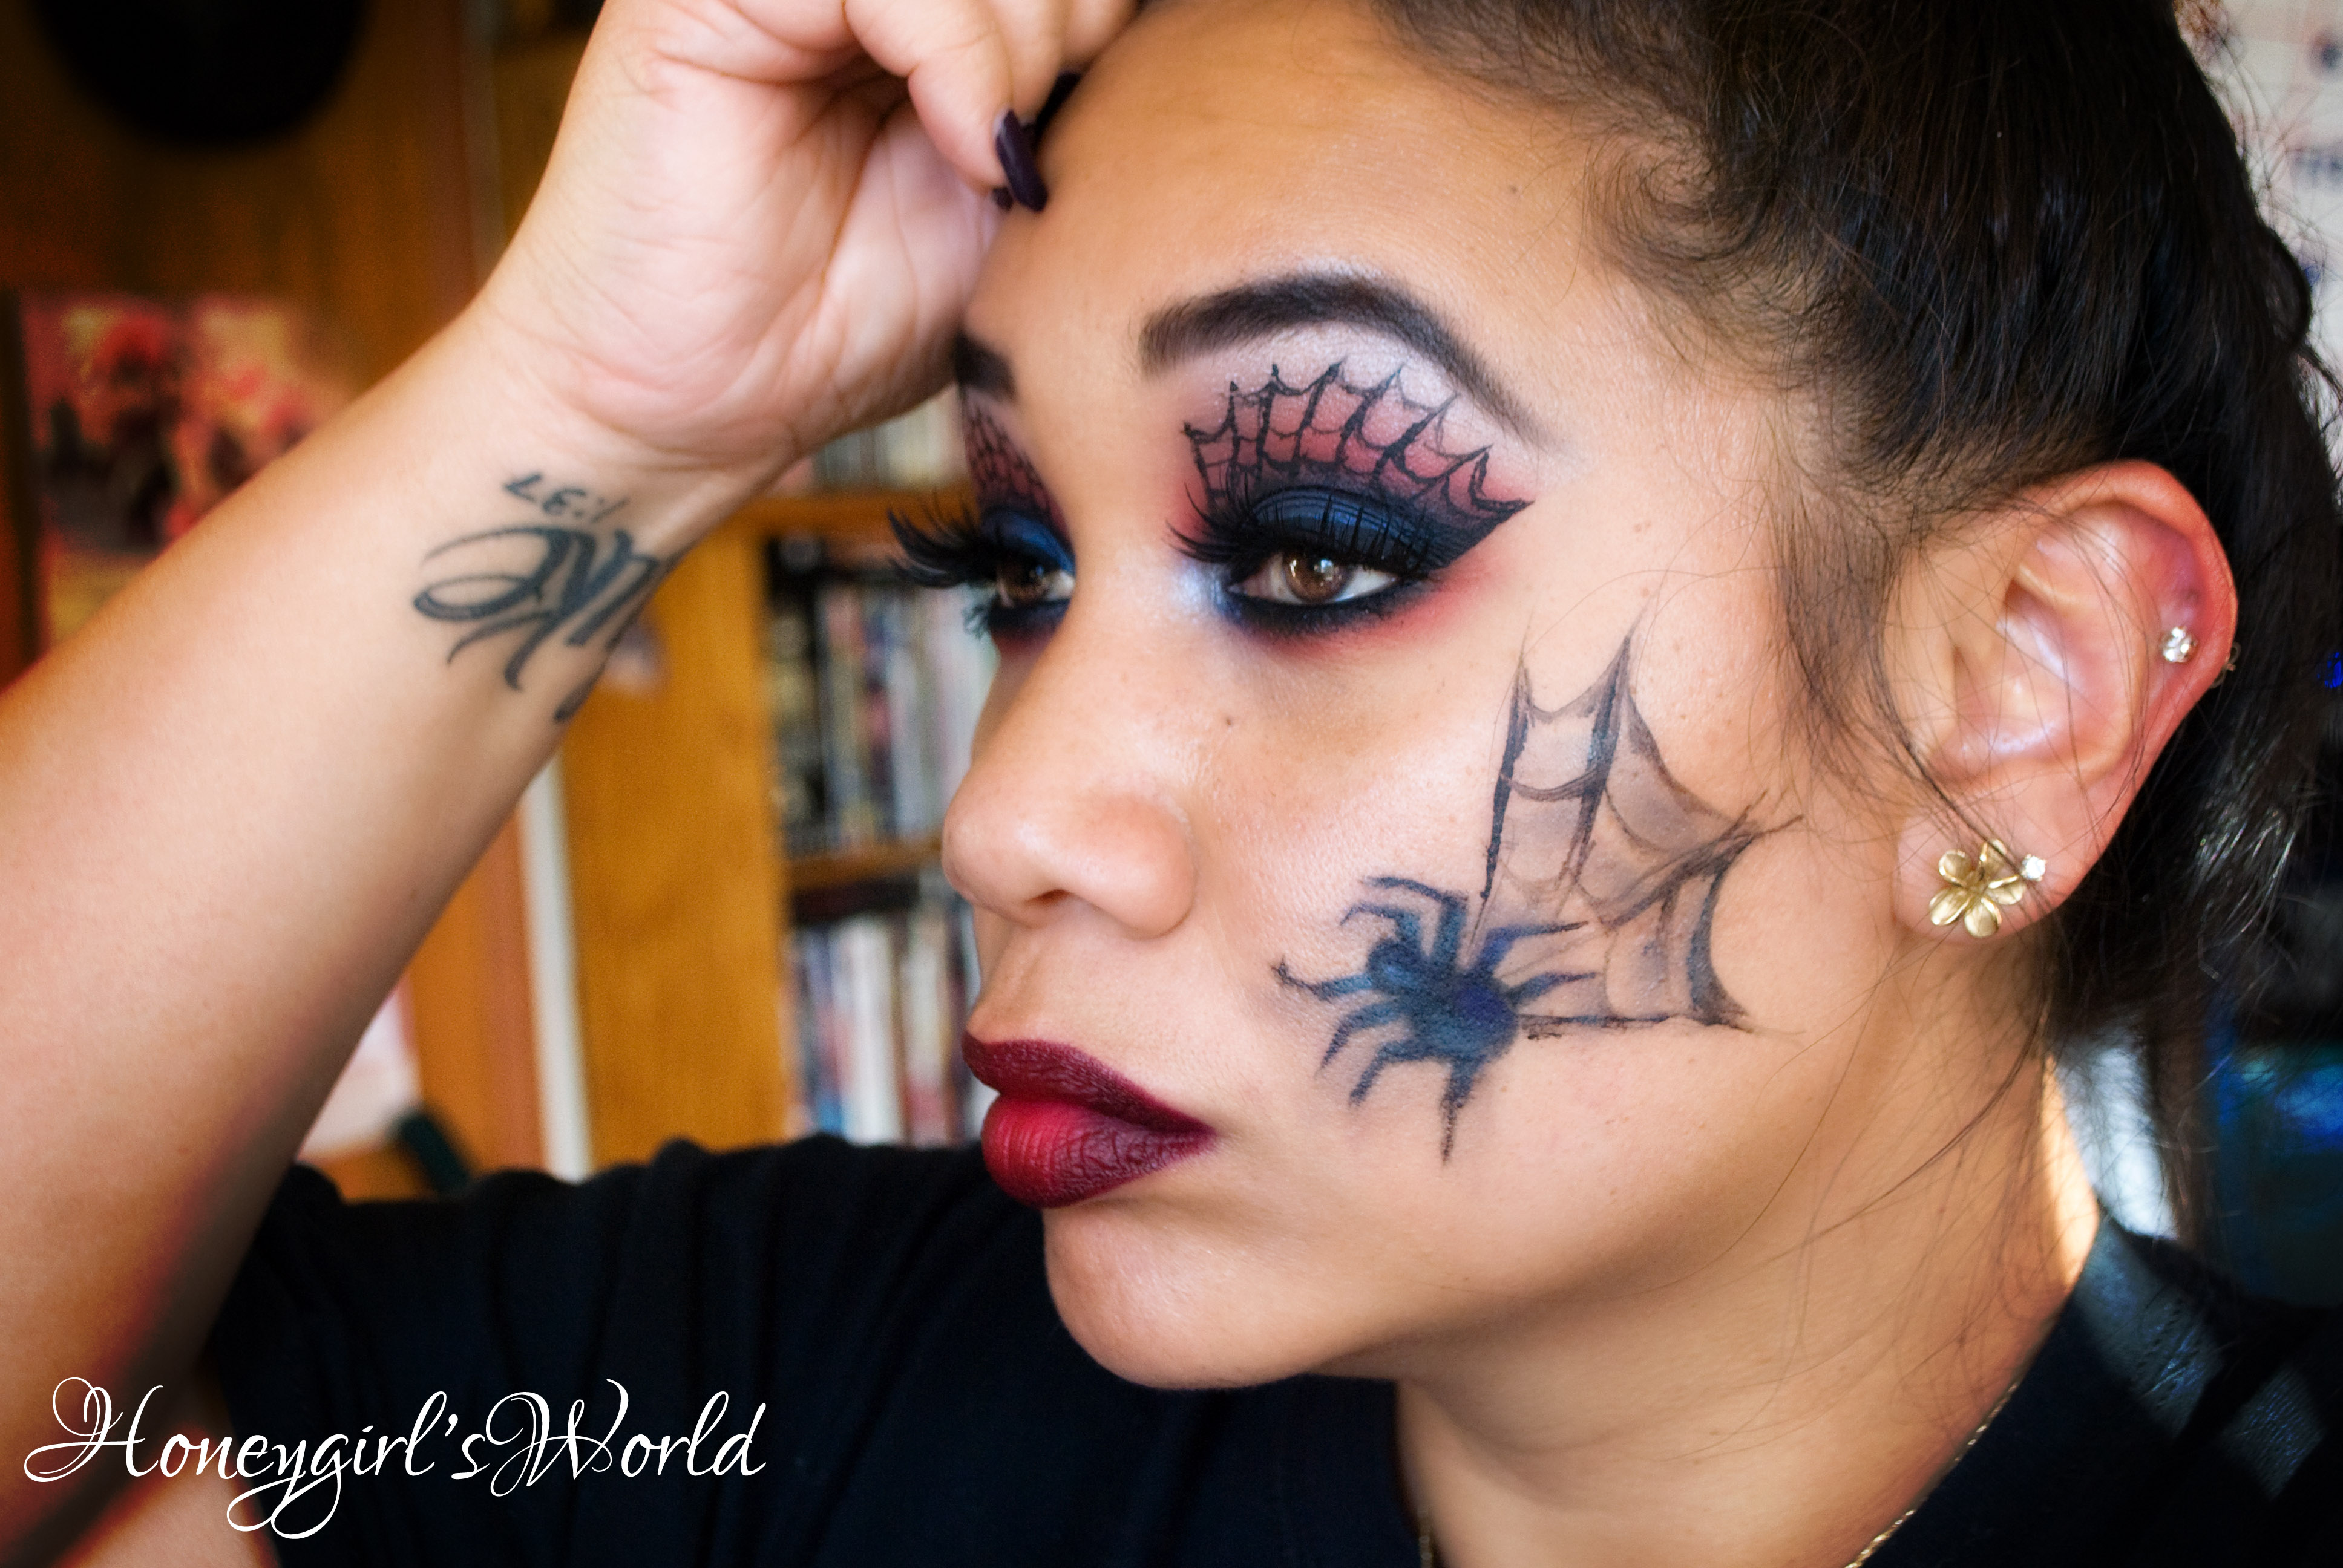
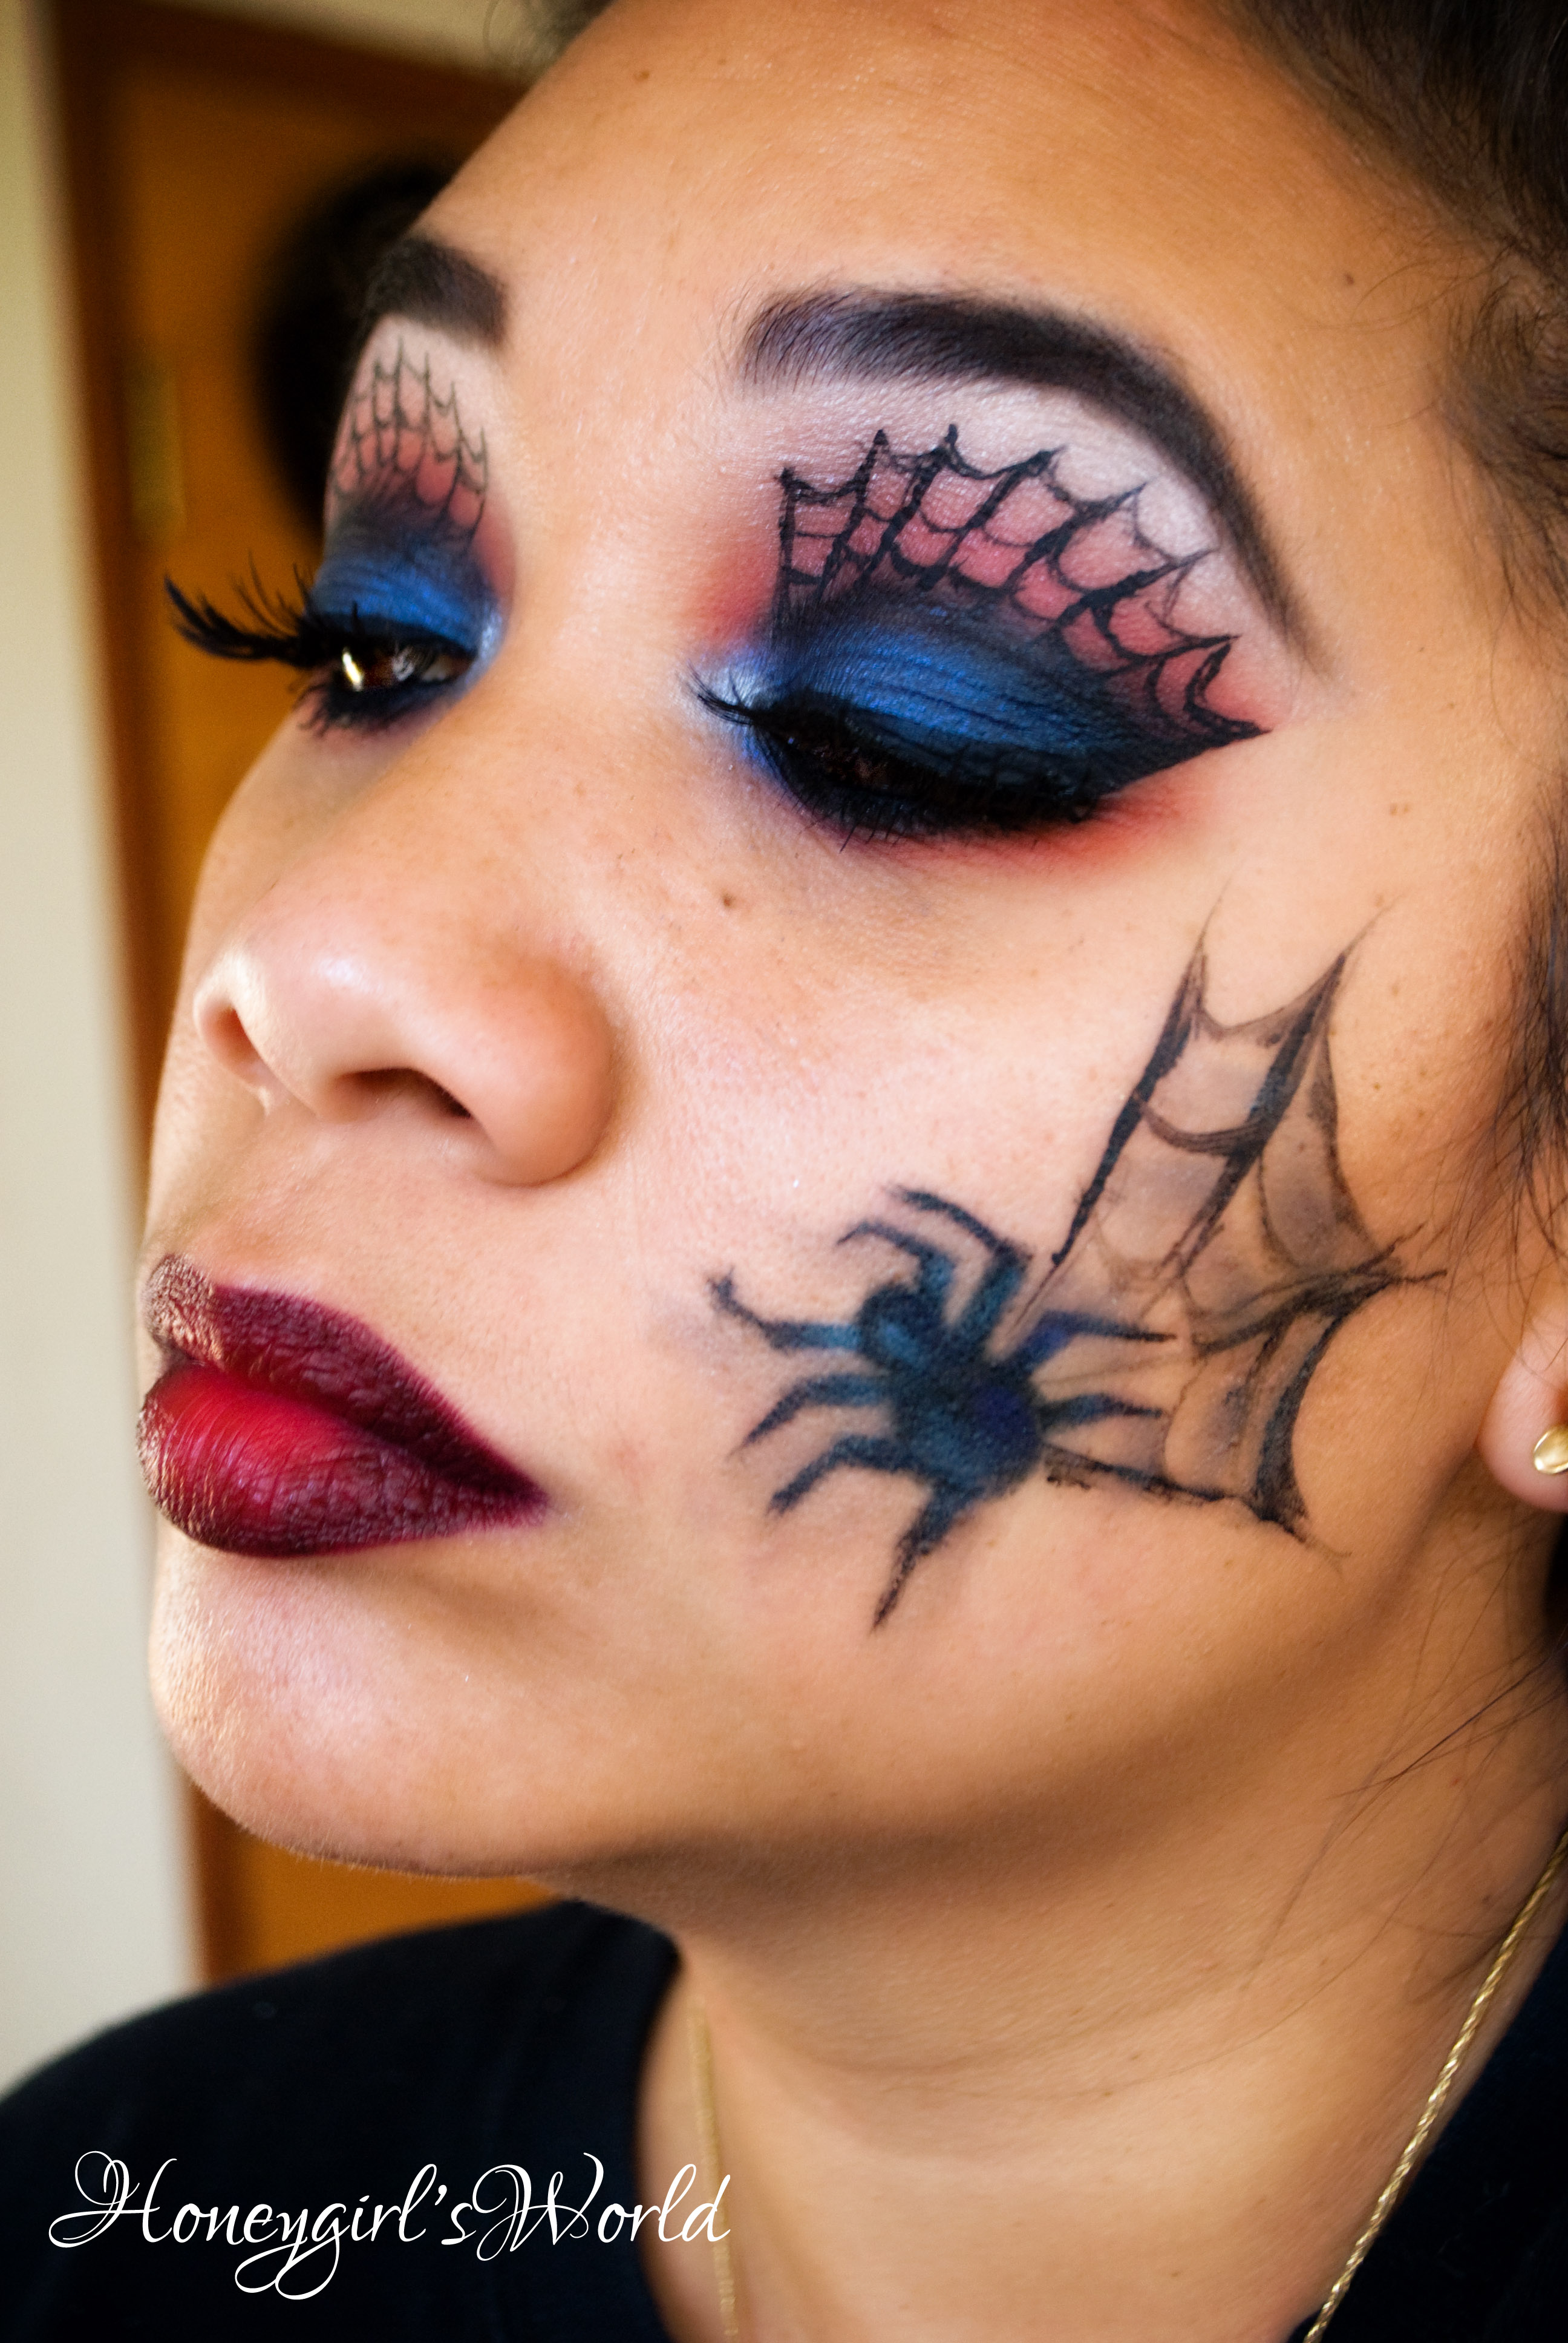
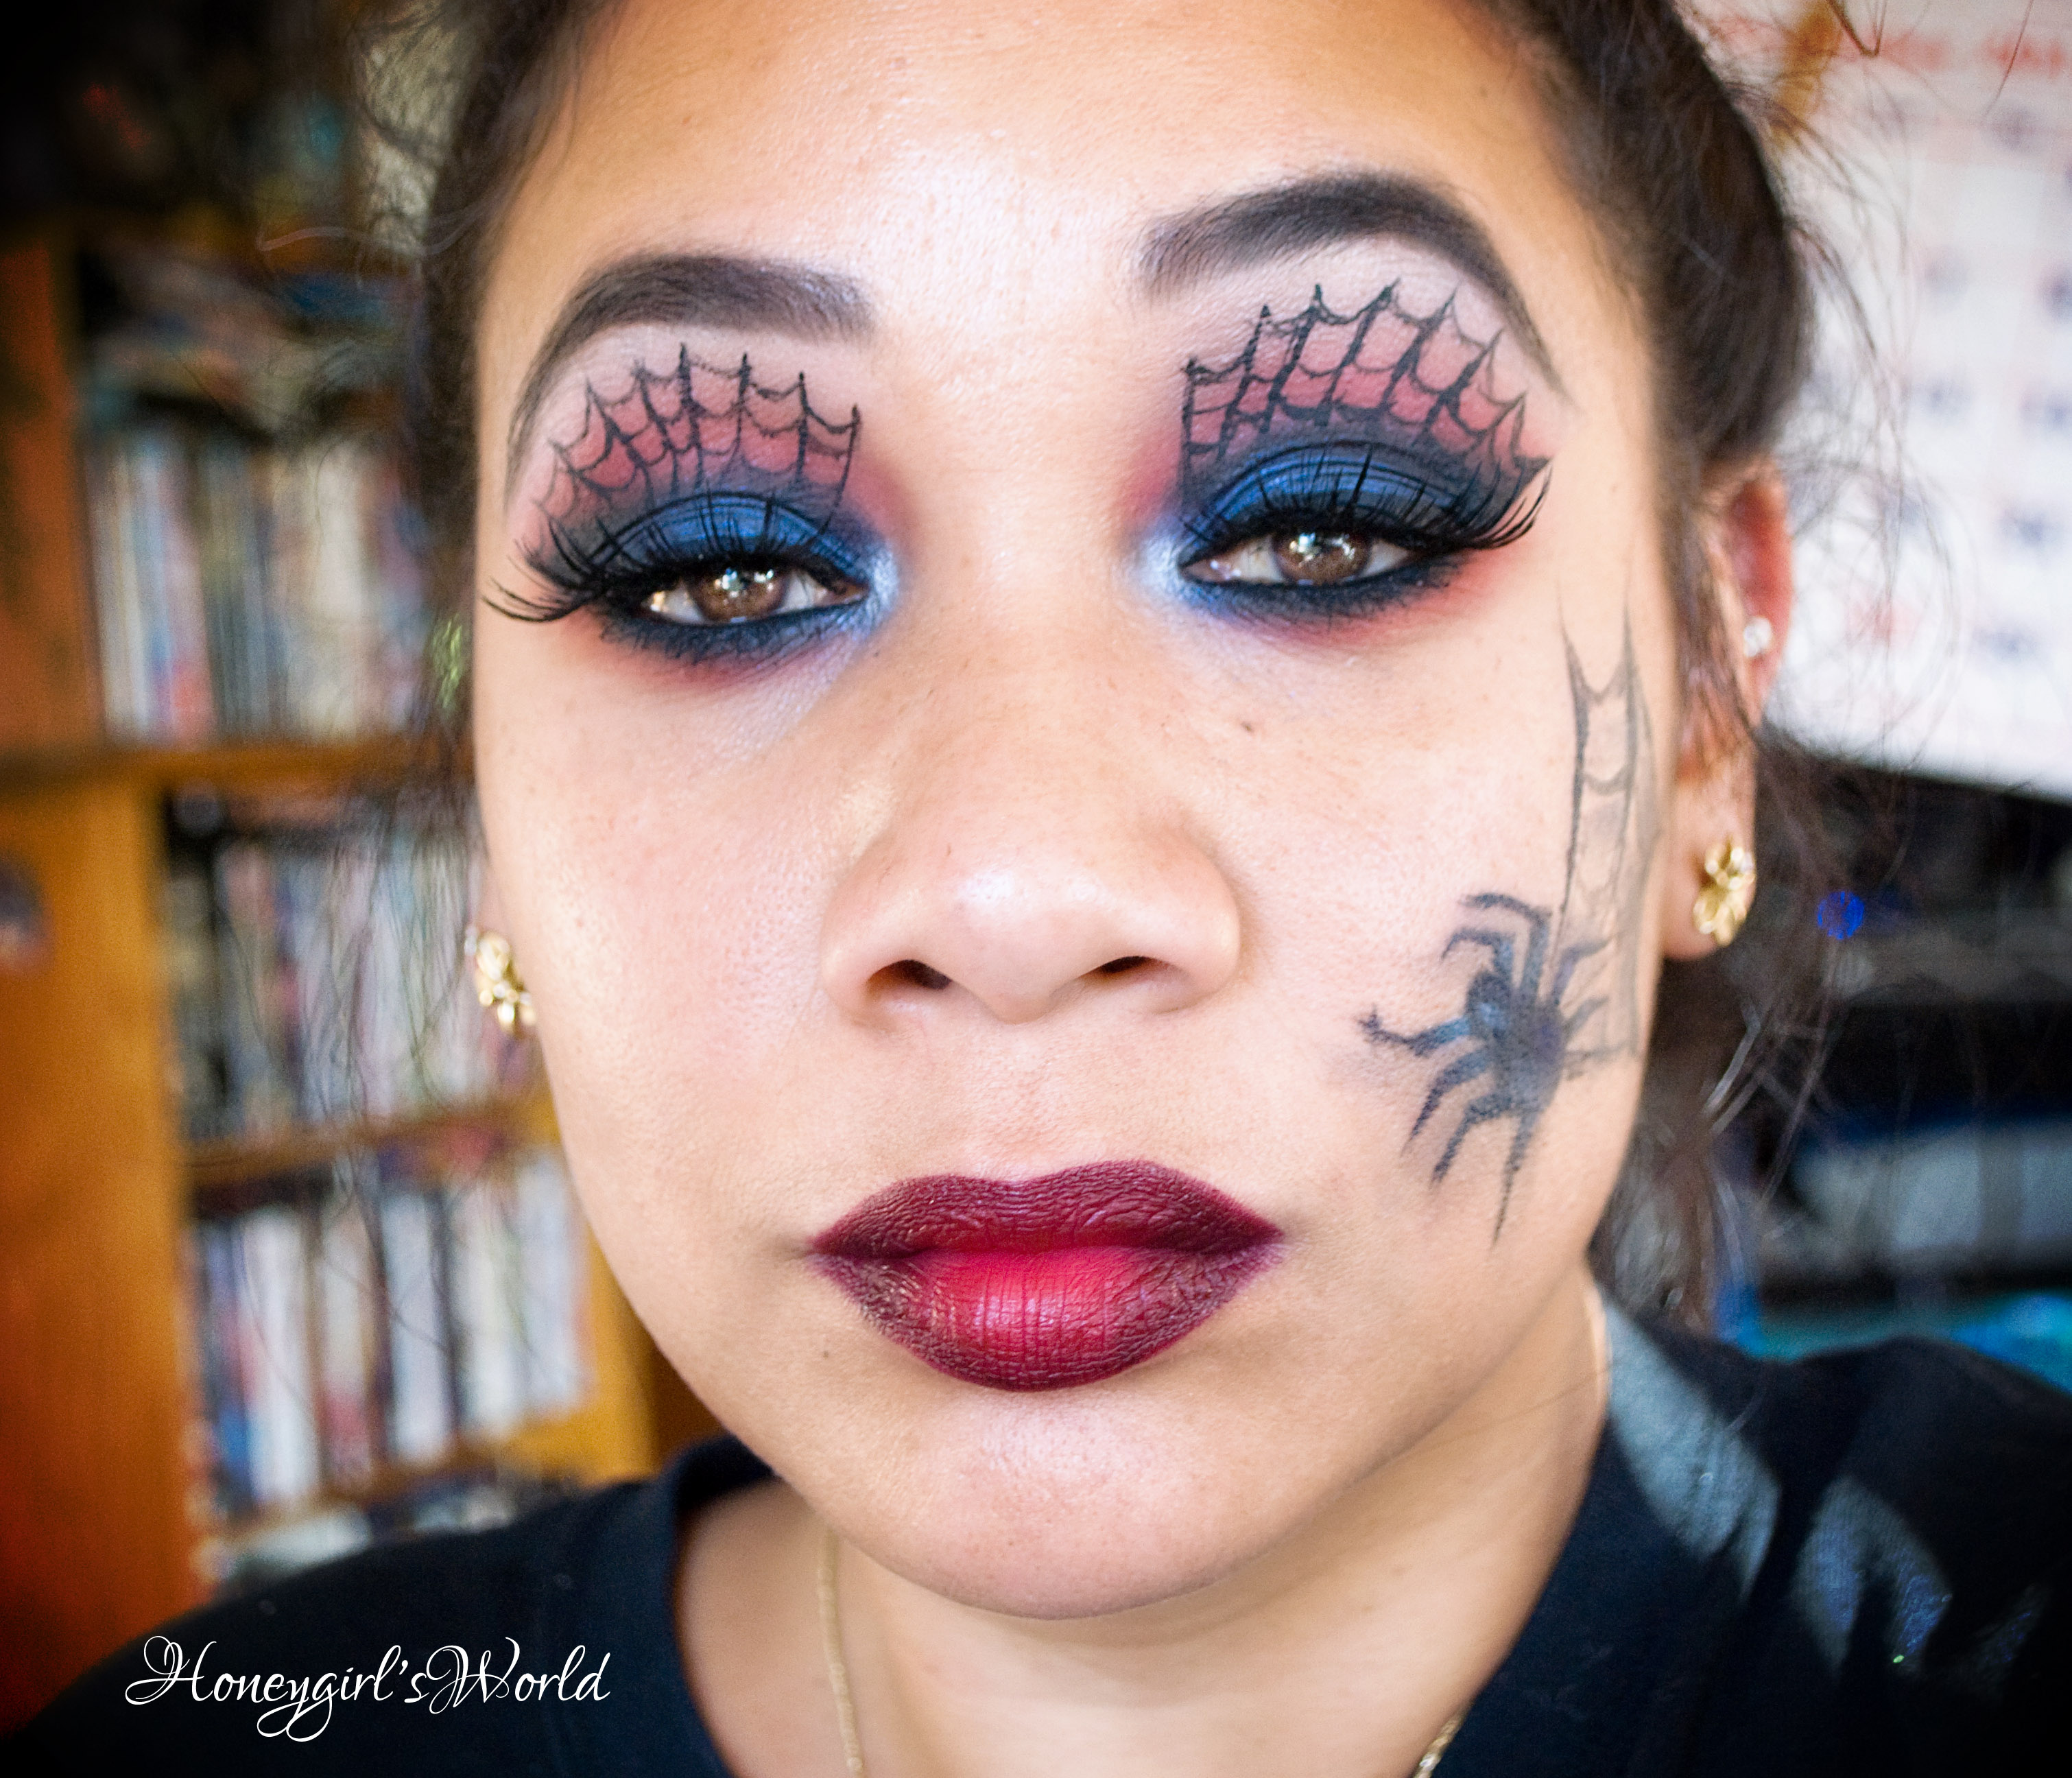
Everyone pretty much knows I live in a house filled with guys… between my husband and three sons, I’m a bit out-numbered. While the guys in my life are very understanding about my makeup obsession, they also inspire much of what I create. The other day while talking to my sons, I decided I would do an Amazing Spiderman inspired makeup look. My sons have named me Spider girl. The look is easy to create as it is all makeup I have in my stash and a good liquid liner to allow me to create the web. I didn’t film a tutorial on this look but figured I would share it since it came out pretty good for my first time doing something like this. I hope you enjoy it as much as my sons and I did. Considering we are a Marvel comics family, I think I did pretty okay for my first try. lol
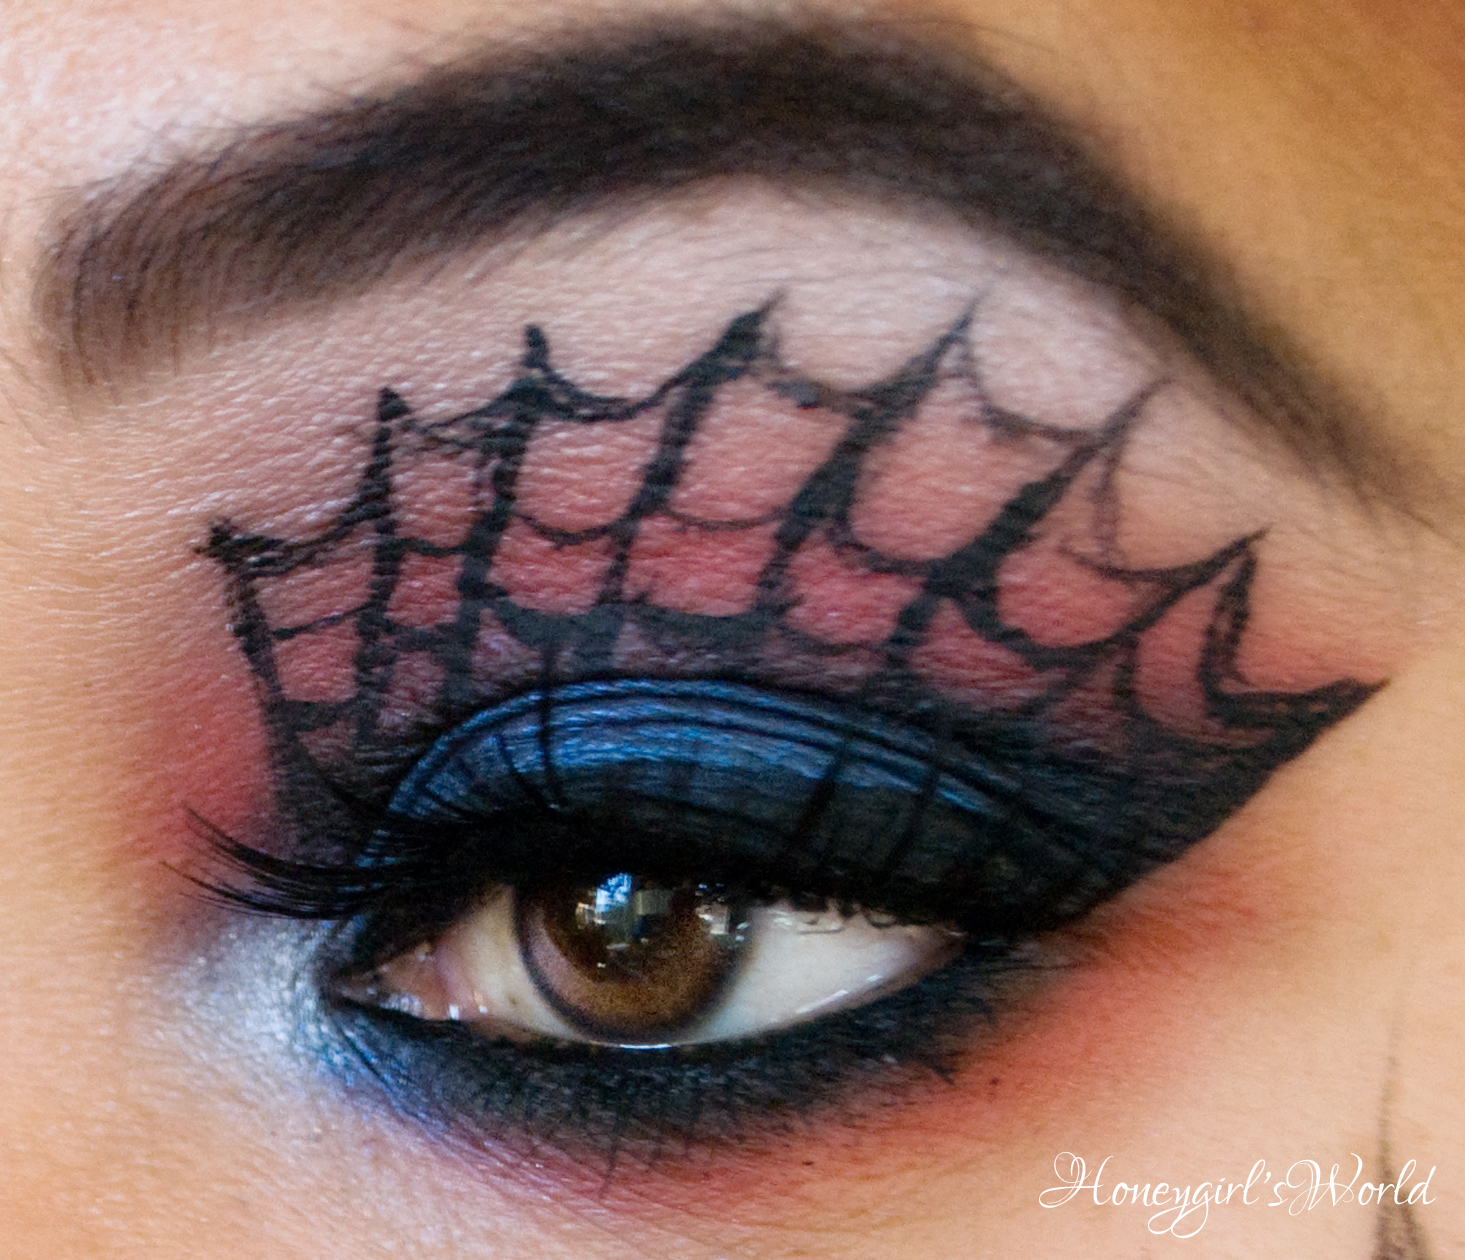
I started off by priming my eyelids using my Too Faced Shadow Insurance.
Then, I blended NYX’s Eye Shadow base in white all over my lid from my lash line to my brow and on my lower lash line. This will act as my base and allow my shadows that I’ll be applying to pop and be much more vibrant.
Did I mention I wanted my brows to be bold, so I used black eye shadow from the BH Cosmetics Party Girl Palette and blended it onto my brows creating a defined look.
Taking a matte brown shade from Milani, Milani Bella Eyes in Cappuccino, I swept this color as my transition and place it above my crease.
Then I applied Milani Bella Eyes in Navy to my lid patting the color on till I got the shade I desired.
Taking the red from the BH Party Girl Palette, I blended that shade into my crease with a fluffy brush. I also took a shimmery white shade and blended that below my brow for my highlight.
With a dense crease brush I took the glittery black shade in the BH Cosmetics Party Girl Palette and swept it into my outer v as well as into my crease.
I then took NYC Liquid liner in black and applied my liner to my upper lash line creating a wing that was bold and defined.
I also took Jordana’s 12 Hour Made to Last Eye liner in Black Point and lined my inner rim (tight line and water line) to create a dramatic look.
I used the NYC Liquid liner to create the spider web pattern on my eyes. Taking my time I drew each line from my brow down to my crease and then connecting each with “c” shapes to create the web.
I added the dark blue (Milani Bella Navy) and red (BH Cosmetics Party girl palette) and blended those two shades (one after the other) on the lower lash line and applied the shimmery white shade (BH PG Palette) on the inner corner of my eye.
For lashes I went with Red Cherry Lashes in 05.
To create the spider and web on my cheek, I drew the spider on with my Jordana Black Point pencil liner and then used shades from the BH Party Girl palette to add shadow and dimension on the spiders body. Taking a brush I also used that to shade with a dark gray shade under the body of the spider to create shadow. I did this freehand and on my face so it can take some practice to get it right.
To create the spider web, I used my NYC Liquid Liner once again and drew a simple spider web next to the spider.
For my lips… I used NYX Monte Carlo Matte Lip Creme blended with Jordana’s Cabaret Lip Pencil and blended them well to create an ombre type look.
And, once the lips are done, you are done… super simple and easy to create. I’m pretty impressed with how the look came out and since Halloween has me running around after the boys, I think since this look was pretty simple, I may do something similar so I can be a bit festive this year. Let’s face it, by the time I’m done getting them together, I can sometimes forget to dress up. I think a cool blue smoky eye with some webs or something, could be a pretty interesting way to add some fun to my jeans and tank top. lol
What are you dressing up as for Halloween? Do you have your makeup look all planned out? Do your children and husband sometimes inspire your makeup creations? I’d love to hear from you… leave your thoughts below. xo
Disclaimer: Nothing to disclose in this post. All products used for this post were self purchased.
As the sun sets and creates a beautiful array of colors that light the soon to be night sky a magical mystical creature is born. Twilight, an Autumn faerie…
I absolutely LOVE fairies, nymphs, pixies and mystical creatures. It is a standing joke in my family that I was born a fairy and left on my parents doorstep to live out my life as a human. I have a love for the forest and nature unsurpassed by few people and my soul always feels so comforted when I’m surrounded by Mother Nature’s gifts that I know I have fairy blood in my body. Regardless, I embrace the sparkle, glitter and pixie dust and welcome it all with open hands. There is nothing wrong with a little magic and mystical thoughts. lol
Each year I look forward to creating my Halloween tutorials and this year I decided I would go with a theme. For this Theme, I decided to start with Honey, Queen of the Forest Nymphs. Nymphs are generally regarded as divine spirits, known to animate nature. Legends depict them as beautiful, young maidens who love to dance and sing. Found to dwell in mountains and groves, near springs and rivers – they can be found in trees and grottoes and blend in with its forest surroundings. This year I hope you enjoy the theme I have in store for you starting with the Queen of the Forest Nymph makeup tutorial.
I wanted this look that I created, or any looks I create for that matter to be simple and easy to create. I tried to use a combination of drugstore and high end products – though the choice of what type of products you use is completely up to you. My goal was to make this look attainable for anyone to create, but most importantly those that are not able to do face painting or special effects, they can easily create this look with the cosmetics they already had on hand.
Products used:
Benefit Porefessional used to minimize any pores and provide a canvas for the makeup we are going to apply.
Olay Total Effects 7-in-One CC Cream used to perfect my skin tone but also to provide a barrier for my skin against the products I’ll be adding. Since my skin is sensitive, I wanted to make sure to have a product barrier to help protect against any sensitivities I may encounter.
Coastal Scents Step One Eye Primer used to prime my eye lids from lash line to brow bone and on my lower lash line.
Milani Brow & Eye Highlights in 03. I used the Natural Taupe side to contour down the side of my nose and under my nose to give it a more defined look. You can use a cream contour, bronzer or eye shadow or foundation that is a few shades lighter than your skin tone.
NYX Matte Bronzer in deep used to set the cream pencil I just applied as contour and to provide a deeper blended contour for my face.
NYX JESP in Horseradish used as a base for the pigments we will apply.
MAC’s Golden Olive Pigment (if you don’t have this, any golden green shadow will suffice. I suggest using a loose shadow or pigment as this will allow you to easily apply with your fingers and blend as needed.)
Jordana 12 Hour Made to Last Liquid Eye Liner pencil in 06 Jade Jewel. This was used as a base on my eyebrows to color and shade them in, define them and so that the shadow I used would adhere.
BH Cosmetics Party Girl Palette:
I used the medium metallic green shade to apply over my brows and create a metallic green eyebrow look.
I used a lighter green shade with metallic flecks to apply to my eyes with a blending brush as a transition shade.
I used a yellow/orange shade to apply to the inner corner of my eye blending with the green in the transition and onto the inner part of my lower lash line.
I used a matte brown shade with a fluffy crease blending brush to apply to my crease. Blending out well.
NYX Roll On Shimmer in Salmon is applied around the edges of the mask (the green on the face) near the eyes and forehead to provide a little extra glitter. I also blended this out well with my finger so that there was not a noticeable line.
Starlooks Pigment in Cinnamon Toss was applied with my finger to my eye lids and softly blended. You can use a brush to apply this but I wanted this look to be simple and using my fingers is simple 🙂
Jordana 12 Hour Made to Last Eye Shadow Pencil in Stay On Black was used as my upper lash line and lower lash line liner. Later I will go in with the NYC Liquid Eye liner to create the wing tail for my liner.
NYC Liquid Eye Liner to create swirls and dainty little designs that look like vines. You can decide how you would like to do this, as I mention in the video – I didn’t plan this look out so I kind of just “winged” it where I could to create something that was girly and whimsical.
Buxom Lip gloss in White Russian was then applied to the lips to prep application for the MAC Golden Olive Pigment that will be placed on top.
Jordana’s 12 Hour Made to Last Eye Shadow Pencil in Endless Emerald was used to draw out some lines along the edges of the mask applied. This will be blended out with a dark emerald green shadow from the BH Cosmetics Party Girl Palette and then blended with MAC’s Golden Olive Pigment.
NYX Candy Glitter Liner in Green was then applied in the leaves that I created using the eye liner. This will add a pop of green that is a different and brighter shade than what I’m using on my face, but it will also add glitter and sparkle.
MAC’s Reflects Antique Gold was then applied with my finger as a part of my highlight on my brow bone and where ever I want to add glitter. Little side note… if there is only one glitter pigment you could ever get from MAC… this should be it. One of my absolute favorites.
BH Cosmetics Party Girl Palette – I then take a Yellow shade with a fluffy blending brush and apply it to my lower lash line blending down towards the green shades and also apply above my brows – this really gives the look more depth and dimension.
MAC’s Golden Olive Pigment is then applied with my fingers to my lips to create a greenish gold lip shade.
Benefit’s They’re Real Mascara was added to my lashes and Red Cherry Lashes in #5 was applied with KISS Aloe Lash Glue.
Once the makeup is complete, I took down my hair and put on my Forest Nymph Crown and the look is complete. I added a pair of blank wings and I put on a black strapless dress to complete the look. If you have more time, adding some leaves would be an awesome way stage this look. You can also sprinkle your pixie dust (glitter) all over to give your look a more whimsical touch.
I hope you enjoyed this look because I enjoyed creating it for you… even if I winged it and really didn’t know what to do until I started doing it. I look forward to sharing more looks with all of you and thank you to all for your unending support. xo
Some of the products used in this look were sent to me as press samples, PR gifts or for consideration for review however, many of the products used were purchased by me. Any discussions regarding any of the products mentioned are 100% honest and unbiased and I was not paid to create this look using the products in question.


")