Category

Beauty

Category

Urban Decay Naked 3 Palette 2

Released in December, the  Urban Decay Naked 3 Palette sold out the day it was released.  When I spotted the sneak peaks in early November, I wondered if this was a “have to have” palette for me, but decided later that it would be a part of my ever growing collection.  After waiting till Christmas to finally open my presents and my palette, I have to say – considering I was on the fence, I am pretty happy and glad I decided I wanted it.

Currently sold out online at Sephora.com but available for purchase through Urbandecay.com, Ulta.com and Sephora stores – Naked 3 is another addition to the Naked family.  Including 12 Rosy Neutrals for show stopping looks.  I currently own the Naked 1, Naked Basics and now Naked 3 (still not sure about Naked 2 – swatched it and was not quite impressed) and I have to say that I’m very impressed with the color range this palette offers.  Retailing for just $52.00 (the same cost as the other Nakeds), this palette offers a gorgeous collection of shades that I believe will offer great compliments to a wide variety of skin tones.

Urban Decay Naked 3 with Packaging

The palette sports a duo ended brush and includes 4 samples of the Urban Decay Eye Shadow Primer Potions in Original, Eden, Sin and Anti-Aging.  I haven’t used any of the primer potions besides my regular (original) but I have heard many awesome things about the Anti-aging primer and Eden.  I will do a review on those separately once I have the opportunity to test out the samples.  Each sample should include enough product for you to get about a week’s worth of use – so once I find a way to store it while testing, I’ll be sure to have my ideas posted.

Urban Decay Naked 3 Palette 1

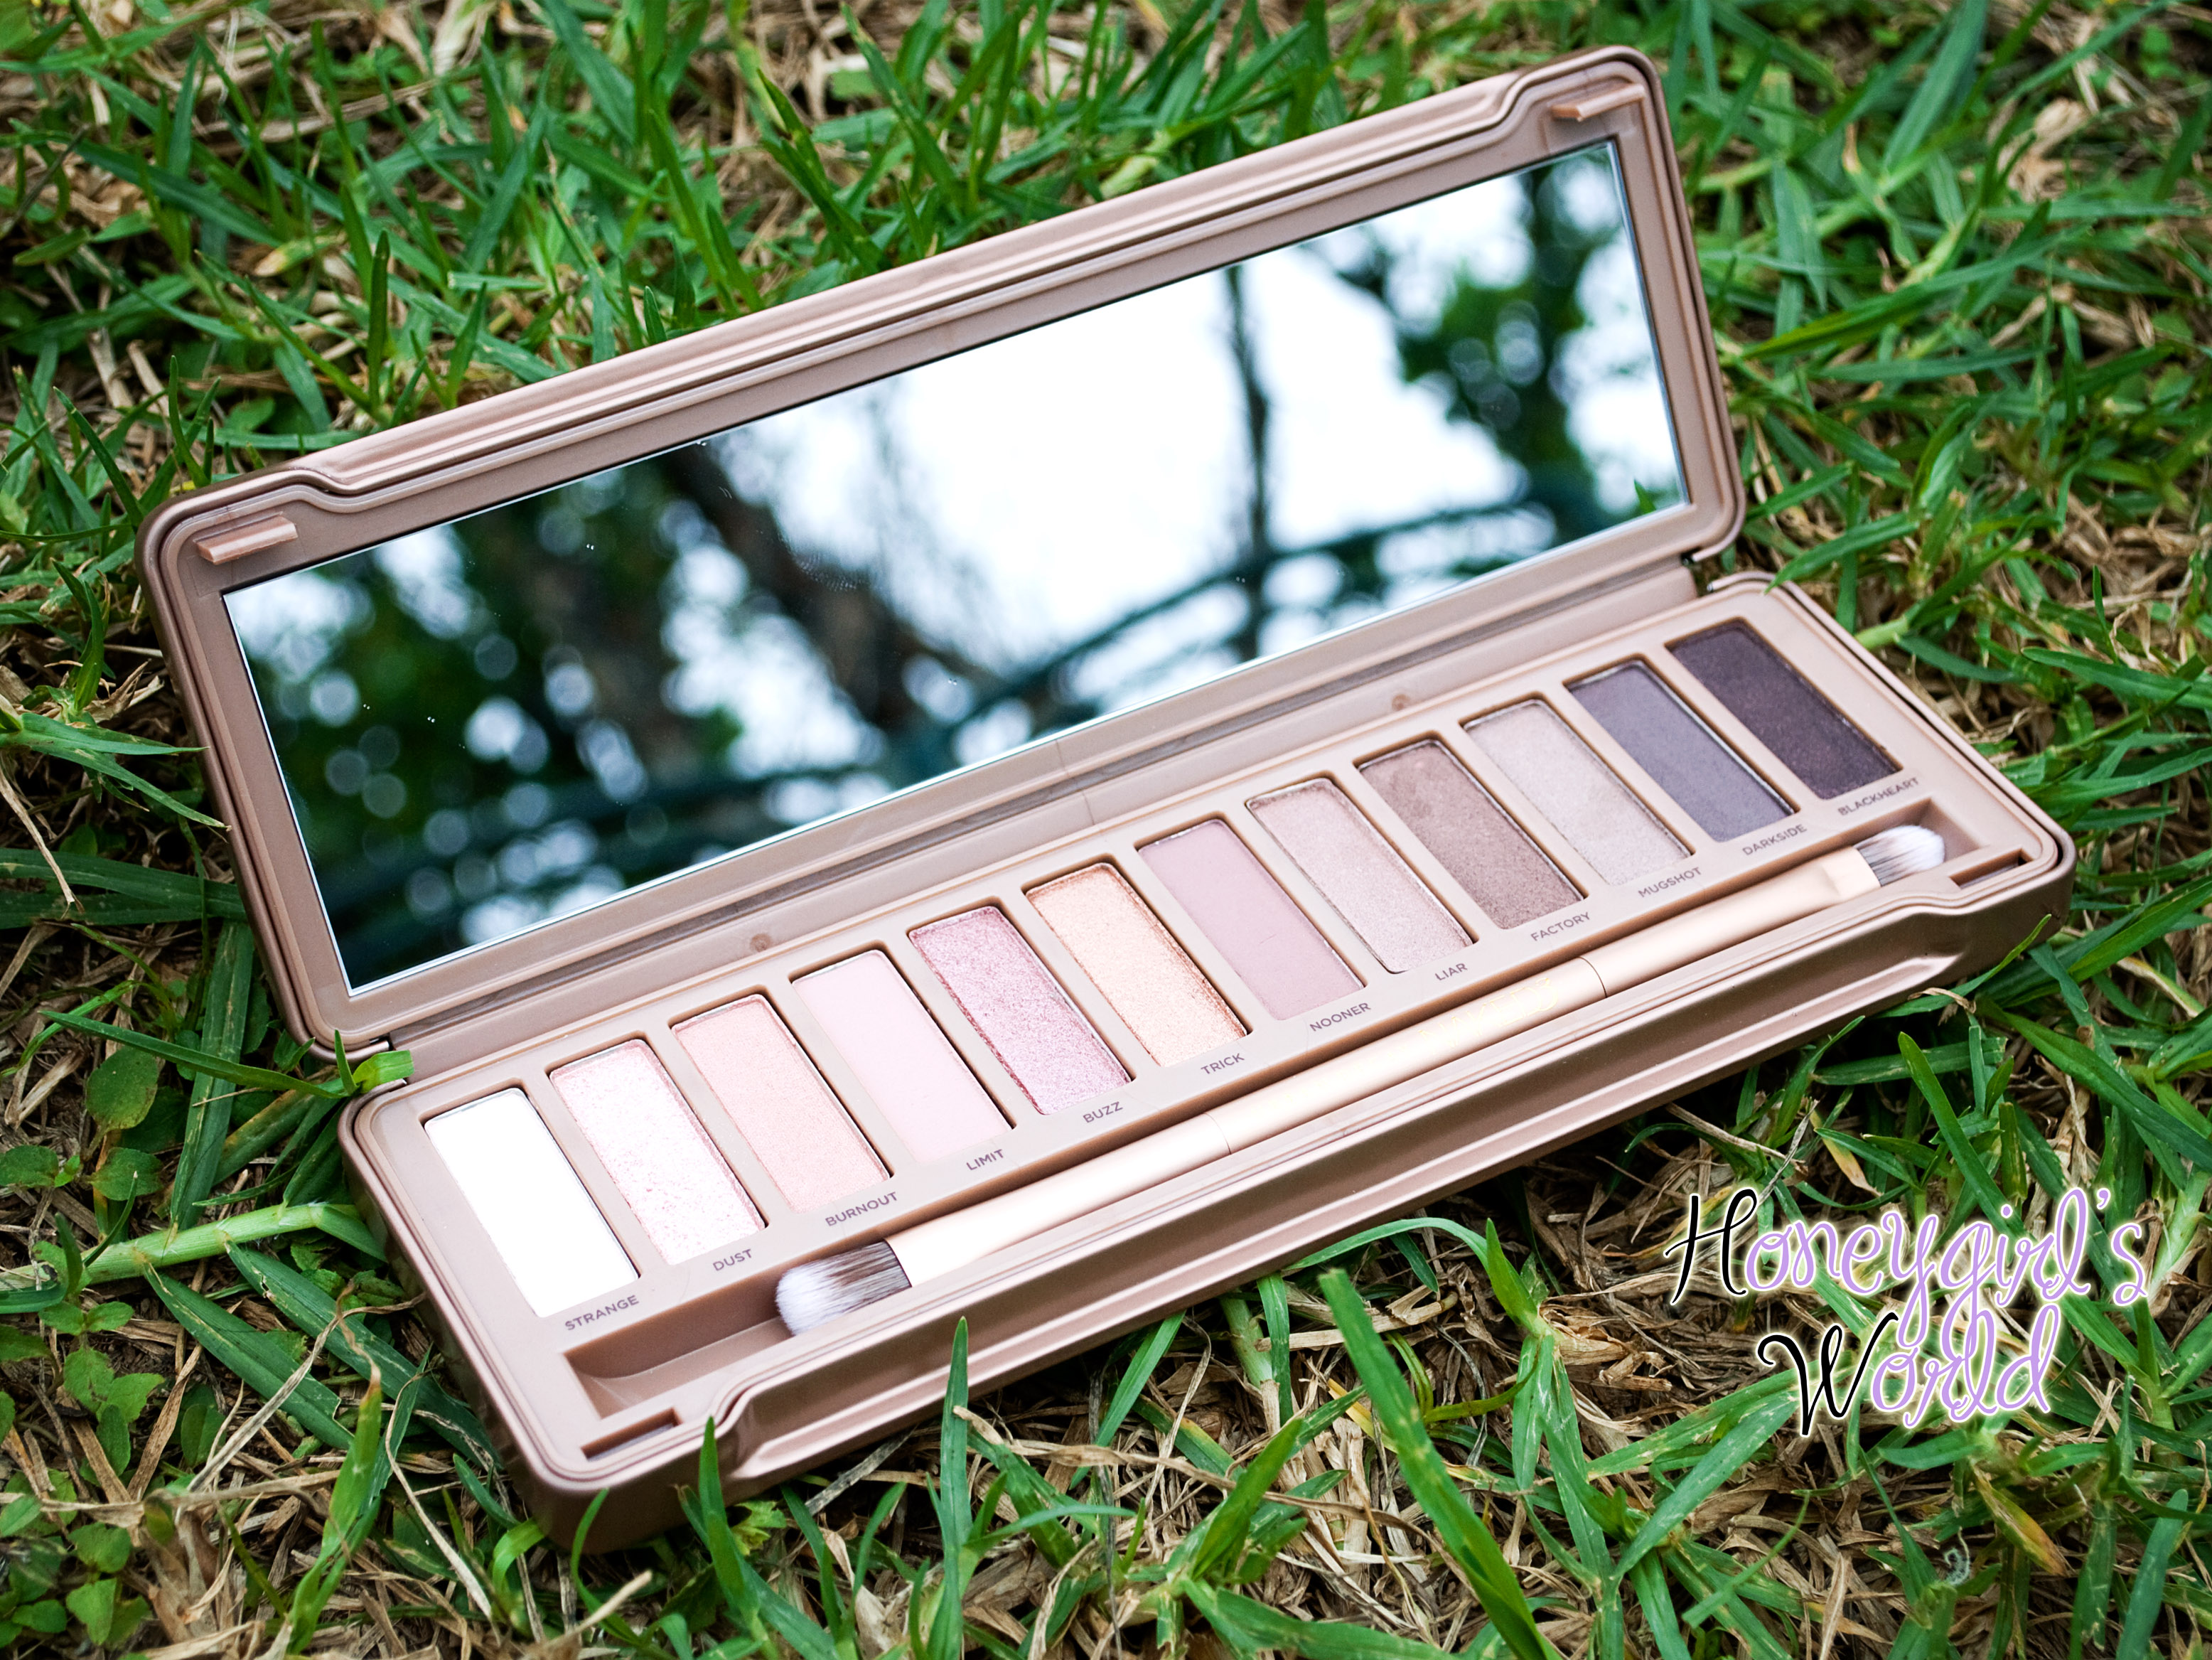
Now – packaging… ooh la la!  The Naked 3, like it’s Naked 2 counterpart comes in a metal tin, very different from the original Naked 1 palette.  The case is sturdy and sleek and has a gorgeous rose gold finish.  Since I love traveling with my Naked 1 Palette, I can imagine that this palette (Naked 3) would be equally travel friendly – offering support and protection to your eye shadows and your brush (included).  The palette sports a large full sized mirror and a little compartment for the included brush.  And, the palette itself – while it feels sturdy, is still pretty light weight.  What I love so much about this palette is how it’s labeled.  Just like the other Naked palettes (and UD palettes in general), there is no guessing – the names are all printed below each shadow which make it easy to use.

Urban Decay Naked 3 Palette 4

As mentioned, there are a total of 12 shades, all of which are brand new rose hued colors.  Each shade has 0.05 oz of product (the same amount as Naked 1 and 2).  The shadows come in a range of matte/satin and shimmer shades allowing you to create a complete eye look by just using one palette.

Swatches

All swatches are done dry without primer or base

Urban Decay Naked 3 Palette 1-4

Urban Decay Naked 3 Palette Swatches 1

Strange – a creamy pale pink shade (matte / satin finish)

Dust – a pale metallic pink with micro glitter (shimmer)

Burn out – a pinky peach (satin)

Limit – a dusty rose (matte)

Urban Decay Naked 3 Palette 5-8

Urban Decay Naked 3 Swatches 2

Buzz – a metallic rose shimmer with micro glitters (shimmer)

Trick (my favorite shade) – a copper pink (rose gold) shimmer.  This shade is my favorite but did give me difficulty when I first started using it.  The first few uses it did not offer me the color pay off I had expected, but after wiping it a bit with a paper towel (dry) and removing the first layer, I realized that it truly  is pigmented and an awesome shade.

Nooner – pink brown (matte)

Liar – a metallic mauve shade.  This shade has grayish undertones so it can lend for an almost taupe color depending on what it is paired with.

Urban Decay Naked 3 Palette 9-12

Urban Decay Naked 3 Swatches 3

Factory – Dark brown with rose hues and gold shimmer

Mugshot – Metallic taupe brown with a light pink shift

Darkside – Gray taupe with a satin sheen

Blackheart – smoky black with rose hued red micro glitters

Sweet Melody - Urban Decay Naked 3

In the look above I am using the Urban Decay Naked 3 Palette – Buzz (all over the lid), Nooner (transition shade), Limit (transition into highlight), Strange (highlight), Blackheart (outer v), Factory (crease color) and Trick (pop of color applied on the middle of the lid and lower lash line).  I only used Urban Decay Naked 3 palette shadows to create this eye look and they were all put on over my Urban Decay Primer Potion.

Urban Decay Naked 3 Palette Duo Brush

I have always liked the brushes that Urban Decay includes in their palettes.  This particular duo sided brush was no exception.  The angled blending side worked well for applying color all over for a wash of shadow on the lid or to blend colors effortlessly and the domed shadow side worked well for packing color on the lid.  While I am not going to go out and buy similar brushes, this is a great brush to have with your palette – especially for travel.

Urban Decay Naked 3 Palette

Now I know you are asking me… “Is it Worth it?  What are my overall thoughts?”  Hmmm… considering I did spend the money on the palette (or the hubby did), I do think it is worth it.  The quality is much like what you would expect from Urban Decay, pigmented, buttery shadows in gorgeous hues that are meant for a showstopping eye look each and every time.  I was a bit worried that the shades would not work well with my skin tone, but I am very happy to say that it not only paired well for me but it also makes my brown eyes pop.  As mentioned previously, I did have a little difficulty with using Trick at first, but having had similar issues with shadows from other brands in the past, I found that I just needed to remove the top layer to find its greatness.  What I love so much about this palette is that it’s not just a “Pink” or “Rose shade” palette, it’s quite universal, allowing me to create a plethora of looks from smoky to neutral with just one palette.  $52 for 12 shades… is it worth the price and the hype?  Yes, I think so!  Makeup like any other object is an investment and this investment has enough product to allow you to create a ton of looks and the product will last.  Each shadow proved to me to be long lasting and over a base or primer, it was showstopping.  I definitely think this will be a great investment for anyone looking to pick up their first Urban Decay product or just adding to their makeup arsenal.

Check out my video below for a quick run down of what I thought. 😉

blog signature

{Self Purchased}

Urban Decay Vice 2 Palette

Early last month (November) I decided I would take advantage of Sephora and splurge on the Urban Decay Vice 2 Palette ($59 US – available on Urbandecay.com).  I didn’t pick up the original Vice Palette that came out last year because I just wasn’t interested in spending the money on it and the colors were not those I would use often.  I’m glad I took advantage of the opportunity to pick up Vice 2 because it is no longer available online at Sephora.com and I was able to cash in on some points by shopping there instead of through UD’s website.

I have seen the original Vice palette in person and was very impressed, but not nearly as impressed as when I received the Vice 2 in the mail and opened up the box.  The palette itself is breathtaking… sporting purples and marbleized looks that are totally showstopping.  I’m glad I decided to get it because packaging alone has won me over.  The palette has 20 ALL NEW eye shadow shades.  If you are one that loves color, this palette is definitely a great one to add to your makeup arsenal.  What I love most about it is that it offers a few neutral shades and mattes so that you can create a vast variety of looks without having to turn to other palettes for a transition shade, highlight or black.

Urban Decay Vice 2 Palette 3

You have a variety of shades in this palette that you can create a bright bold look with (Madness, Coax, Betrayal) and colors to do a nice brown smoky eye (Smokeout, Rewind, Ambush and Habit).  The palette sports the awesome pigmentation of Urban Decay shadows and have that buttery feel we are all used to when using UD.  Some of the shimmery shades do offer some fall out – but considering the size of the glitter/shimmer in those colors – that is definitely expected.  If you are looking for an even bolder look in some of the shades, use them foiled or over a sticky base to keep that bright color and shimmery effects.

Urban Decay Vice 2 Palette 1

If I had to choose one shade I absolutely love… it would be Prank.  This shade is gorgeous when used wet, as an eyeliner or even to smoke out a look.  Definitely a shade that goes well in this palette and it’s great that they included something along those lines because I absolutely love it.

031 copy

For the look above I am using the following colors from the Vice 2:  Rewind – Transition above the crease, Habit – Brow highlight, Ambush – Lid Color, Betrayal – lower lash line pop of color, Strike – pop of gold in the middle of the lid.  Like I mentioned previously – this palette can be used for a wide variety of looks.  If you are someone that tends to lend more towards neutral makeup – then this palette may not necessarily be the right fit for you.  However, if you love neutral colors but love a “pop of color” from time to time, this palette offers a wide range of color options for you to use.

Now – let’s talk swatches.  I have been trying to take photos of swatches several times over the course of the last couple of weeks.  I’m not sure if it’s because some of the shades have color shifts or because our lighting here has shifted due to the Winter season – but some of the shades in the swatches are a tad bit different then how they look in the palette.  Please be sure to look at the palette photos for shades… though I’ll be honest and say that the swatches are very much still true to color.  I swatched them on bare skin (no base or primer) and all photos were taken in natural light without flash.

Urban Decay Vice 2 Palette Swatches - 1st row

Row 1:  Smoke Out (metallic/shimmer grayish black with pinkish red reflects), Love Sick (Matte Black with silver micro glitter), Shell shock (shimmery frosty silver), Coax (shimmer/metallic rose pink with light gold sparkles), X-Rated (a shimmery baby pink)

Urban Decay Vice 2 Palette Swatches - 2nd row

Row 2:  Prank (a black/blue with teal sparkle), Madness (rich metallic blue), Strike (shimmery yellow gold), Stash (Olive Green with Gold Sparkle), Poison (charcoal gray with micro sparkles – check out the “whole” palette photo for an accurate photo)

Urban Decay Vice 2 Palette Swatches - 3rd row

Row 3: these swatches varied from what they look like in the palette.  Again, I tried several times to get an accurate color swatch but it just didn’t photograph well for me.   If these colors are used with certain bases, it can definitely lend to similar shades pictured here due to the fact that some of these have awesome reflects and shimmer as well as color shifts.

Radar (a gorgeous metallic bronze with gold micro glitter),  Damaged (metallic / shimmer emerald green), Voodoo (a beautiful plum metallic purple with iridescent micro glitters), Betrayal (a lavender purple with a blue shift / duo chrome), Derailed ( a shimmery metallic taupe brown)

Urban Decay Vice 2 Palette Swatches - 4th row

Row 4: Dope (a light peach champagne satin), Toxic (a copper metallic pink with pink micro glitter),  Habit (a matte nude cream brown), Ambush (metallic brown satin), Rewind (a deep matte brown – it looks like a taupe in the swatch – but it lends for more of a brown shade)

Urban Decay Vice 2 Palette brush

The palette also came with a double ended (dual-ended) brush that I like.  I love that there is a shader brush and a blender in one so I don’t have to worry much about which brushes to use.  The brushes are soft and like any UD brush – it works well and does the job right.

Urban Decay Vice 2 Palette 3

All of the shades in this palette are awesome, I didn’t come across any of them that didn’t work to par or didn’t have enough color payoff.  I overall think this palette is a great buy and investment because you can use the colors in so many different looks – the options are endless.  You get a total of 20 shades at 0.03 oz each for a total of 0.6 oz of product.  You also get a large full sized mirror in the palette (which is awesome for creating your looks).  The palette is very sturdy (trust me – I’ve dropped it at least 10 times) and like I mentioned above… it’s gorgeous – definitely one for display.

Urban Decay Vice 2 Palette 3

Overall – if I had to rate it on my Sparkle Scale I would definitely give it 5 Sparkles… which I never do.  I believe this palette is well worth the investment, is highly pigmented, offers a pretty nice color range and like most Urban Decay shadows, they feel buttery and awesome on the skin.  Staying power is average and long lasting when used on a good primer or base.  I didn’t experience any creasing after testing them out on their own – however, I did do a wash of color to create the look so I did not pack color onto my lids.  If you are looking to invest in a palette that you will love for years, then this is definitely a good buy.

For my YouTube friends – I’ll be showcasing this palette in a “Quick Review” in the next week or two so stay tuned for that.  Subscribe to my new channel here

{Self Purchased}

blog signature

Have you heard of Freeman Beauty Facial Masks before?  I’m sure you have, but I figured I would ask.  Could it be possible that an affordable product on the market can offer awesome results?  Could it be true that a product that costs less than $5.00 can give you soft and smooth skin?  Hmmm… read on to see what I think.Freeman Avocado and Oatmeal Clay maskI have used Freeman masks for a couple of years now… though I’ll admit that I really was not a fan prior to now.  Many of them that I had bought dried my skin out so terribly that it actually was more damaging on my face then it was beneficial.  Of course, now that I know more about my skin and my eczema that I was diagnosed with last year, I now know how to use these products properly.  For years, I was told I had oily combination skin so I used products such as these (Freeman Masks) as ways to keep my skin at bay… but little did I know – I had dry skin – hence the eczema.  Now that I know better, I have enjoyed using Freeman Masks and they are a part of my skincare routine along with other favorite skincare products.

So – you can expect to see reviews on several of these since I have at least 5 full sized masks and at least 20 little packets to go through… but I decided to write about the one that I have been using the most lately – Avocado & Oatmeal.  The mask itself is just a $1.99 for the Travel / Sample Size (0.5 oz) or $3.99 for the full sized tube (6.0 oz). Freeman offers a wide range of products to suit all your skincare needs and this is just one of the products from the Feeling Beautiful line.  The consistency of their prices is a breath of fresh air, because you can go to most retailers like Walmart, CVS and Walgreens and find the products at about the same price range at each location.  The Travel size has enough product to use about 2-4x in my opinion – but for some, depending on the thickness of the product, you may use it just once.  The full size tube offers you many many uses.  I use mine every week and half to two weeks and I still have a lot left in my tube, considering I have been using it for at least 2 months.

Freeman Avocado and Oatmeal Clay mask 2


The products texture is much like other masks you can find on the market today.  The mask feels creamy and dries quickly so you will feel the tightening of your skin after it starts to dry.  While I haven’t tried Botox, I worked in Plastic Surgery for years and it reminds me of what my patients would describe their face would kind of feel like after getting Botox, but of course… without the pain of the needle – just the tight feeling.  I absolutely love that this mask smells pretty good – it doesn’t have a chemical scent, which is awesome.  I want to say it smells a little like oatmeal, but at the same time – I’m honestly not sure.

Ingredients listed on the website for this product include:

Key Ingredients:
Avocado Oil
Oatmeal
Kaolin Clay
 
Ingredient List:
Water/Aqua/Eau, Kaolin, Bentonite, Titanium Dioxide, Propylene Glycol, Magnesium Aluminum Silicate, Colloidal Oatmeal, Tocopherol, Persea Gratissima (Avocado) Oil, Caprylic/Capric Triglyceride, Montmorillonite, Disodium EDTA, Sodium Polyacrylate (Veegum Ultra), Diazolidinyl Urea, Methylparaben, Propylparaben, Methylchloroisothiazolinone, Methylisothiazolinone, Fragrance (Parfum), Yellow 5 (CI 19140), blue 1 (CI 42090).

Packaging for the Full Sized Mask is easy to use and definitely awesome for storing.  It is larger than the size you are allowed to travel with, but that’s why the Sample Travel Size packets are so awesome because they are travel friendly.  If I had to make one suggestion, it would be to have a zip top for the travel sized packets because I can actually get 3 or more uses out of it depending on my need for the product.  Because the travel size is perfect for just that, a zip top will allow me to take one packet with me and it will last my entire trip depending on the length of stay.

Freeman Mask application


From the Website:

Nourish and purify with one amazing mask! Rich clays dive deep to purge dirt and oils from pores. Nutrient-rich Vitamin E, Avocado and Oatmeal moisturize for lasting skin softness. Skin looks and feels squeaky clean and is soft to the touch. Perfect for normal to combination skin.

Directions: Apply mask to face and neck, avoiding contact with eyes. Let dry and rinse with warm water. Use two times a week or as often as needed.

As I mentioned earlier, I have eczema, mainly on my face – so I stay clear of many drug store products that I know can be drying to my skin.  After using other Freeman Feeling Beautiful Masks, I was very scared to try them again, but I figured I would give it one last try.  I’m glad I did because my skin feels soft, smooth and clean after each application.  It is my perfect little treatment and spa right at home at a VERY affordable price tag.  I love that I can also walk into most drug stores and find the samples, which allow me to purchase different ones to try them out before committing to a larger full size.  This Christmas, I have stocked many stockings and baskets with Freeman Mask samples because I do really love them.

Application is very easy and not as messy as most may think.  It will apply with little to no effort and washes off very easily as well.  Now that I have changed up my skincare routine, I do not get acne or breakouts, so I can’t say how well it will clear it up if you have acne prone skin.  But, I can say that it works awesome for a spot treatment as well… just dab a little on your pimple at night and you will notice a significant difference when you wake up the next day.  Be sure to remove your makeup prior to using this product as well.  Cleanse your skin first.  One tip though… be sure to moisturize accordingly after removing your mask to ensure you are putting moisture back into your skin after you have stripped any away.  But have a girl’s Spa Day and pamper yourself – I think it’s a great goodie for your skin.

Oh – one more thing… I’ve had to deal with Freeman’s customer service via email and let me just say – Fast response, helpful, polite… I’m very impressed!

To purchase this product and more – check out Freemanbeauty.com or on Facebook for special offers and new products.

blog signature


Have you tried Benefit’s Creaseless Cream Shadows?  I have had my eyes on them for a while and I was totally stoked that I got my hands on two of them.  Like with all Benefit products, the packaging definitely caught my eye first.  They look like little bonbons to me and I thought they were so cute – even more so that they came in cute little round boxes.  So what are my thoughts on them?  Keep reading and see what I think 😉

Benefit Creaseless Cream Shadow

These cream shadows come in 10 awesome colors.  I own two of them – Bronze Have More Fun (a gorgeous bronze brown) and Bikini-Tini (a perfect for neutral looks – cream color shade).   Each pot retails for $20.00 on Benefit’s Website and you get a Net wt. of 0.16oz/4.5g worth of product.   On average you are getting about the same amount of product in your pot as other brands offer but honestly, to me – formulation is very different and the packaging is just too adorable.

Benefit Creaseless Cream Shadow copy

So – what do I love about these cream shadows?  Well, first – what isn’t there to love.  I love MAC Paint pots and Maybelline Color Tattoos… but these are very different.  In my opinion the Benefit Cream Shadows have a mousse like texture.  Because of it’s awesome texture, it applies so effortlessly and blends very easily on my eye lids without tugging.  Not only is it a great base for your favorite shadows, I absolutely love that I can wear the colors I have for a quick wash of color in my 5 minute look and it will be there from the time I put it on till the time I take it off.  It is long lasting and even with my oily eyelids – I didn’t have any trouble with creasing.

Both of the cream shadows I have did not crease on me considering they do have some form of shimmer/metallic to them.  They held up to use on its own or paired with eye shadows both matte and shimmer.  Also – I love using these in combination with loose shadows, even if they set nicely and blend onto the skin easily – they are still tacky enough to hold onto my favorite loose shadows for a great and long lasting eye makeup look.

Benefit Creaseless Cream Shadow bronze have more fun 2

Bronze Have More Fun is a deep chestnut bronze.  I love it for a smoky eye or just an every day eye look.  It feels great on my eye lid – it’s smooth and doesn’t feel heavy like some cream shadows can.  This color does lend for a metallic look (as does Bikini-tini) but will work for all eye shadow combinations you have in mind.   If you are looking for a punch of color from this shade, build the color up slowly and blend between layers so that you will avoid creasing.  While this hasn’t creased on me, I know that it may not lend as nicely to others.

Benefit Creaseless Cream Shadow bikini-tini 2

Bikini-Tini has an almost pearl sheen but not really.  It reminds me of a shell color – very neutral in tone, creamy colored and perfect for every day makeup looks.  I love that I can easily use this color as a quick wash over my eye lids up to my brow bone and then blend in my favorite matte shadows to create a nice “every day” work type makeup look.  I also love using this cream shadow as a pop of color and highlight on the arch below my brow for a soft highlight that brightens my look.  I do notice that I need to apply this particular shade in layers to deepen and increase the color against my dark skin.  But, I love it for every day use.

Benefit Creaseless Cream Shadow makeup look

In the look above, I am using “Bronze Have More Fun” Creaseless Cream Shadow from benefit as my base for the eye shadows in the look.  My eye makeup stayed in place and stayed put from the morning until late that night when I took my makeup off.  While I am using Benefit’s Cream Shadow as a base for darker colors in this look, I love using them in lighter shades as well.  Bikini-tini is my favorite to use beneath colors in my Naked Basics palette by Urban Decay as well as my Benefit Peek-a-Bright-eyes Palette (review on that coming soon).

Benefit Creaseless Cream Shadow 2

My favorite way to apply these shadows is to use a synthetic brush like my MAC 217.  That brush grabs the colors and applies them to my eyelid so effortlessly – it looks airbrushed.  Keep in mind that that is how I like to use it – just a little bit of color to make my shadows pop.  If you are looking to have a punch of color with lots of product applied, use a flat synthetic brush and pat the cream shadow onto your lid to get the color payoff you are looking for.  I do use my fingers from time to time, but I really rather a brush.  At the end of the day, you can use any brush you feel will work for you – but since it is a cream product, synthetic is best.  Oh – did I mention that you can use these as eyeliner as well.  Bronze Have More Fun makes such a great eyeliner (Bikini-tini too, but I find it is not the type of eyeliner color I would use. lol) – it goes on so creamy and applies without any problems.  Use an angled eyeliner brush for great precision and take your time.  You can create a light eyeliner look for every day wear or build up the color for a bold line.  Remember to close your pot of cream shadow tightly when you’re done using it so it will last and not dry out.  I like to store mine upside down (cover down) not only to see the color but it’s just a habit and it tends to not dry out as fast.  I have had mine for about 2 months now and it has not dried out yet.

So – have you tried the Benefit Creaseless Cream Shadows?  If so, what colors do you have?  If you haven’t tried them yet – do you think this may be a little splurge you are interested in trying.  So far after using it a few months, I’m impressed.  I’m glad I took photos “before” I started using them… because now they look like a hot mess. lol Have a wonderful week and thanks for reading! xo

blog signature